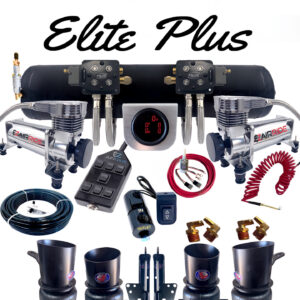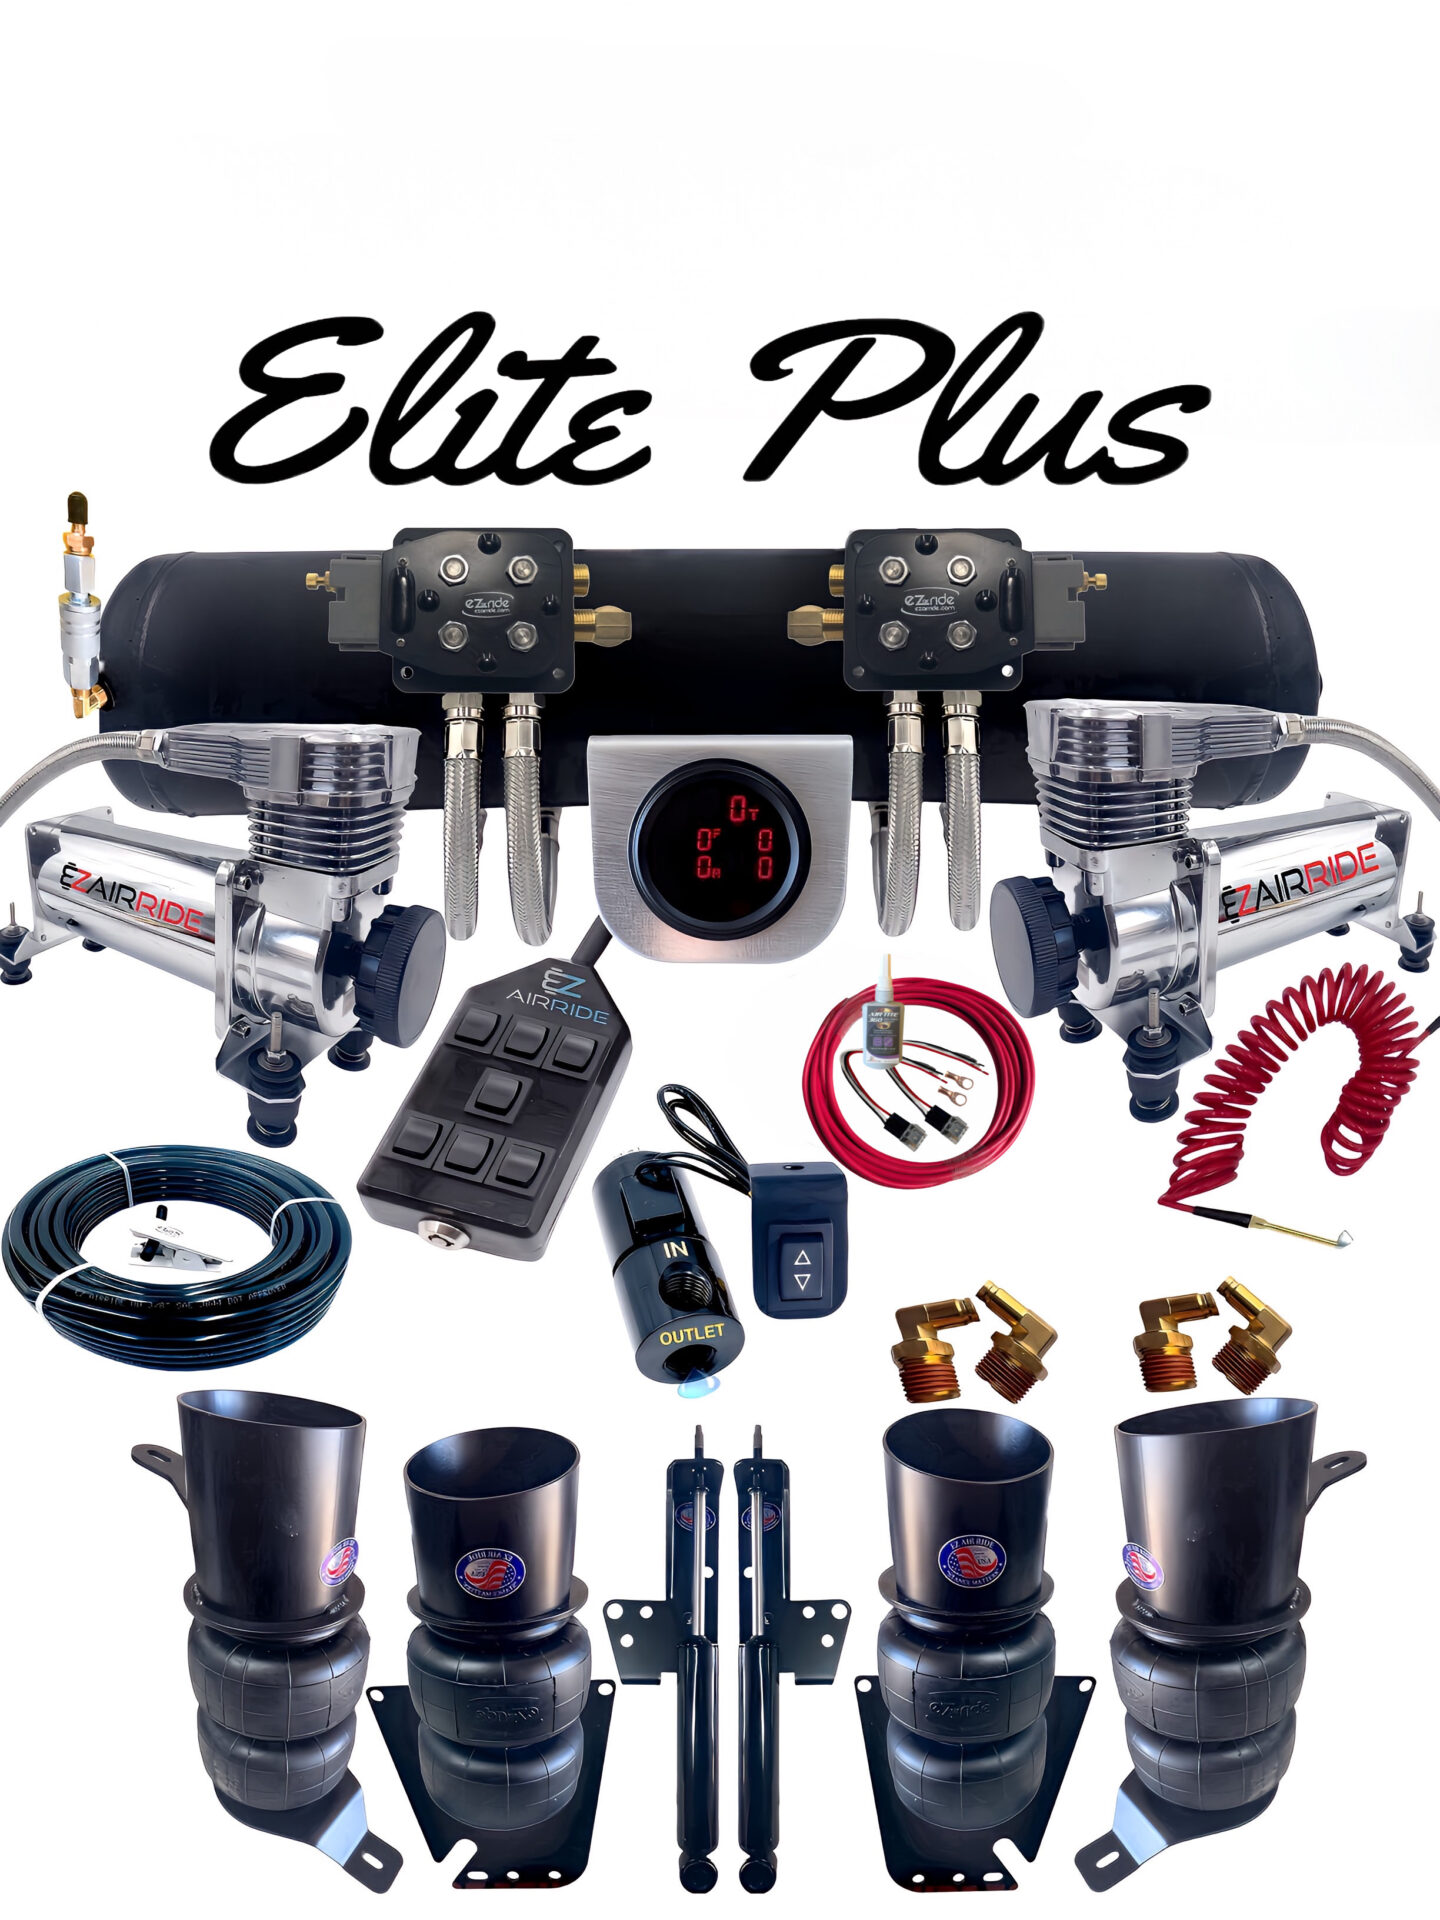
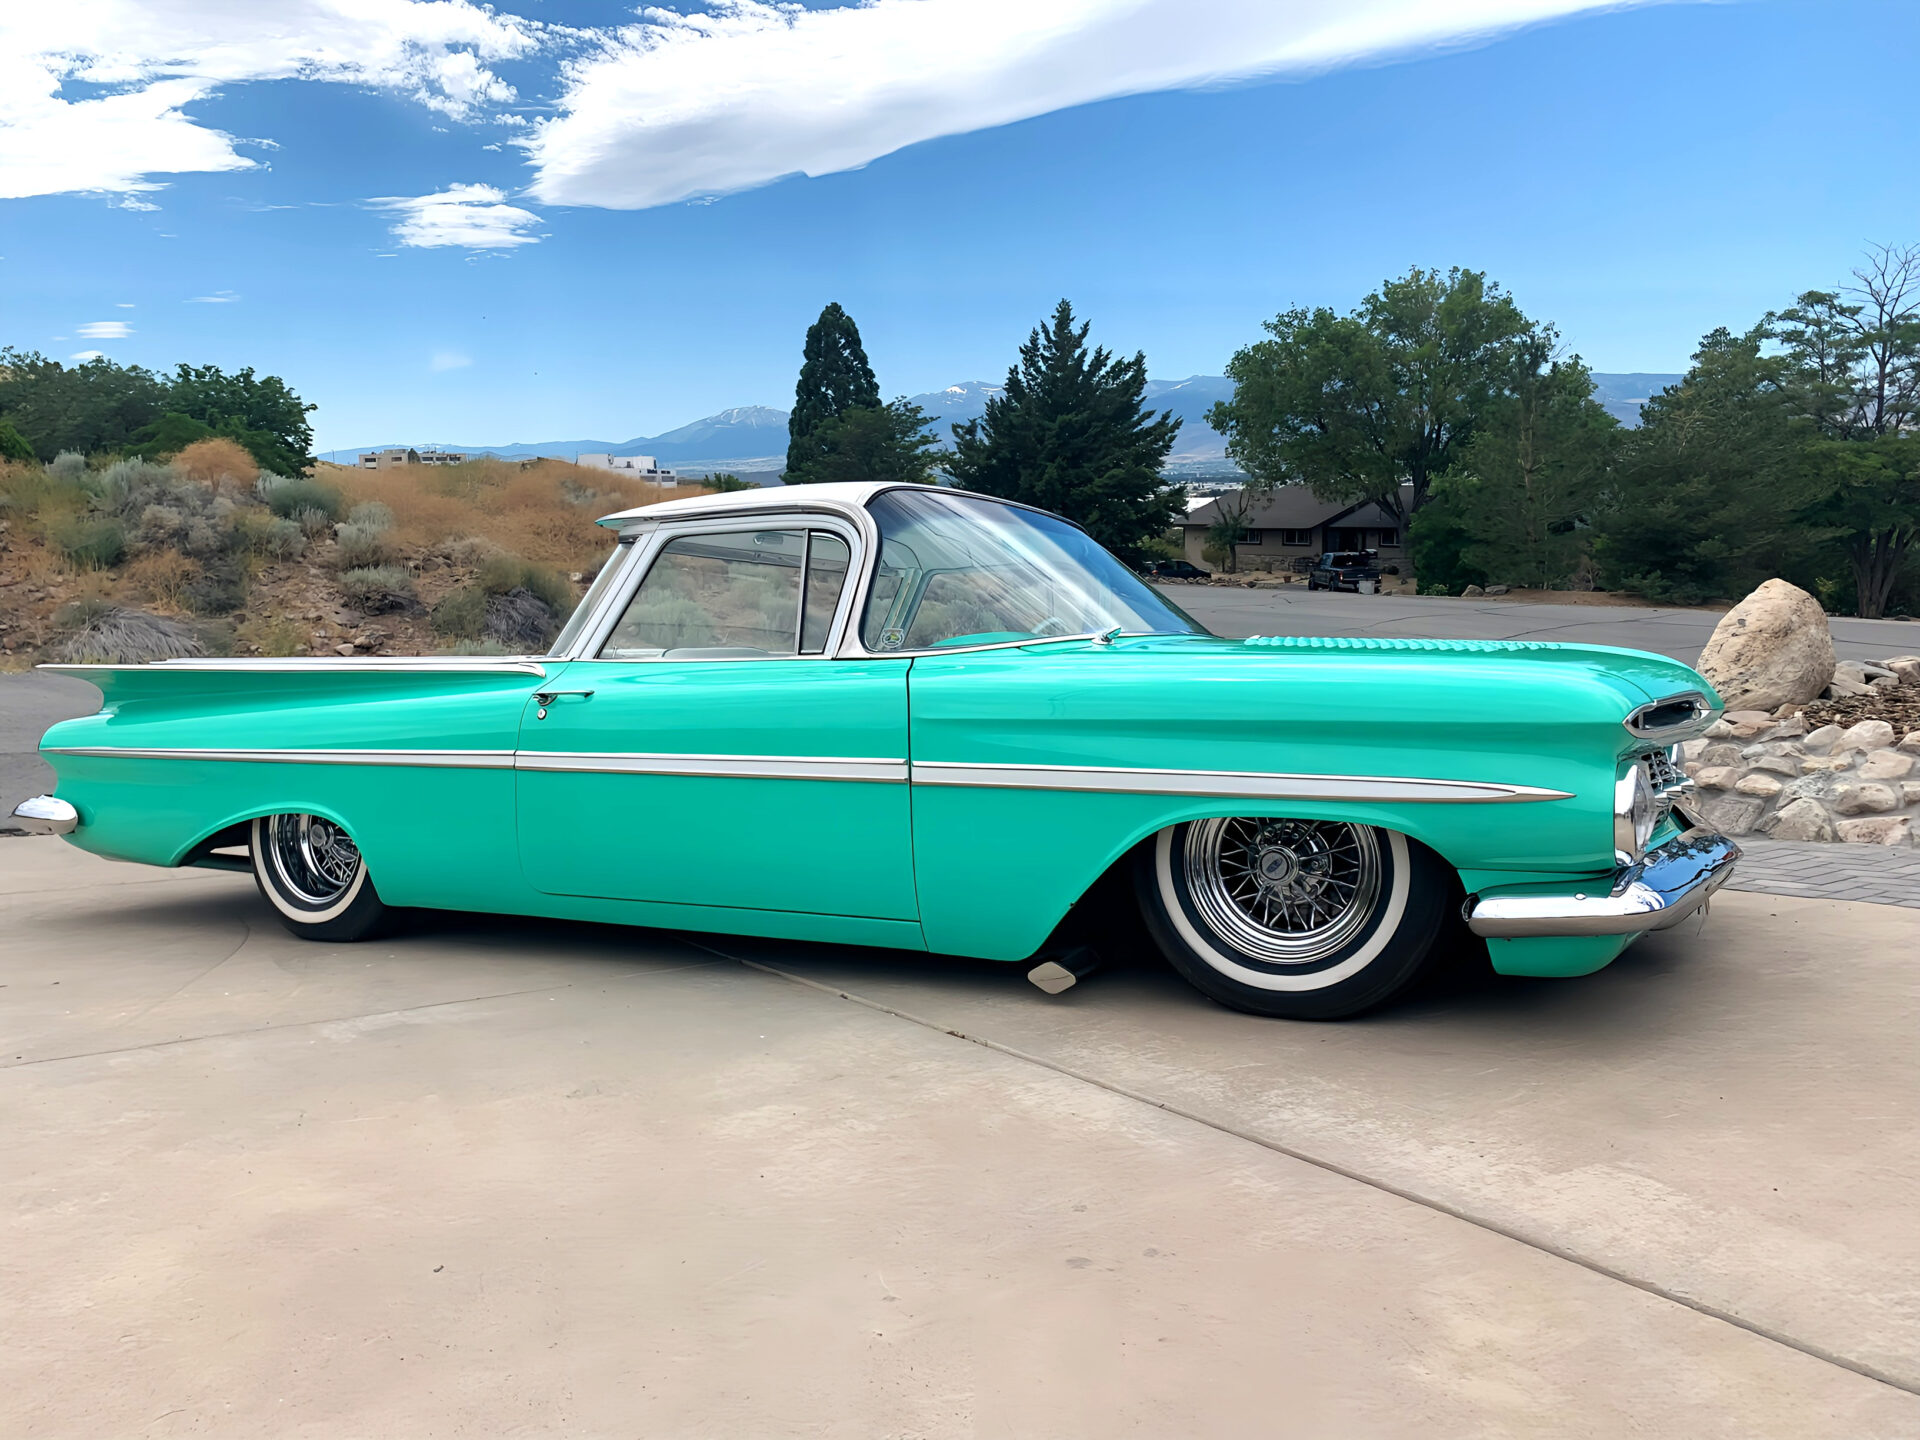
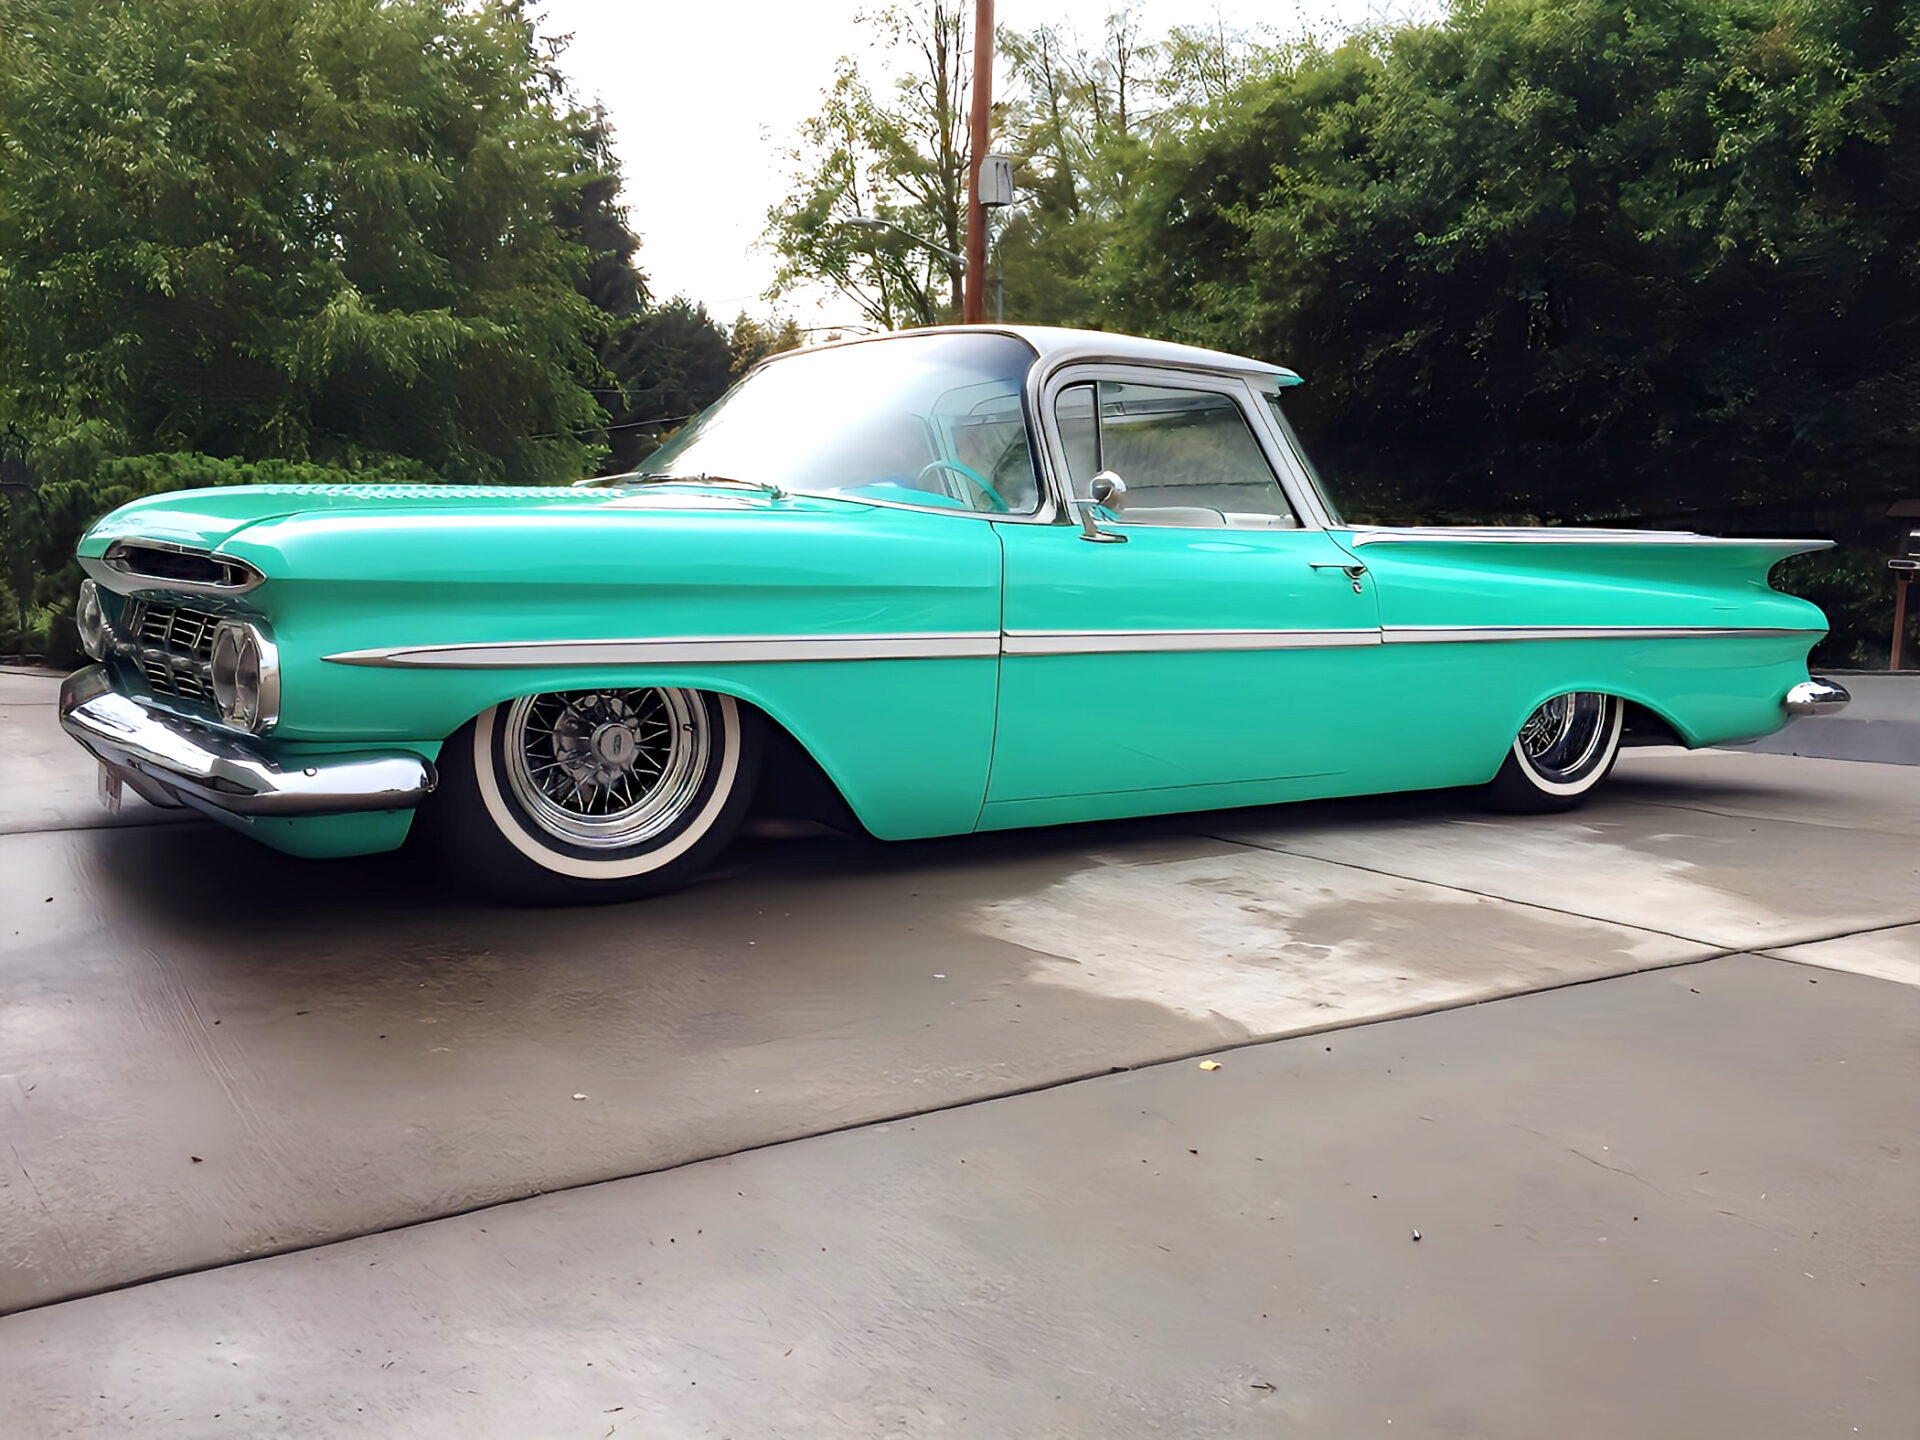


ELITE PLUS KIT: Transform your El Camino’s suspension for enhanced driving comfort and a striking stance. Discover why our Elite Plus Kit stands out in our collection for exceptional performance, making it the ultimate upgrade for your classic ride.”
WHILE OUR STANDARD ELITE KIT DELIVERS EXCEPTIONAL FUNCTIONALITY WITH ONE PUMP AND ANOLOGUE GAUGES: The Elite Plus takes it a step further with several key enhancements that set it apart.
KEY UPGRADES:
- DUAL PUMP SYSTEM: The Elite Plus features two of our 485c pumps, providing faster tank refilling lift times. While one pump is sufficient and does not affect the speed of the lift, drop, or ride quality, the inclusion of two pumps in this kit enhances overall efficiency and performance. This means replenishing air back into the tank quicker, allowing for more playtime with your setup. “Additionally, the dual pump configuration enhances the symmetrical appearance of your air ride system, whether you choose to install it in the bed of your El Camino or inside the smuggler’s box, making it ideal for showcasing when you lift the lid at a car show.”
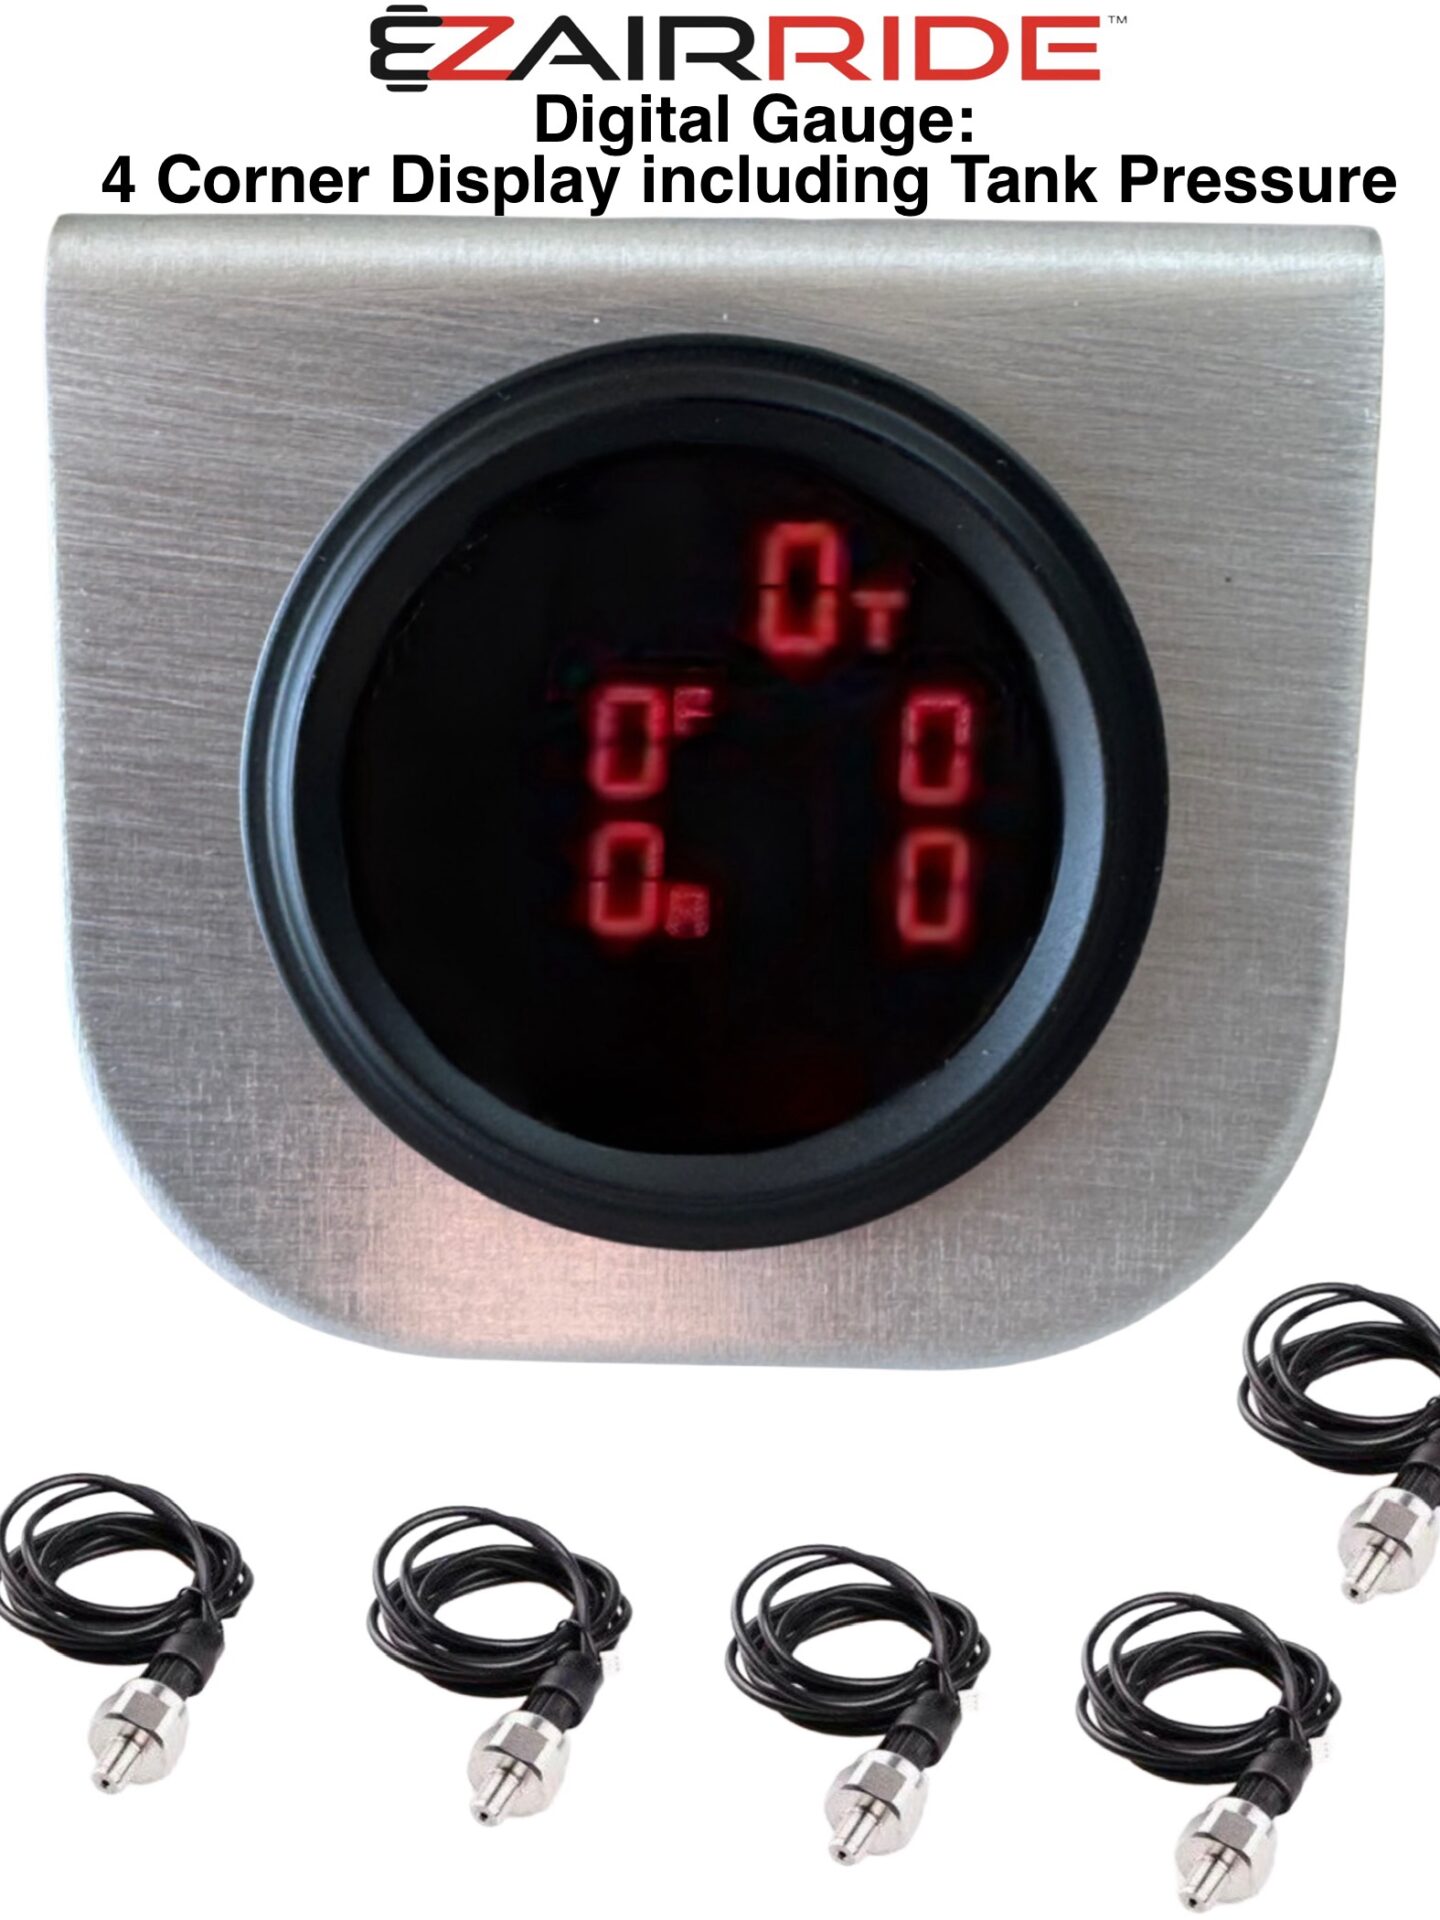
- DIGITAL AIR GAUGE: Our LED illuminated digital air gauge combines functionality with a sleek design, featuring a vibrant multicolor readout that is perfect for limited space. This advanced gauge provides four corner readouts for each airbag, as well as tank pressure readings. It streamlines the installation process by eliminating the need for running air hoses and additional fittings through your vehicle’s cabin, simplifying the setup while enhancing the visual aesthetics. The gauge is securely housed in an aluminum bezel for added durability. However, if you prefer a standalone installation, you can easily remove it from the bezel and mount it directly into your dash or custom center console, offering versatility to fit your specific needs.
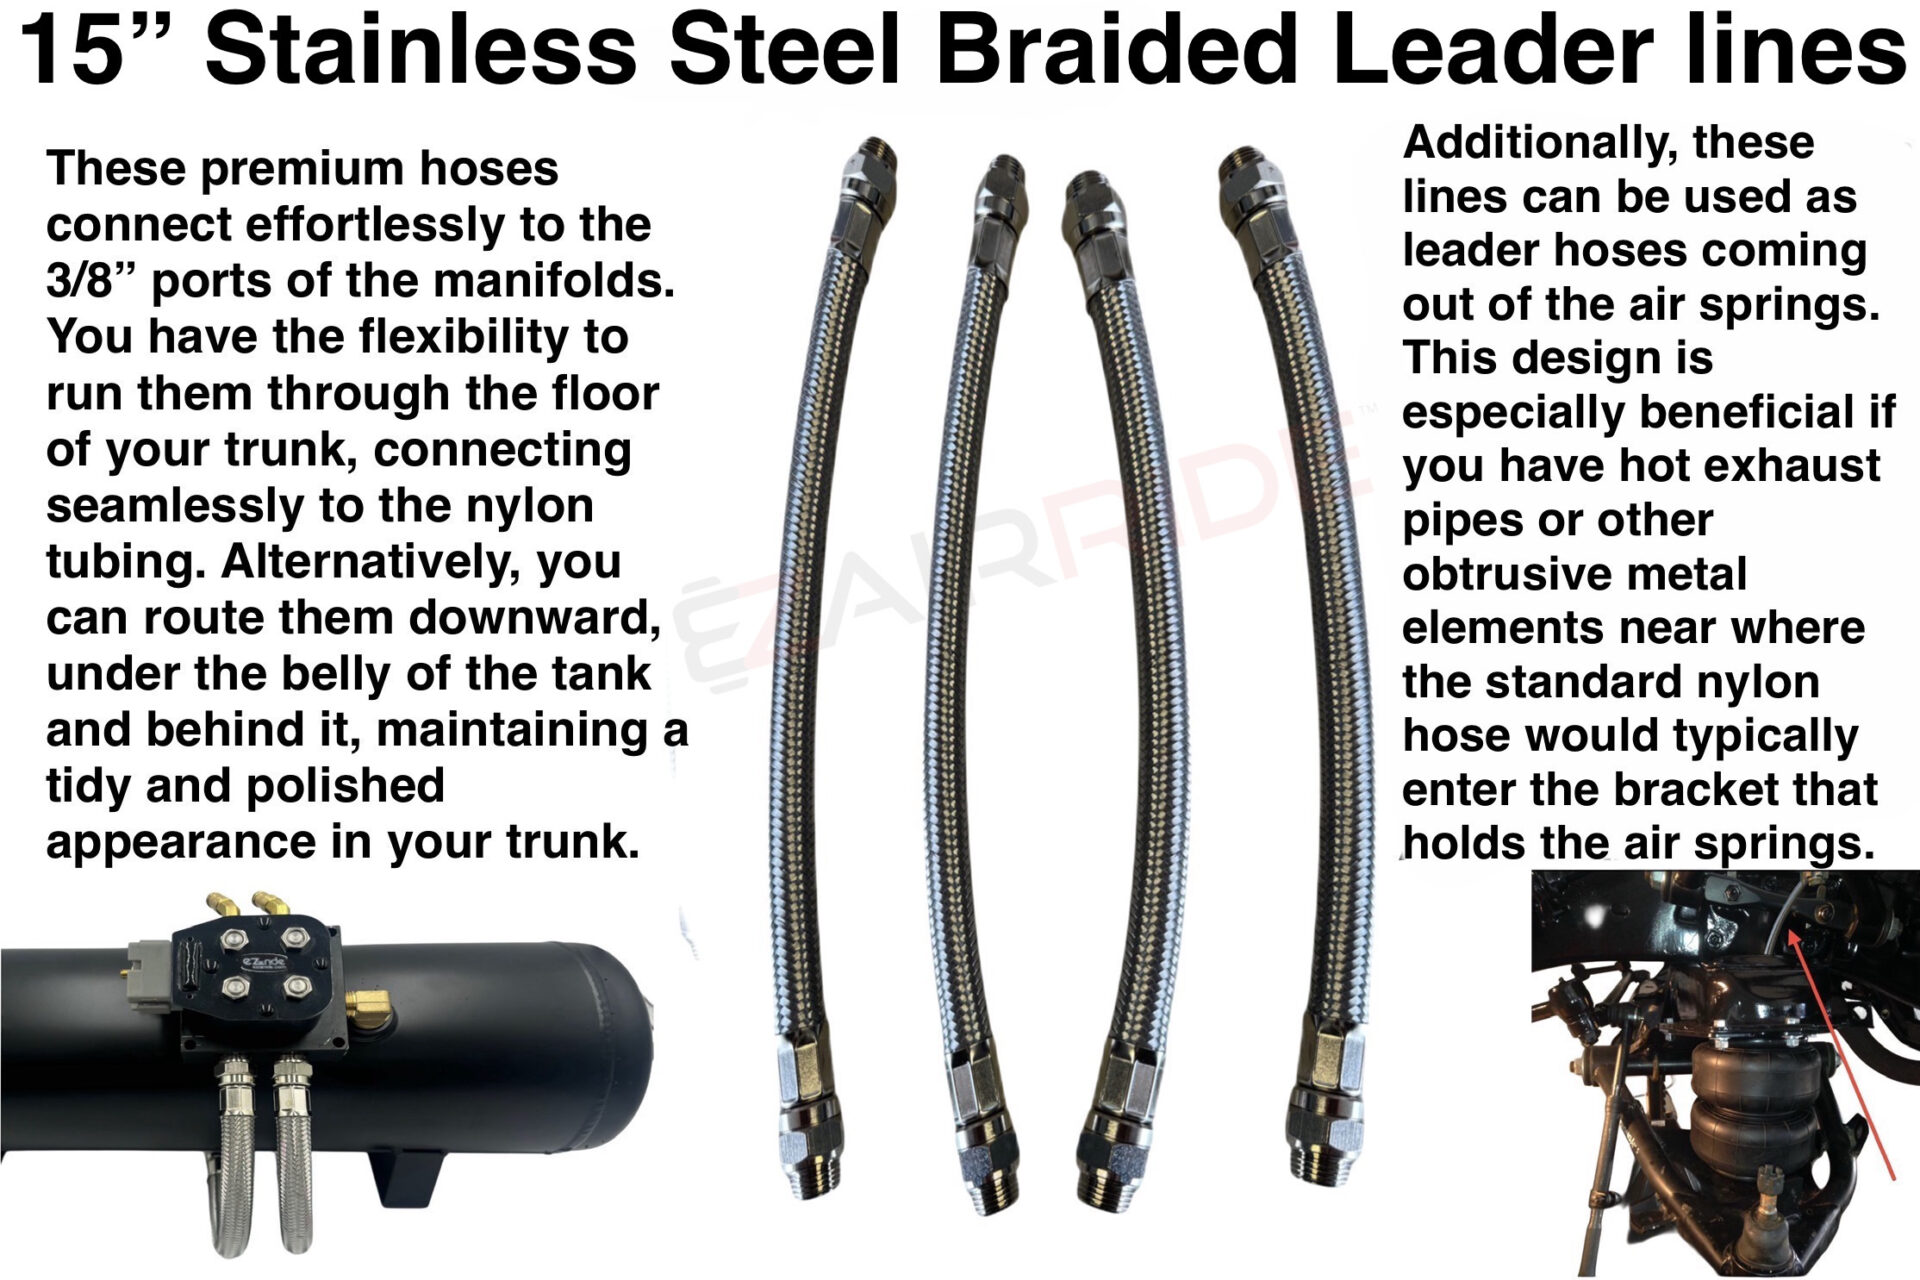
- 12″ STAINLESS STEEL BRAIDED MANIFOLD LINES: These 12-inch stainless steel braided lines connect directly to the manifolds and run seamlessly to, or through the trunk floor. They complement the stainless steel braided lines connecting the compressors to the tank, creating a cohesive look that enhances the visual appeal of your setup by highlighting the braided transition from the pumps to the tank and then from the manifolds down through the trunk floor.
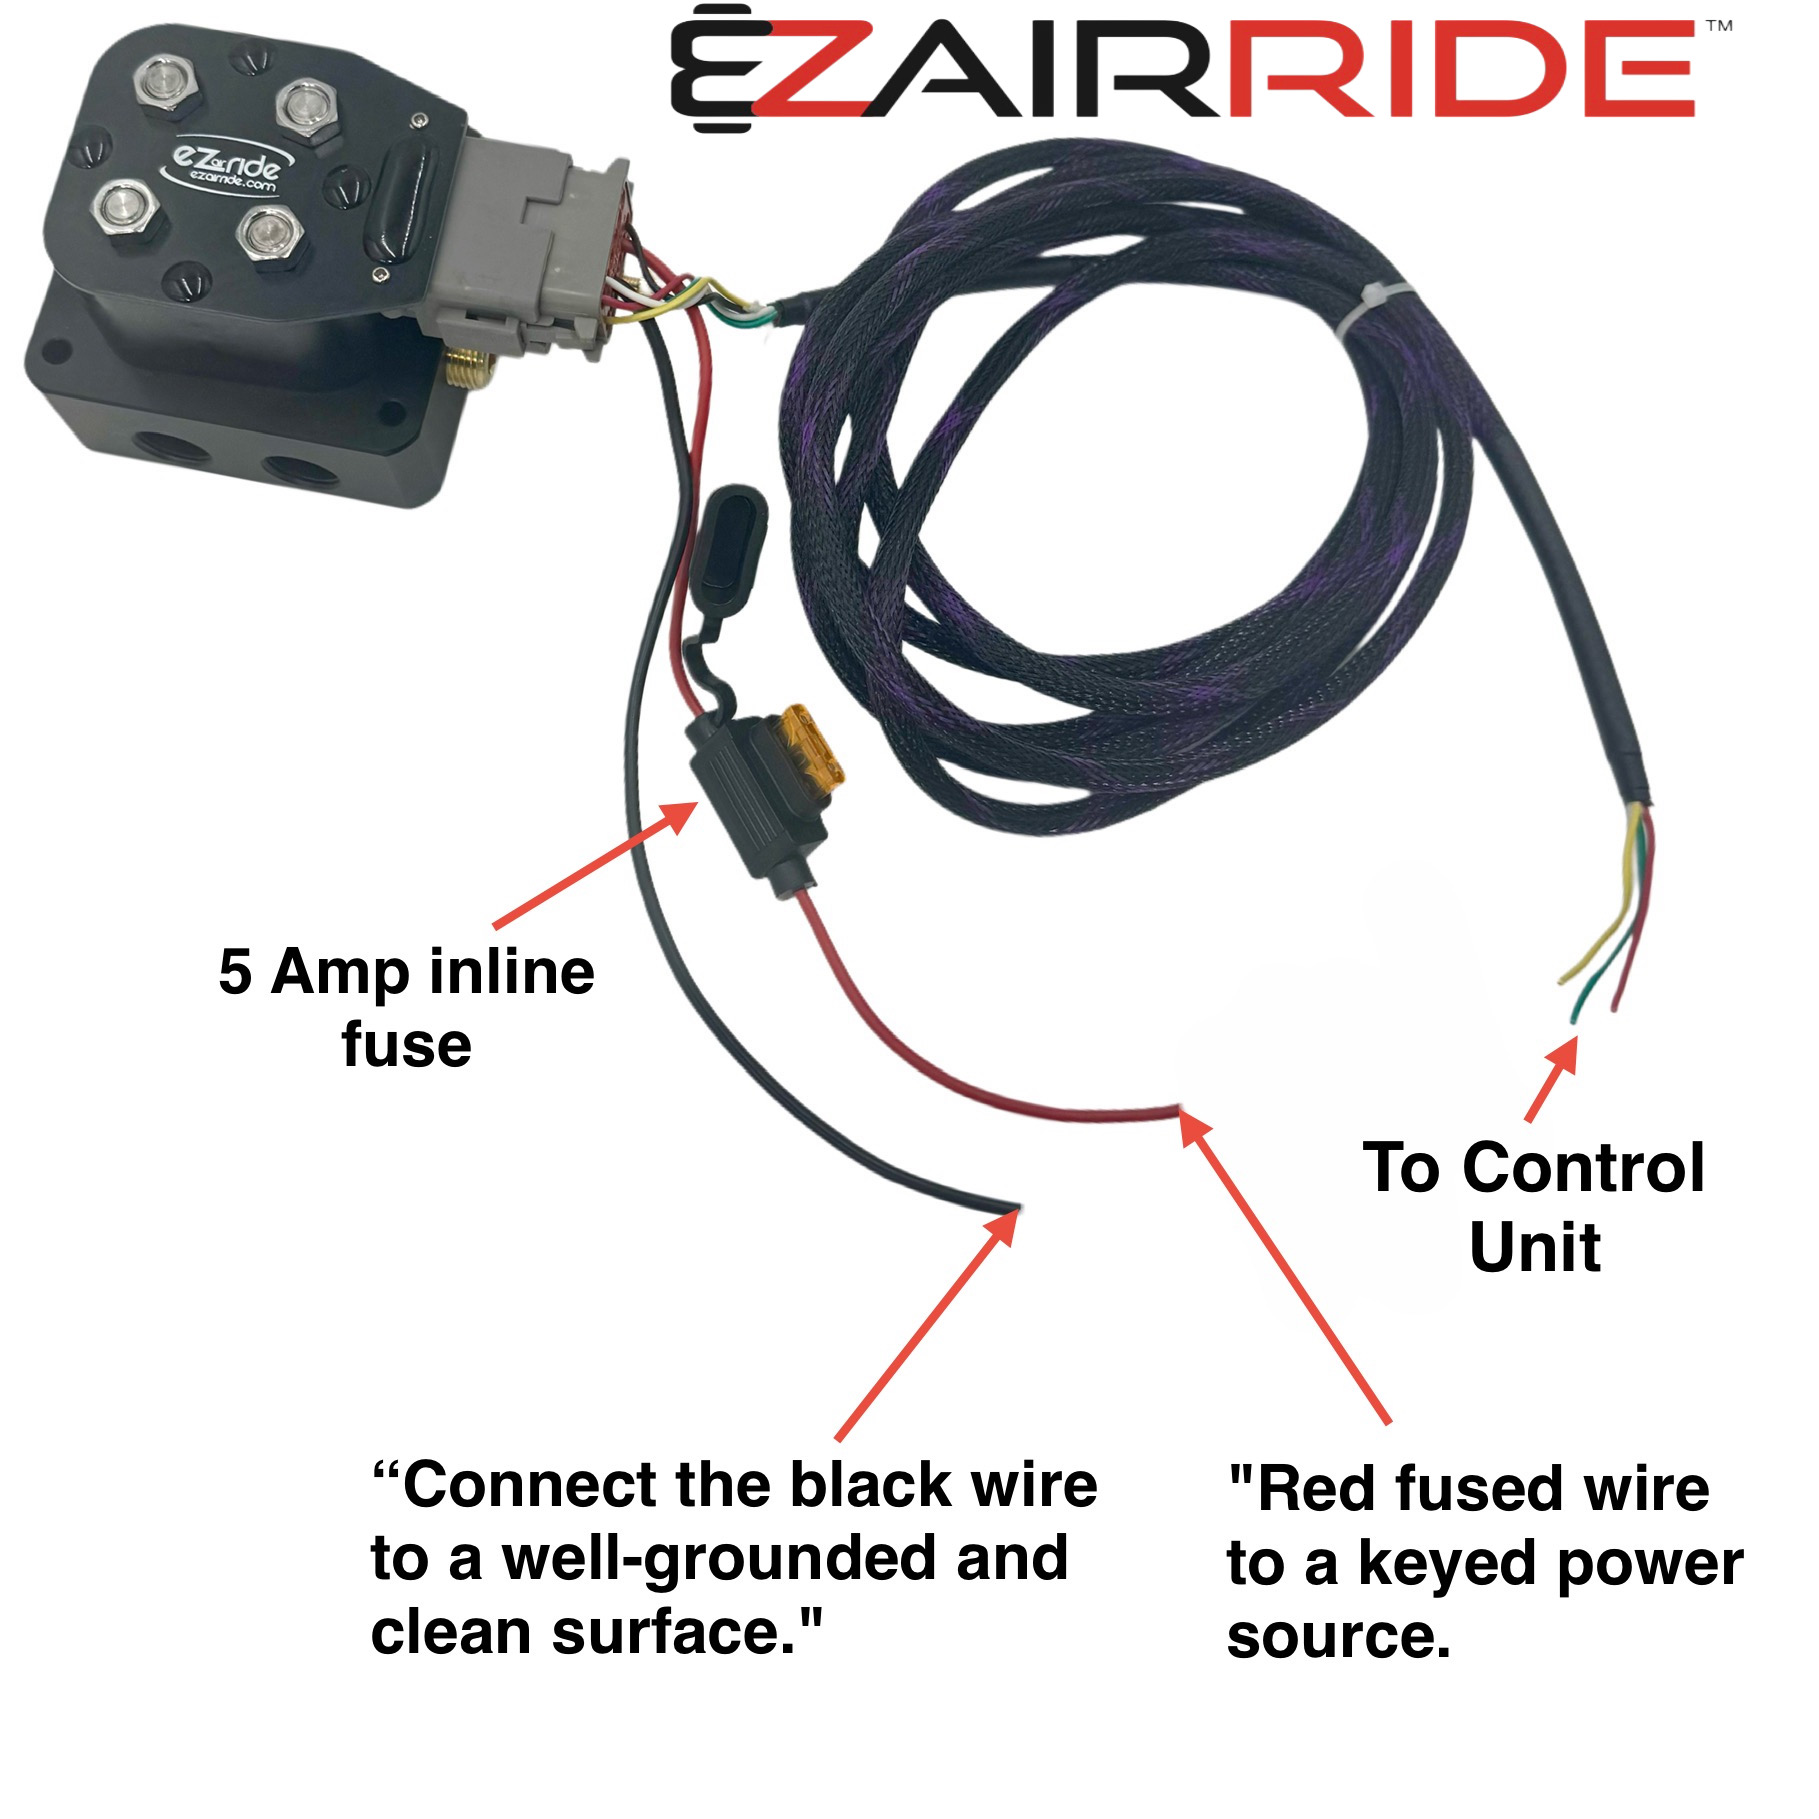
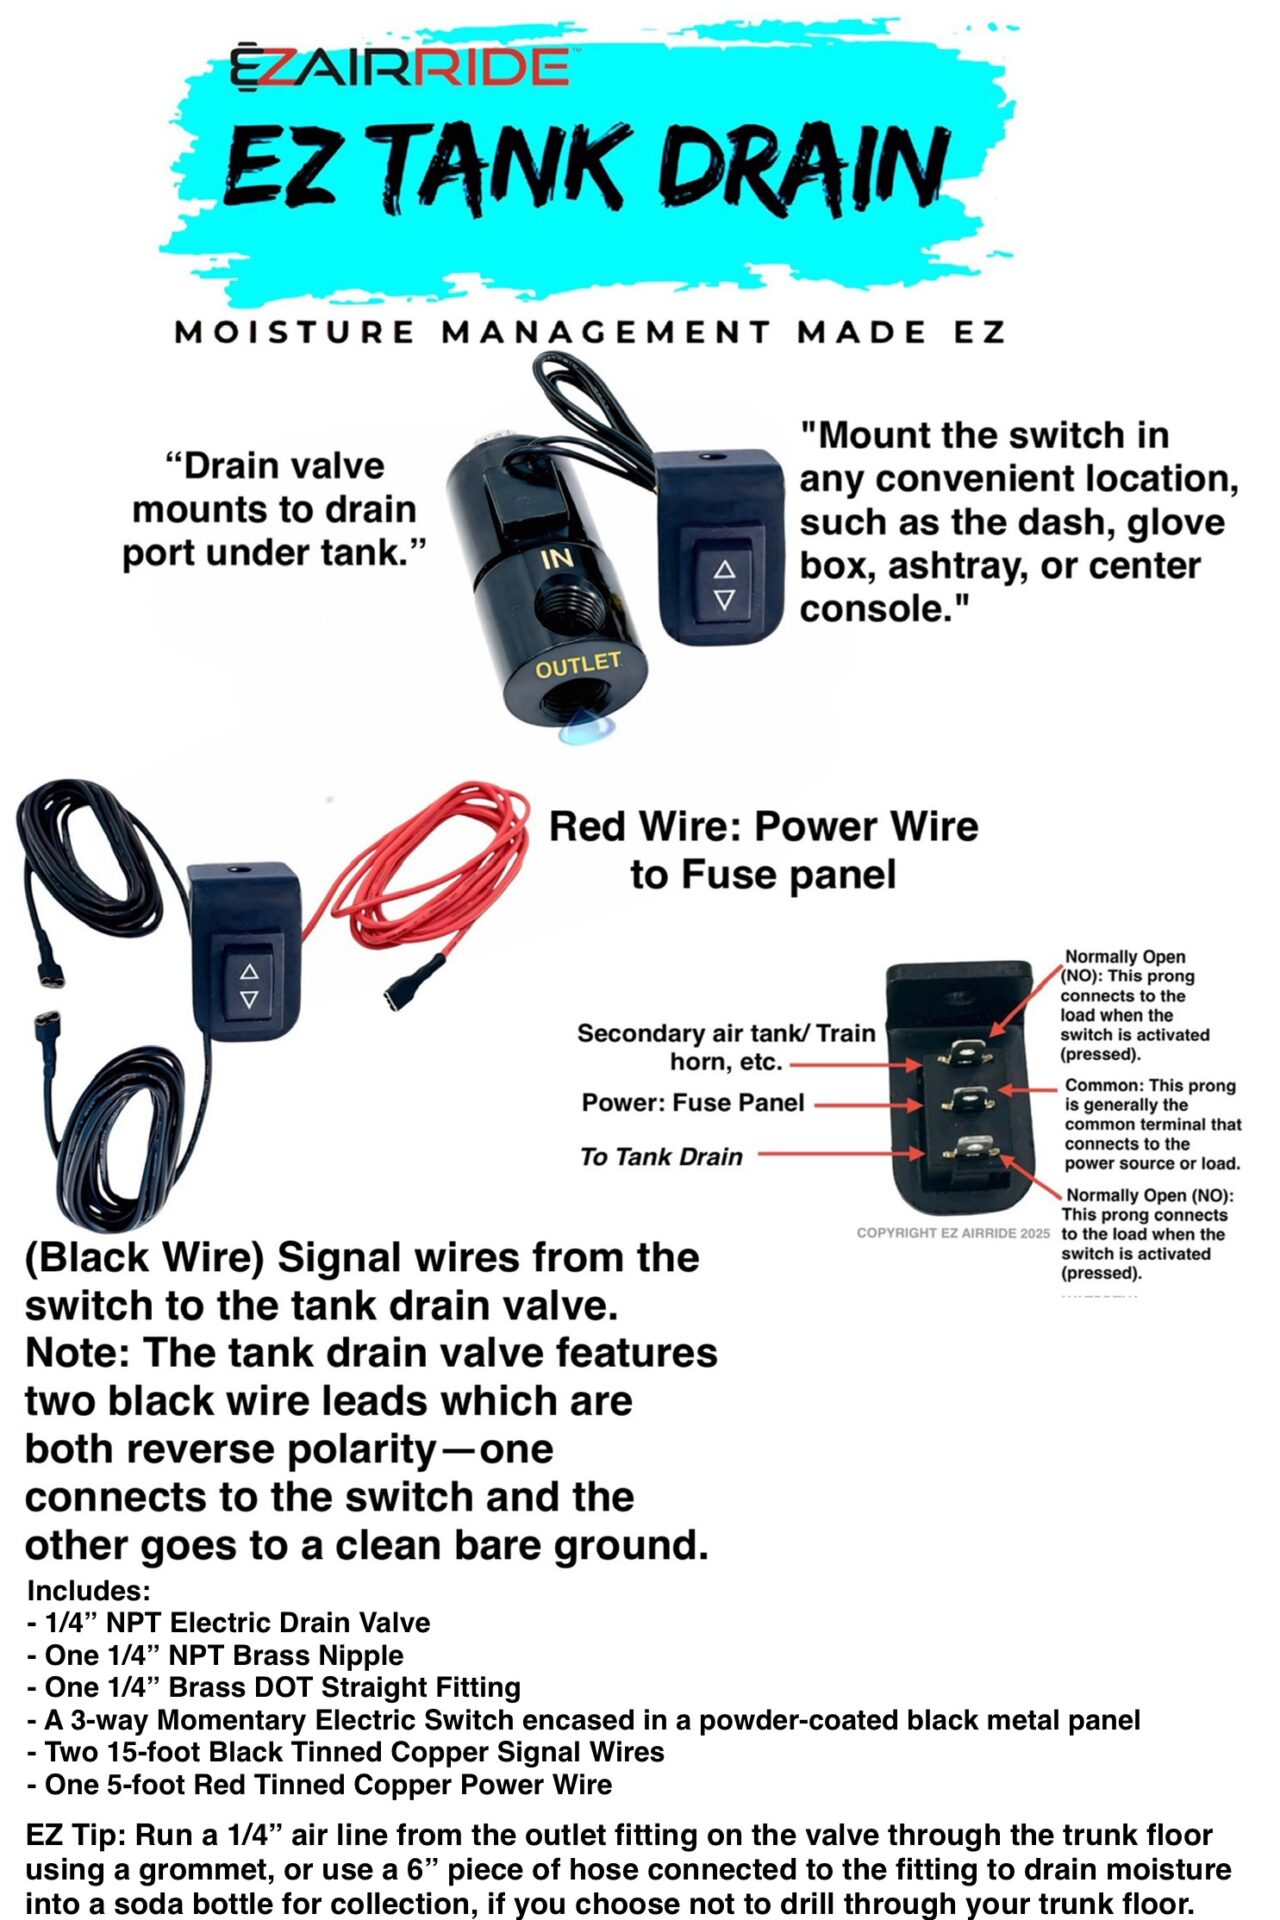
- STAND-ALONE ELECTRIC TANK DRAIN SWITCH FOR EZ TANK DRAIN COMMAND: This convenient feature includes a red power wire that connects to the fuse panel for power and a black wire that activates the tank valve. Both wires are long enough to position the switch in convenient locations near the dashboard, such as the glove box, under the dash, or in the ashtray. With this setup, you can easily purge your air tank of any condensation buildup, ensuring optimal performance and longevity.
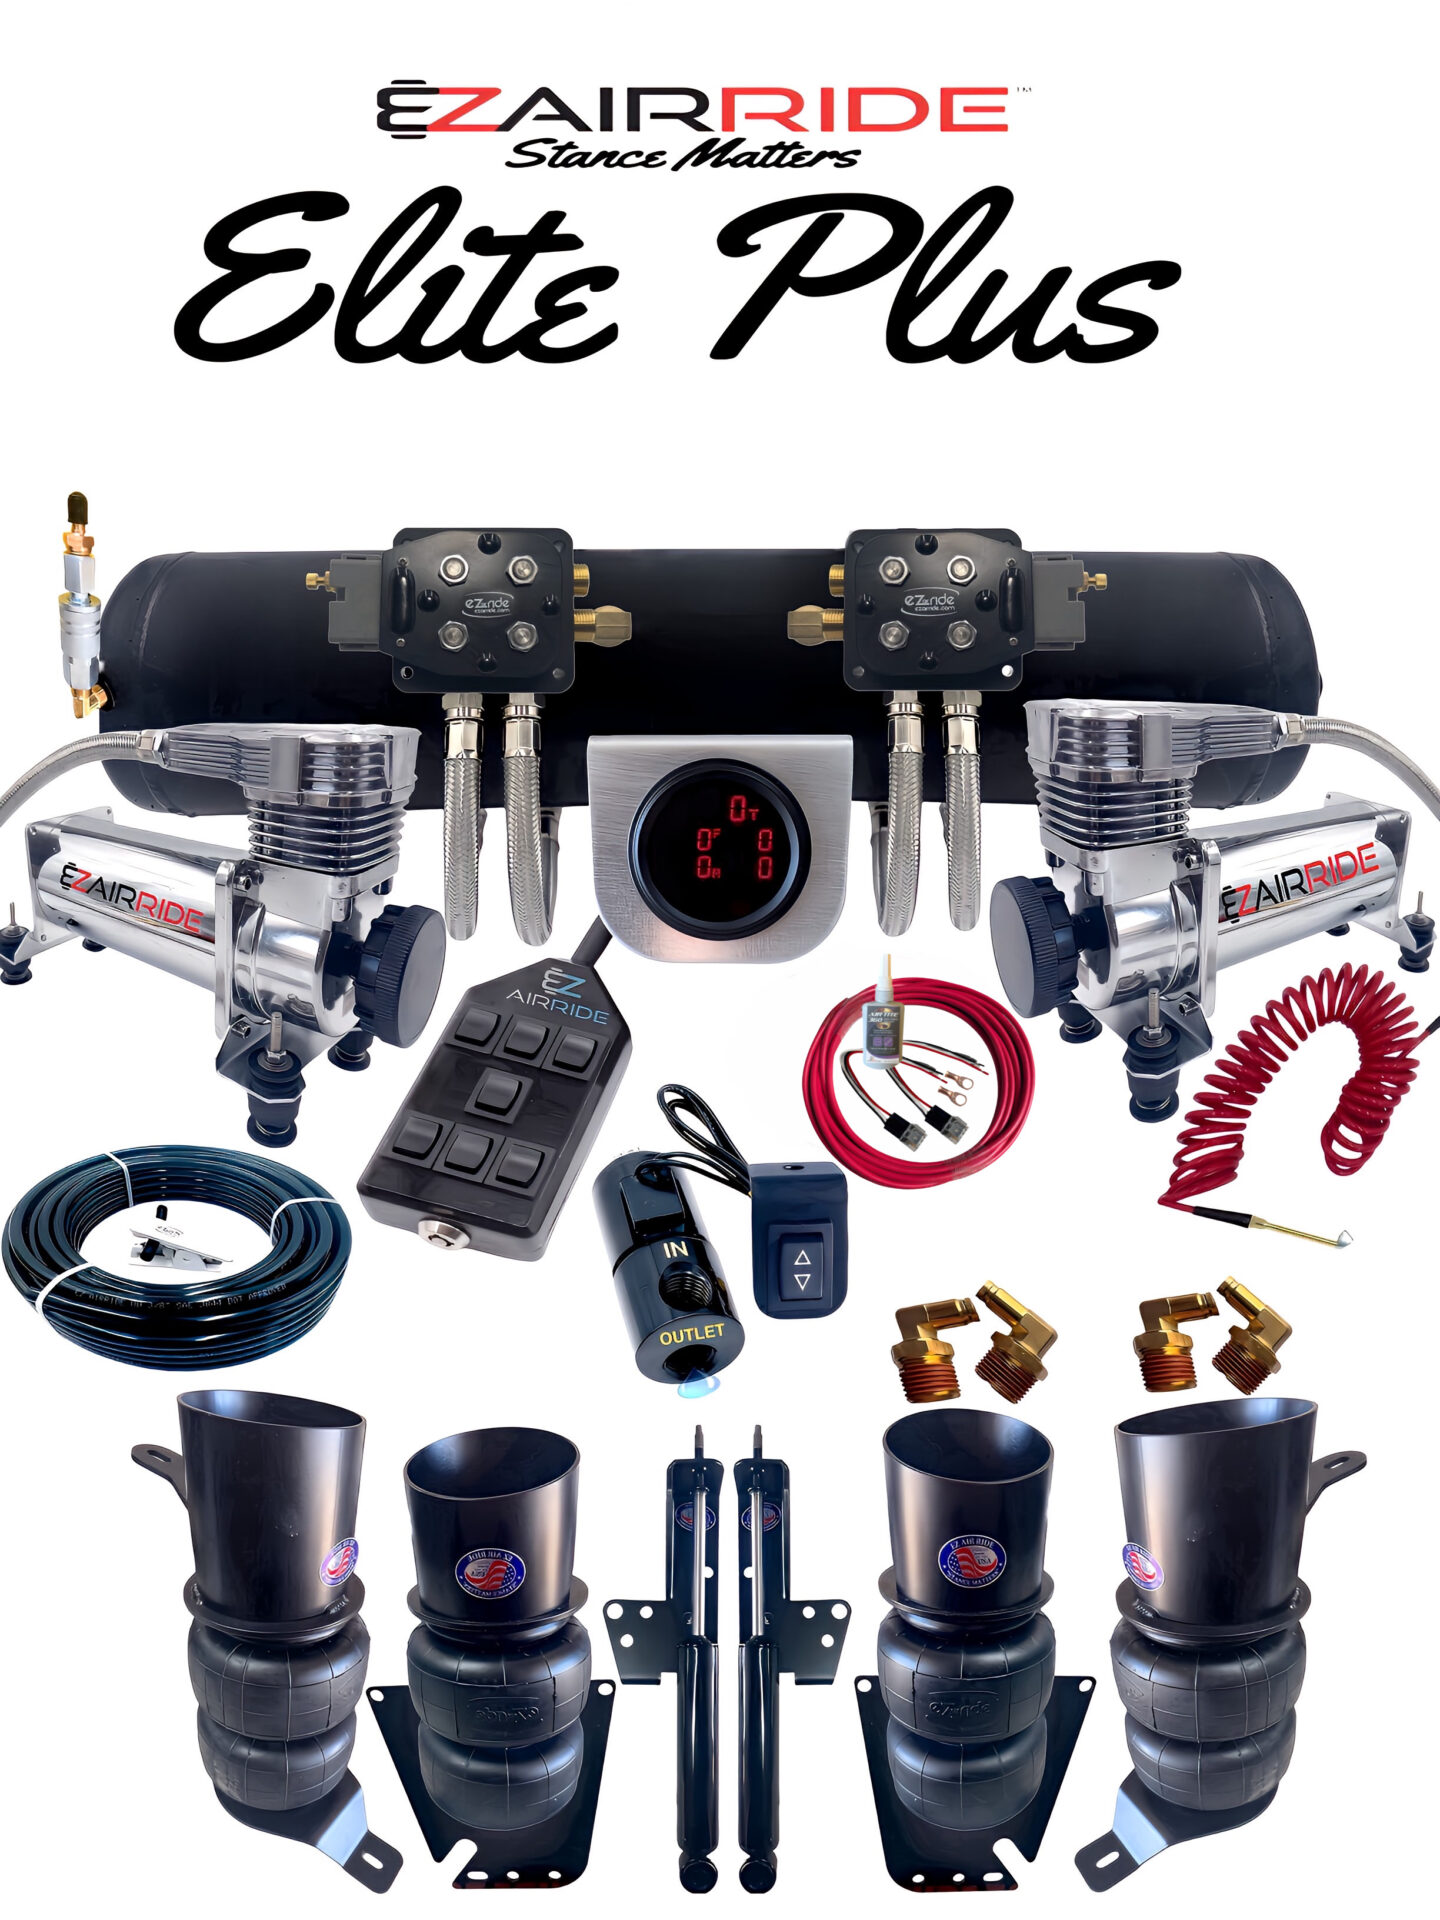
“HERE’S A COMPREHENSIVE LIST OF EVERY COMPONENT INCLUDED WITH THE ELITE PLUS KIT: To ensure you have everything you need for EZ installation and optimal performance:”
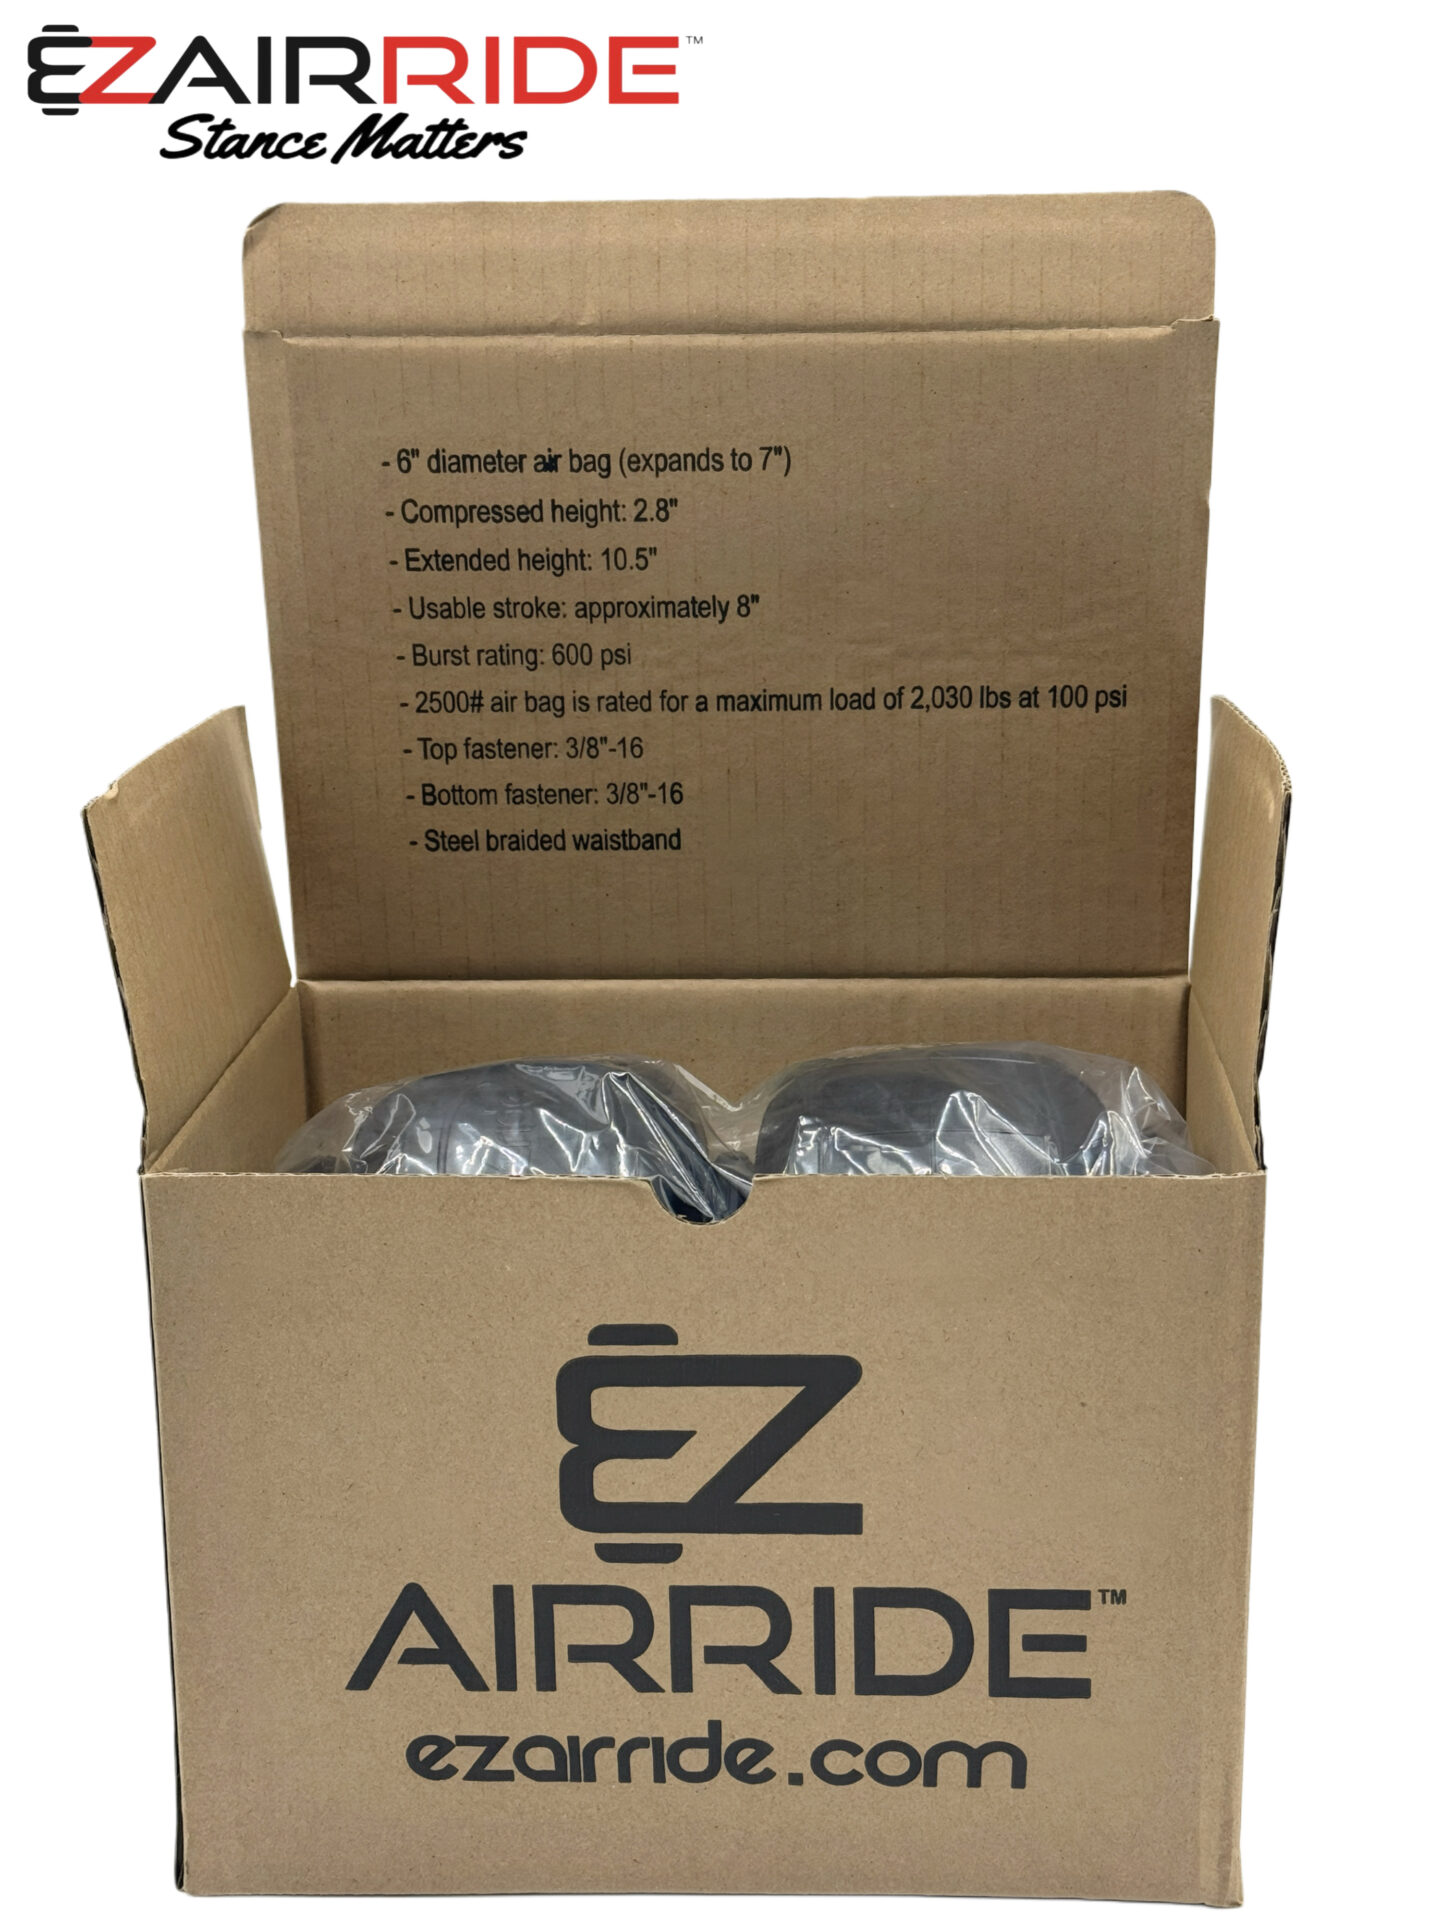
- EZ AIRRIDE 2500# AIR SPRINGS: 8” usable stroke with a 600 psi burst rating. Featuring steel braided waistbands.
- BOLT-ON POWDER-COATED AIR SPRING BRACKETS: with all necessary hardware.
- (2) 485c COMPRESSORS: Boasting 100% duty cycle @ 200 psi, 2.24 CFM and a 3/8″ NPT Stainless Steel Leader Hose these work horses come equipped with sound-limiting spring kits.
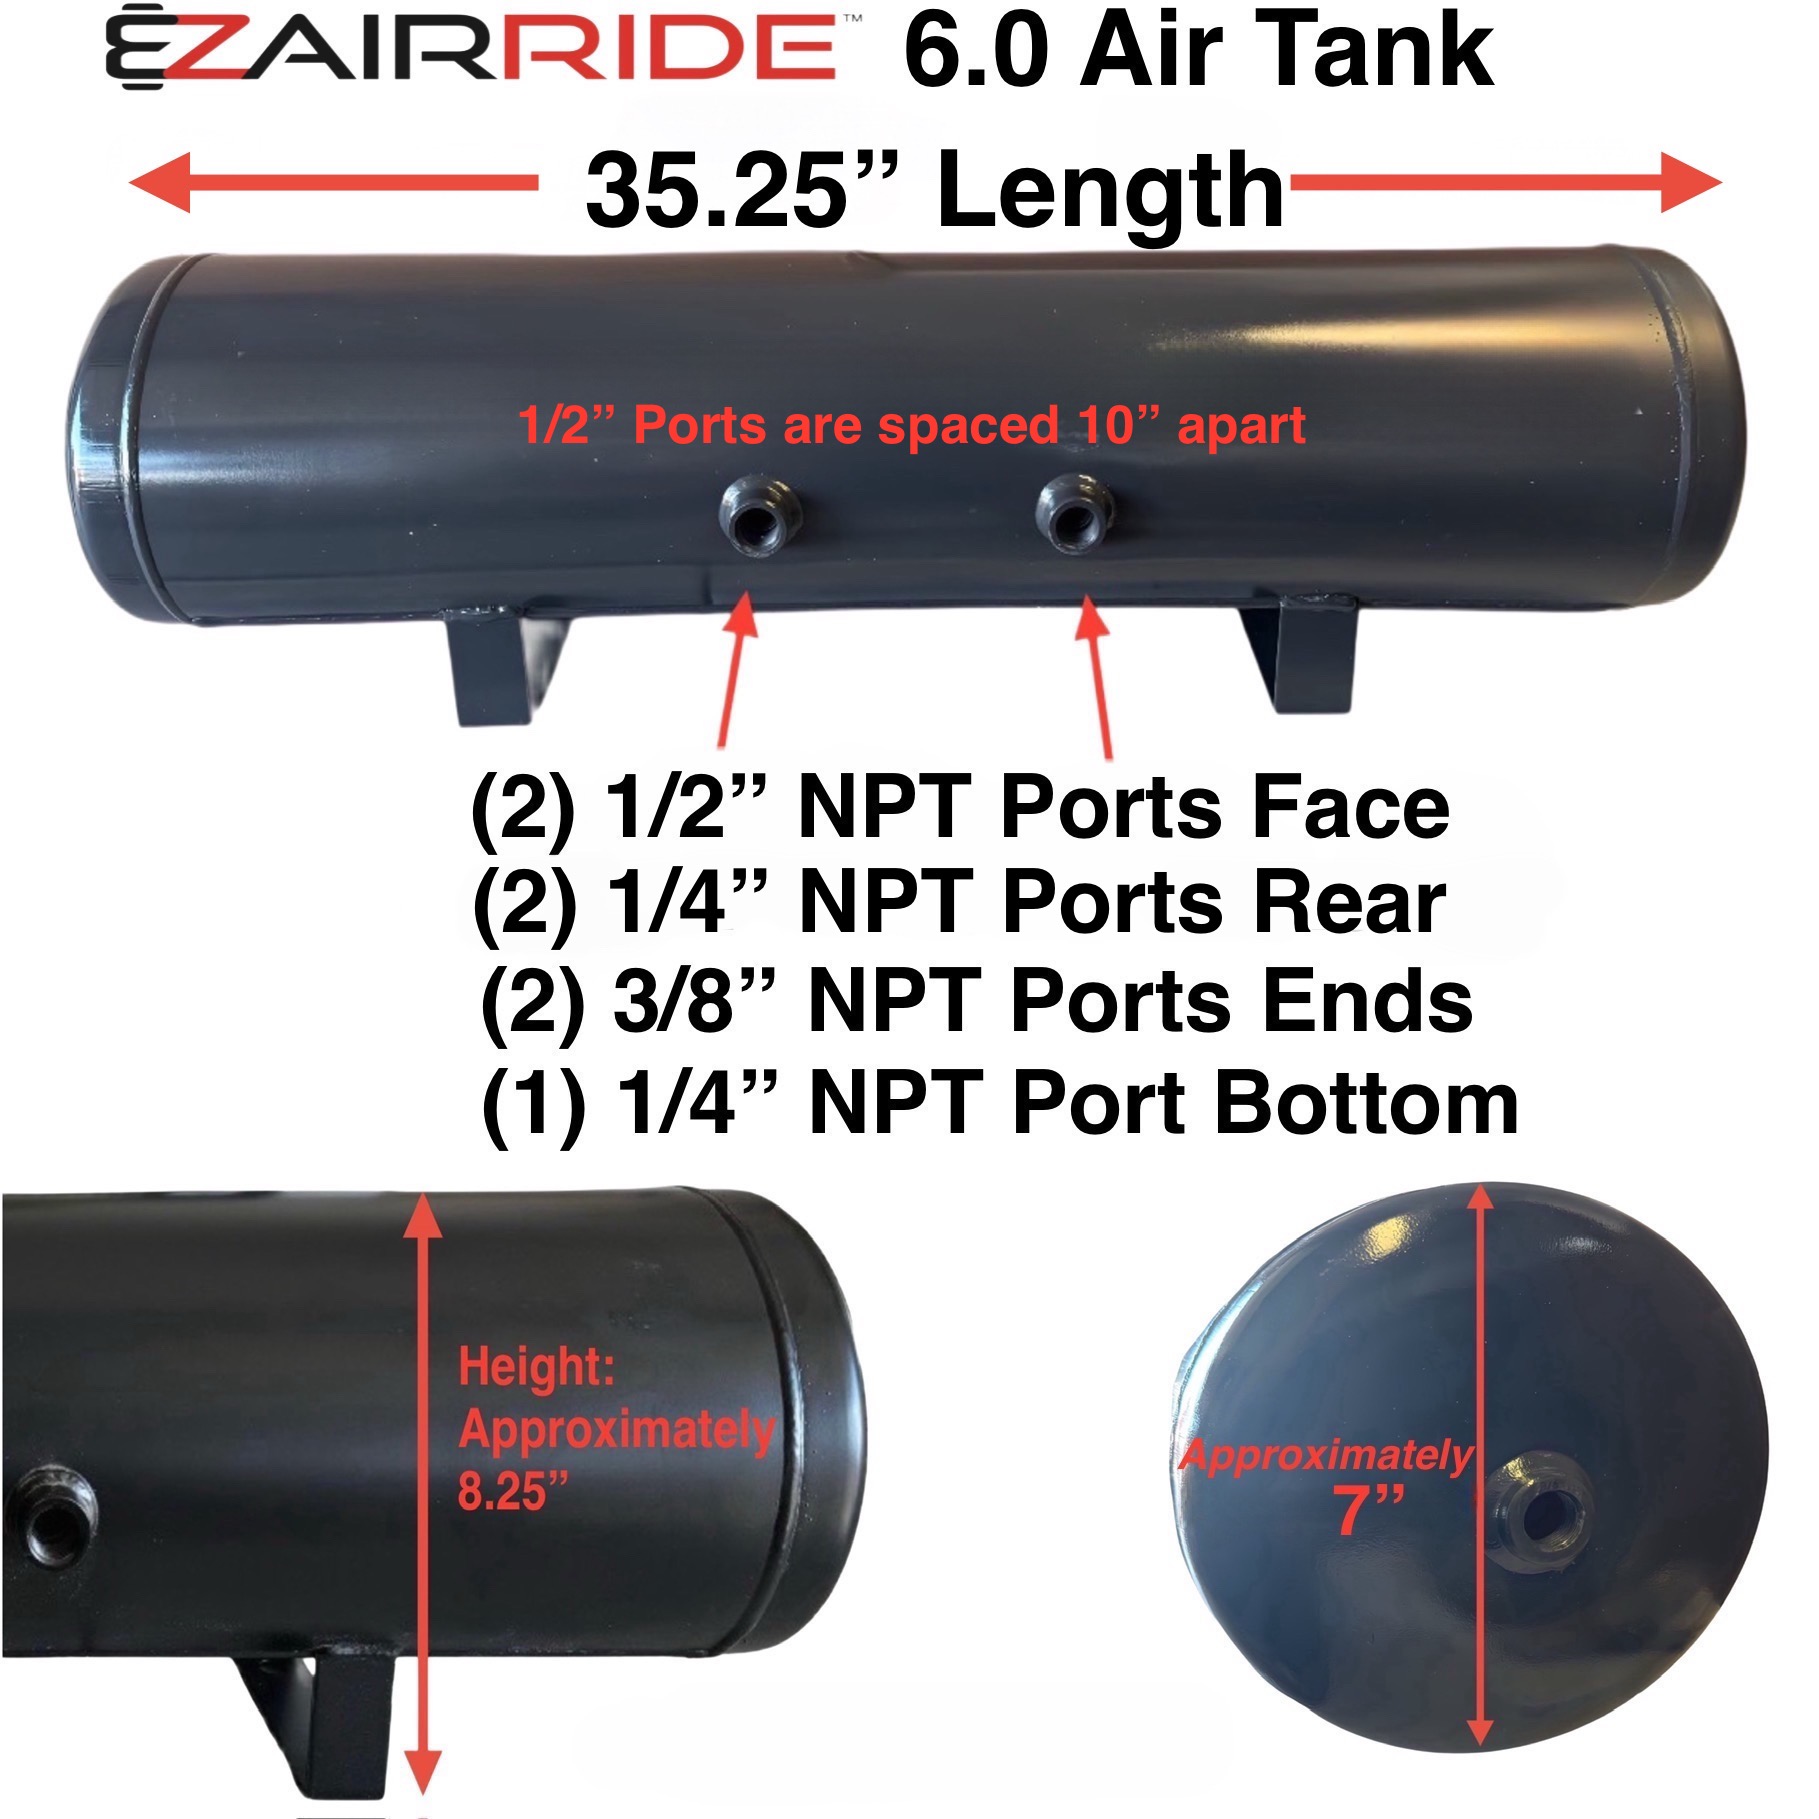
- LARGE CAPACITY 6.0 GAL AIR TANK: Equipped with all necessary fittings.
- ELECTRIC TANK DRAIN VALVE & SWITCH PANEL : Comes with lead/power wires and necessary fittings.
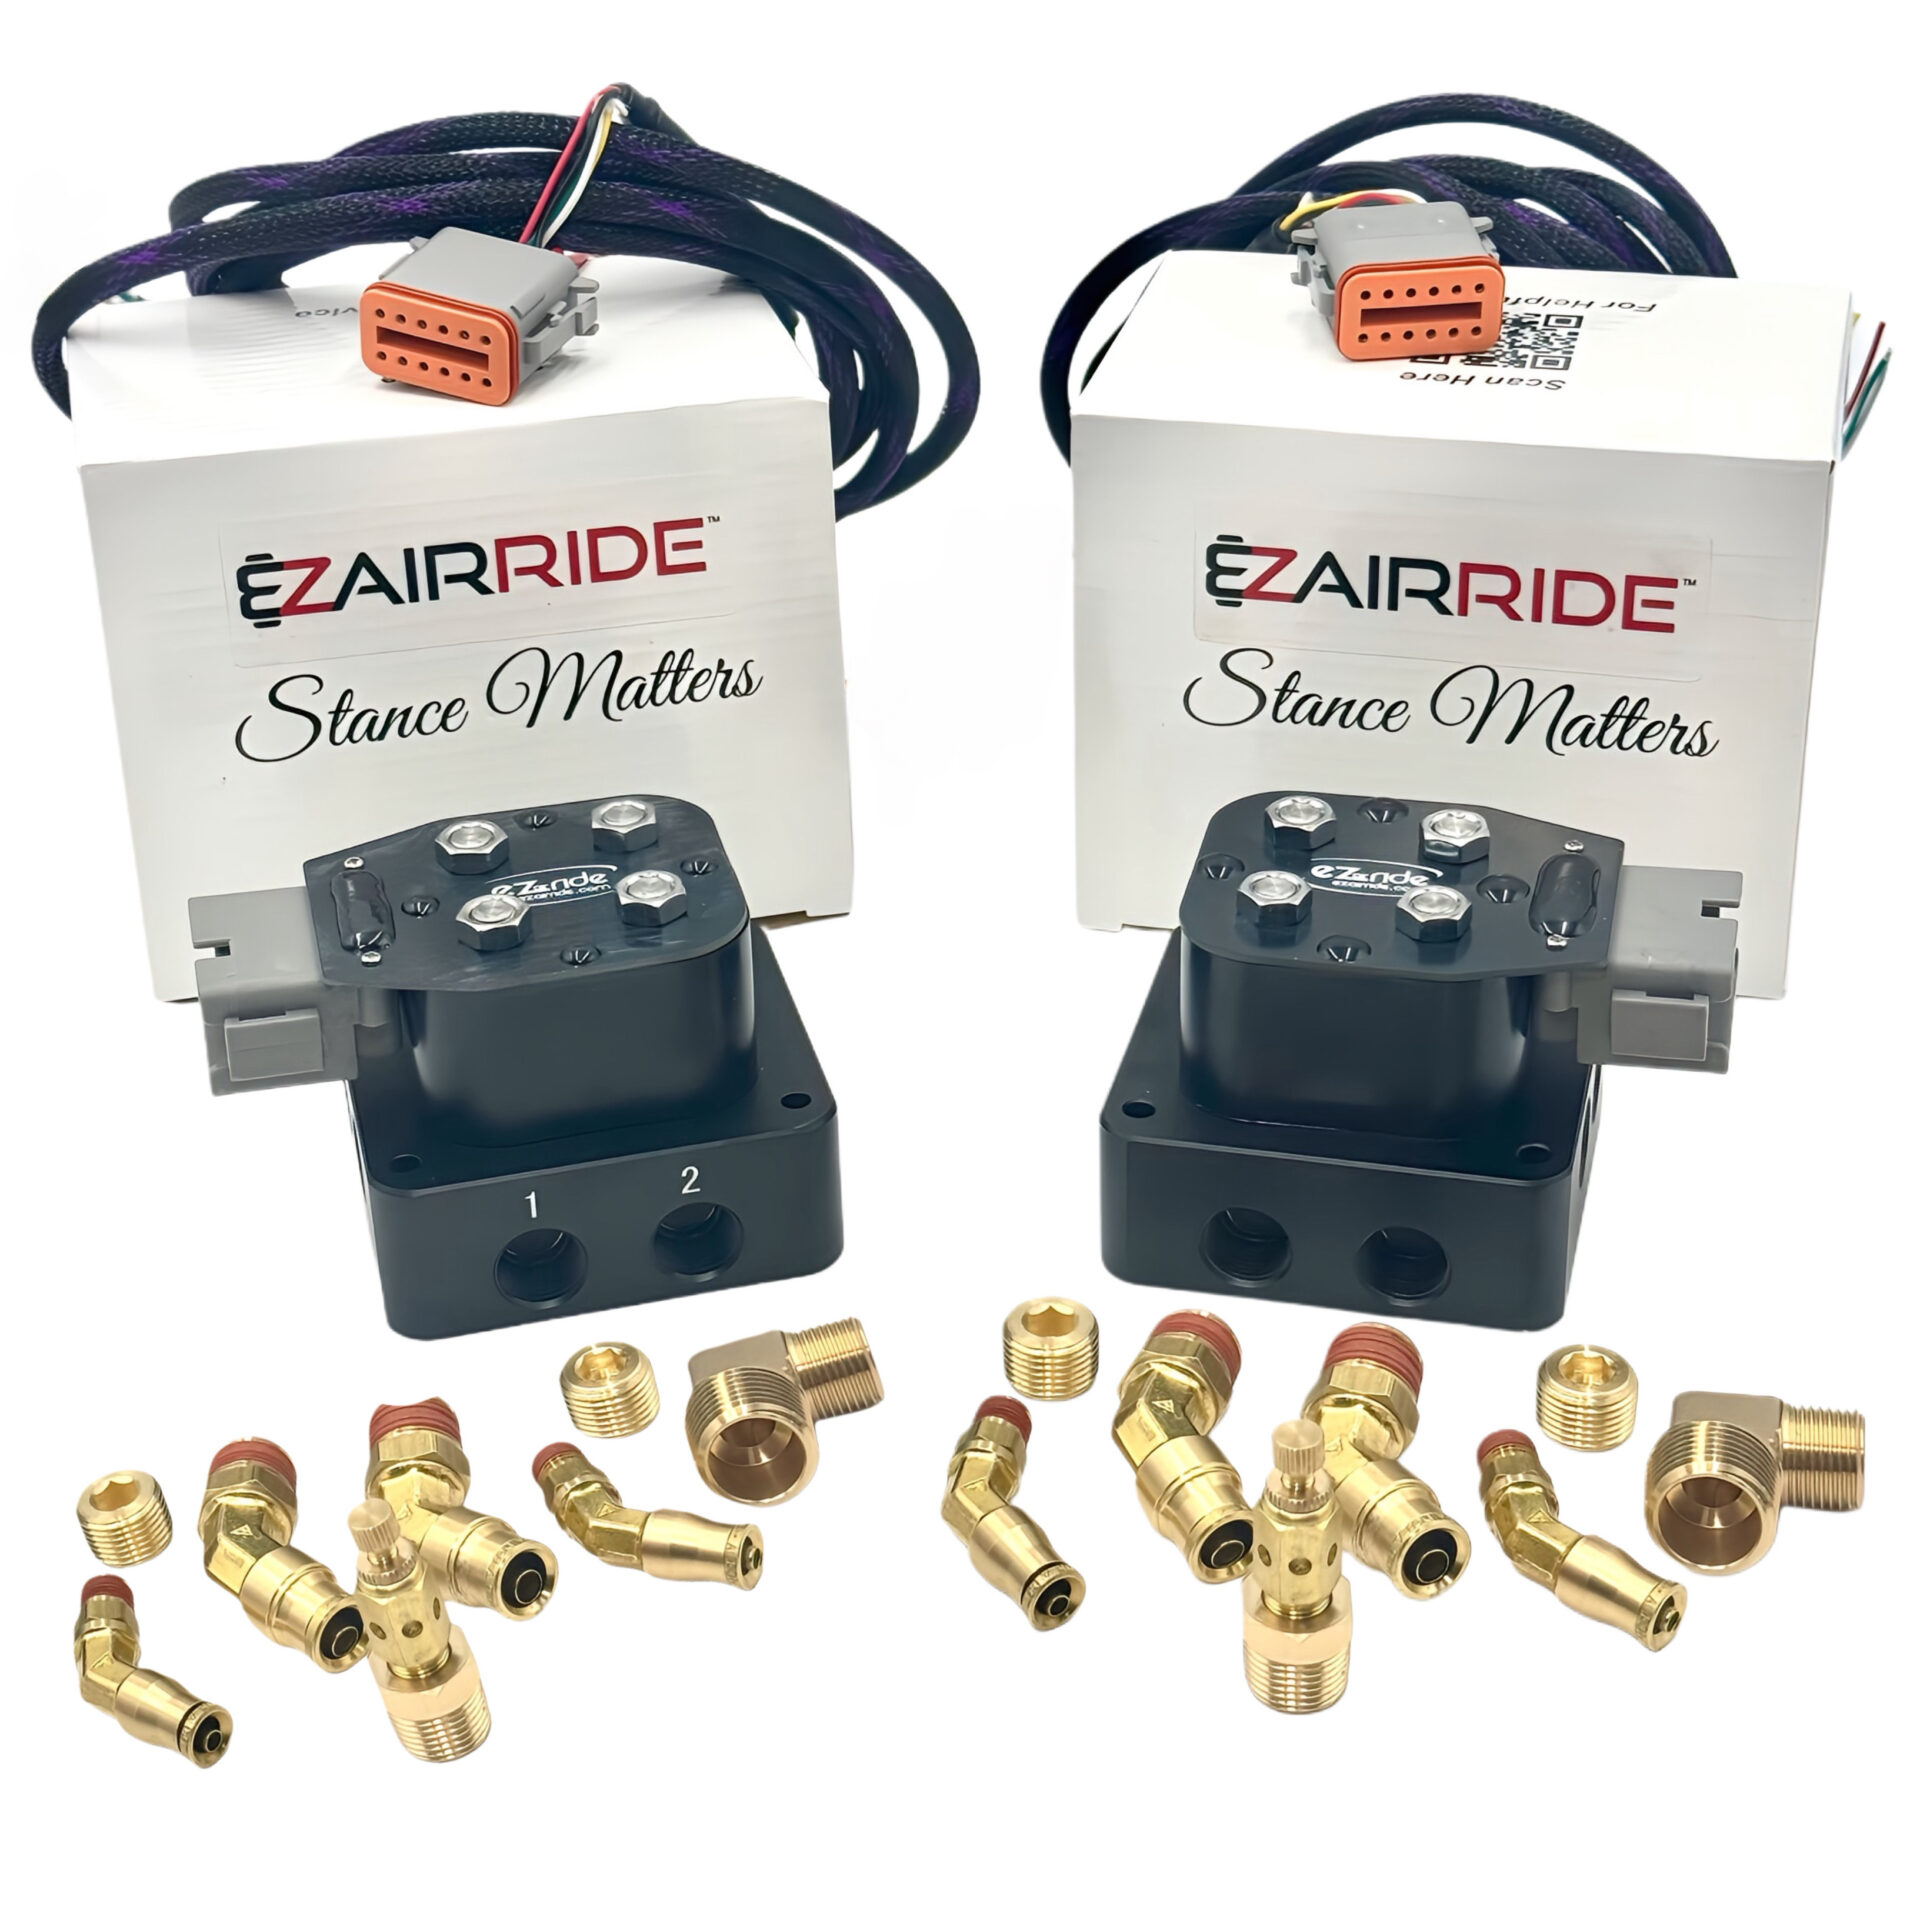
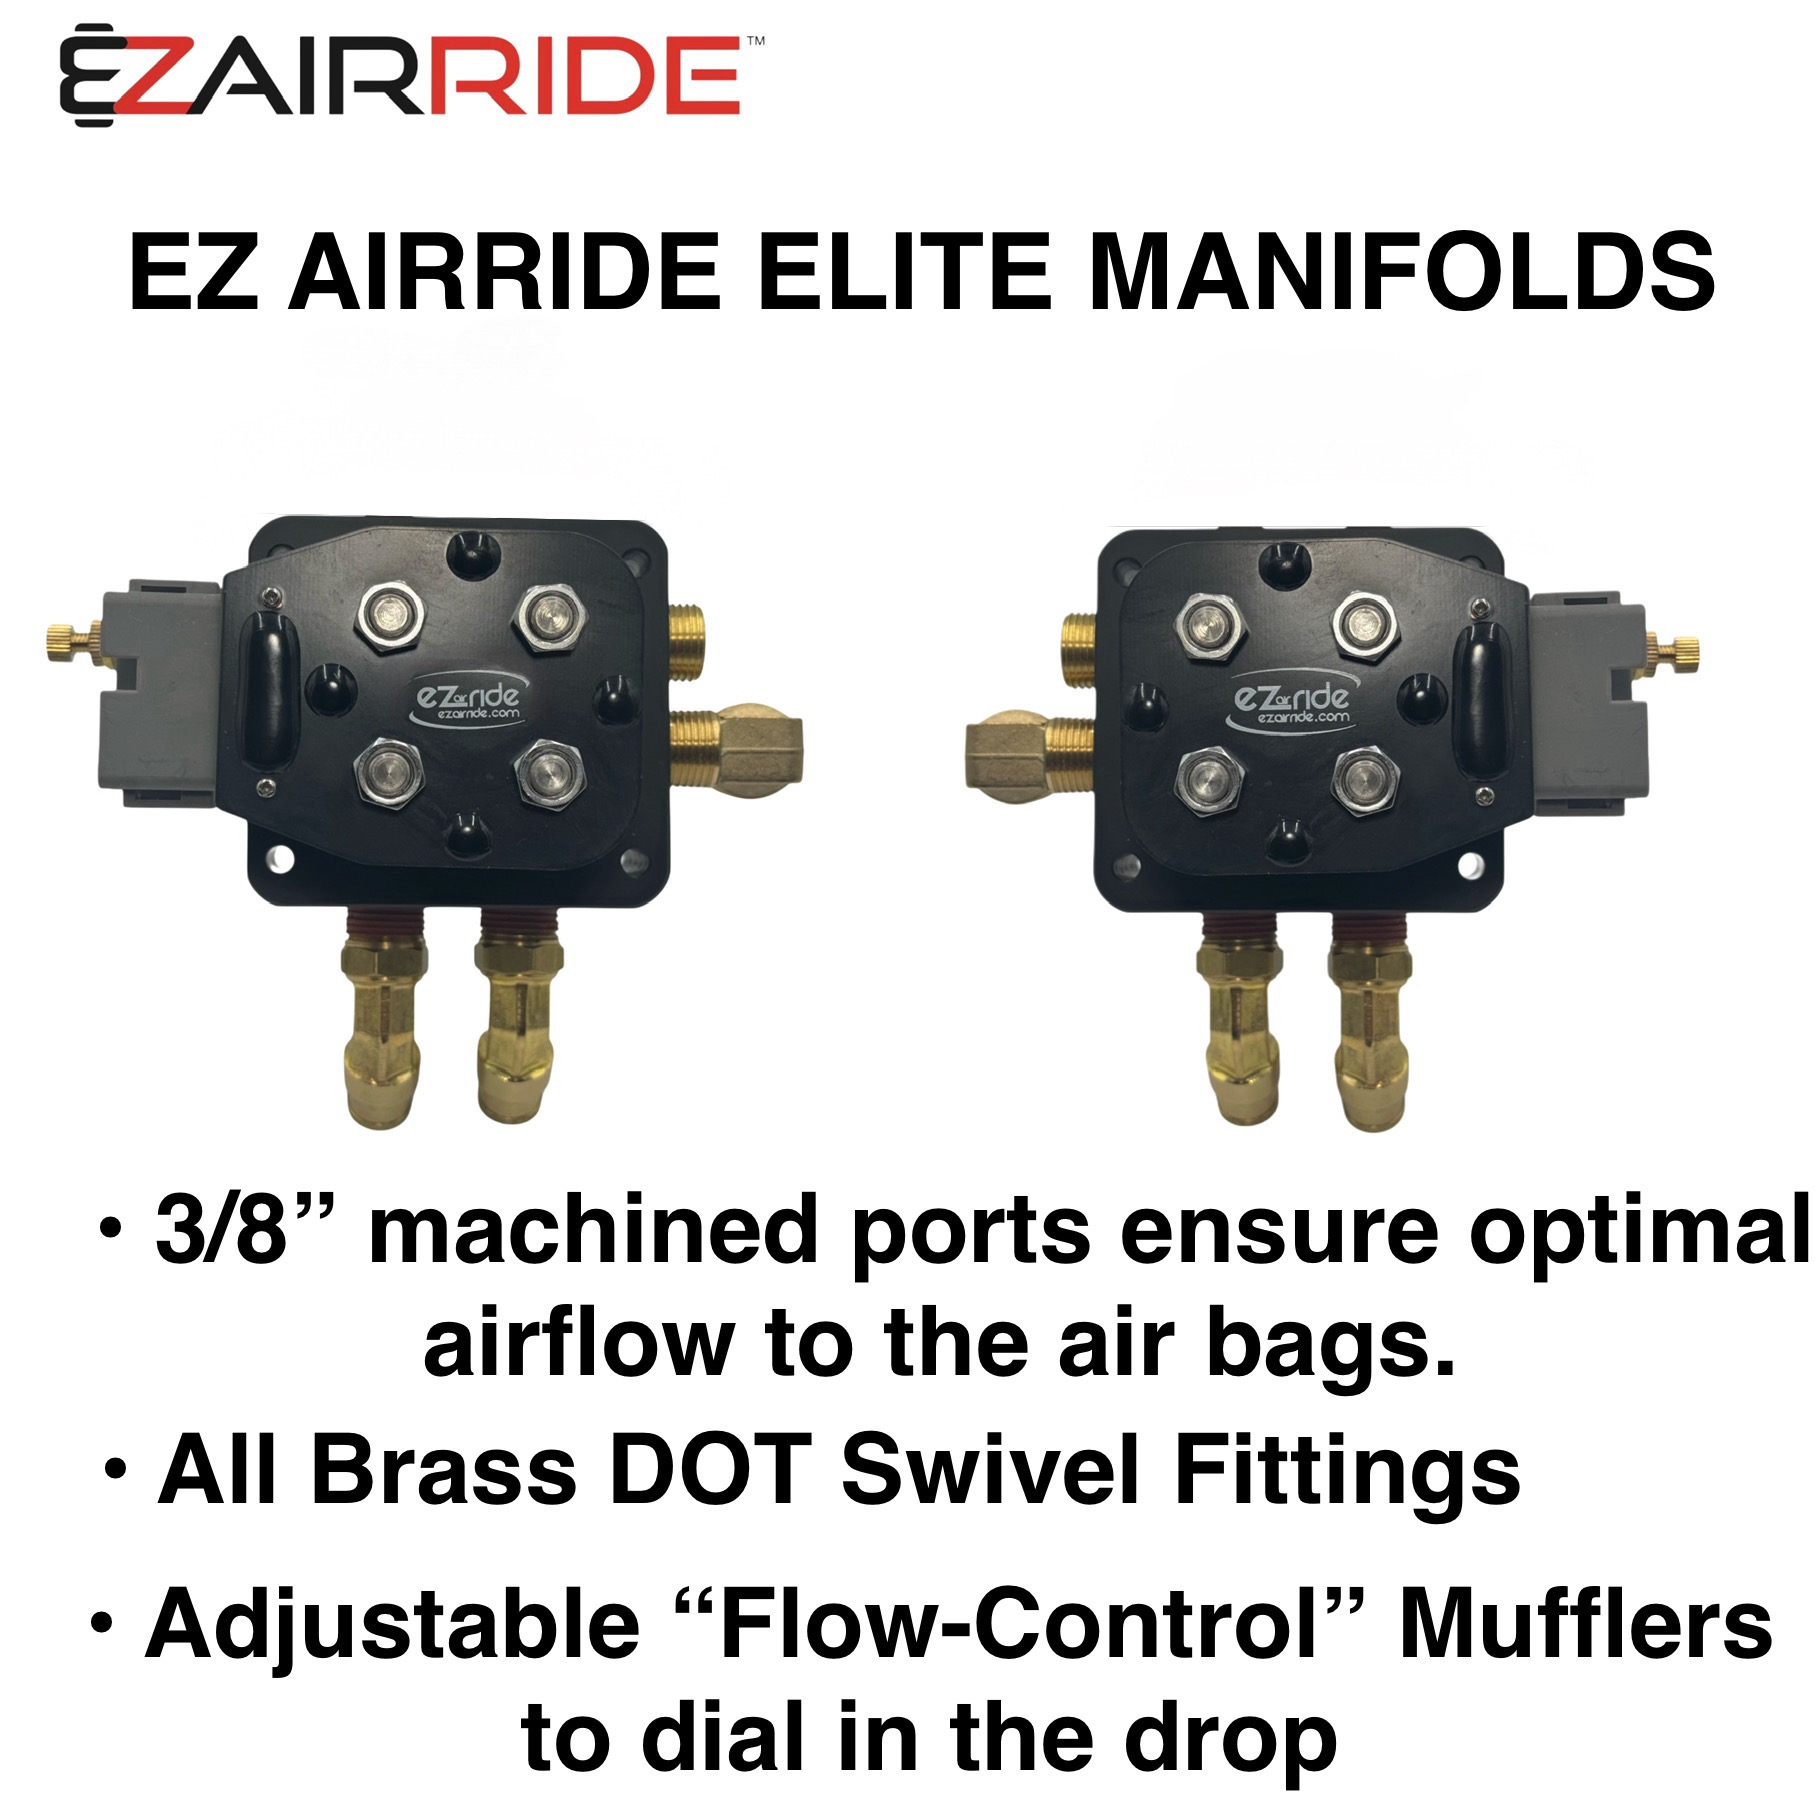
- (2) 3/8” Aluminum Manifolds: Comes with all necessary brass DOT fittings, slow-flow mufflers for controlled drop speed, and plug-in wire harnesses to connect to controller device.
- 7-BUTTON SWITCH BOX: Comes with a 16-foot extension and lock-out feature.
- DIGITAL GAUGE : The digital gauge is housed in an aluminum bezel and features a multicolor readout that displays bag pressure in each corner, along with tank pressure. It comes with five 15-foot long wired sending units for easy connectivity to the manifolds, which are mounted further back at the tank.
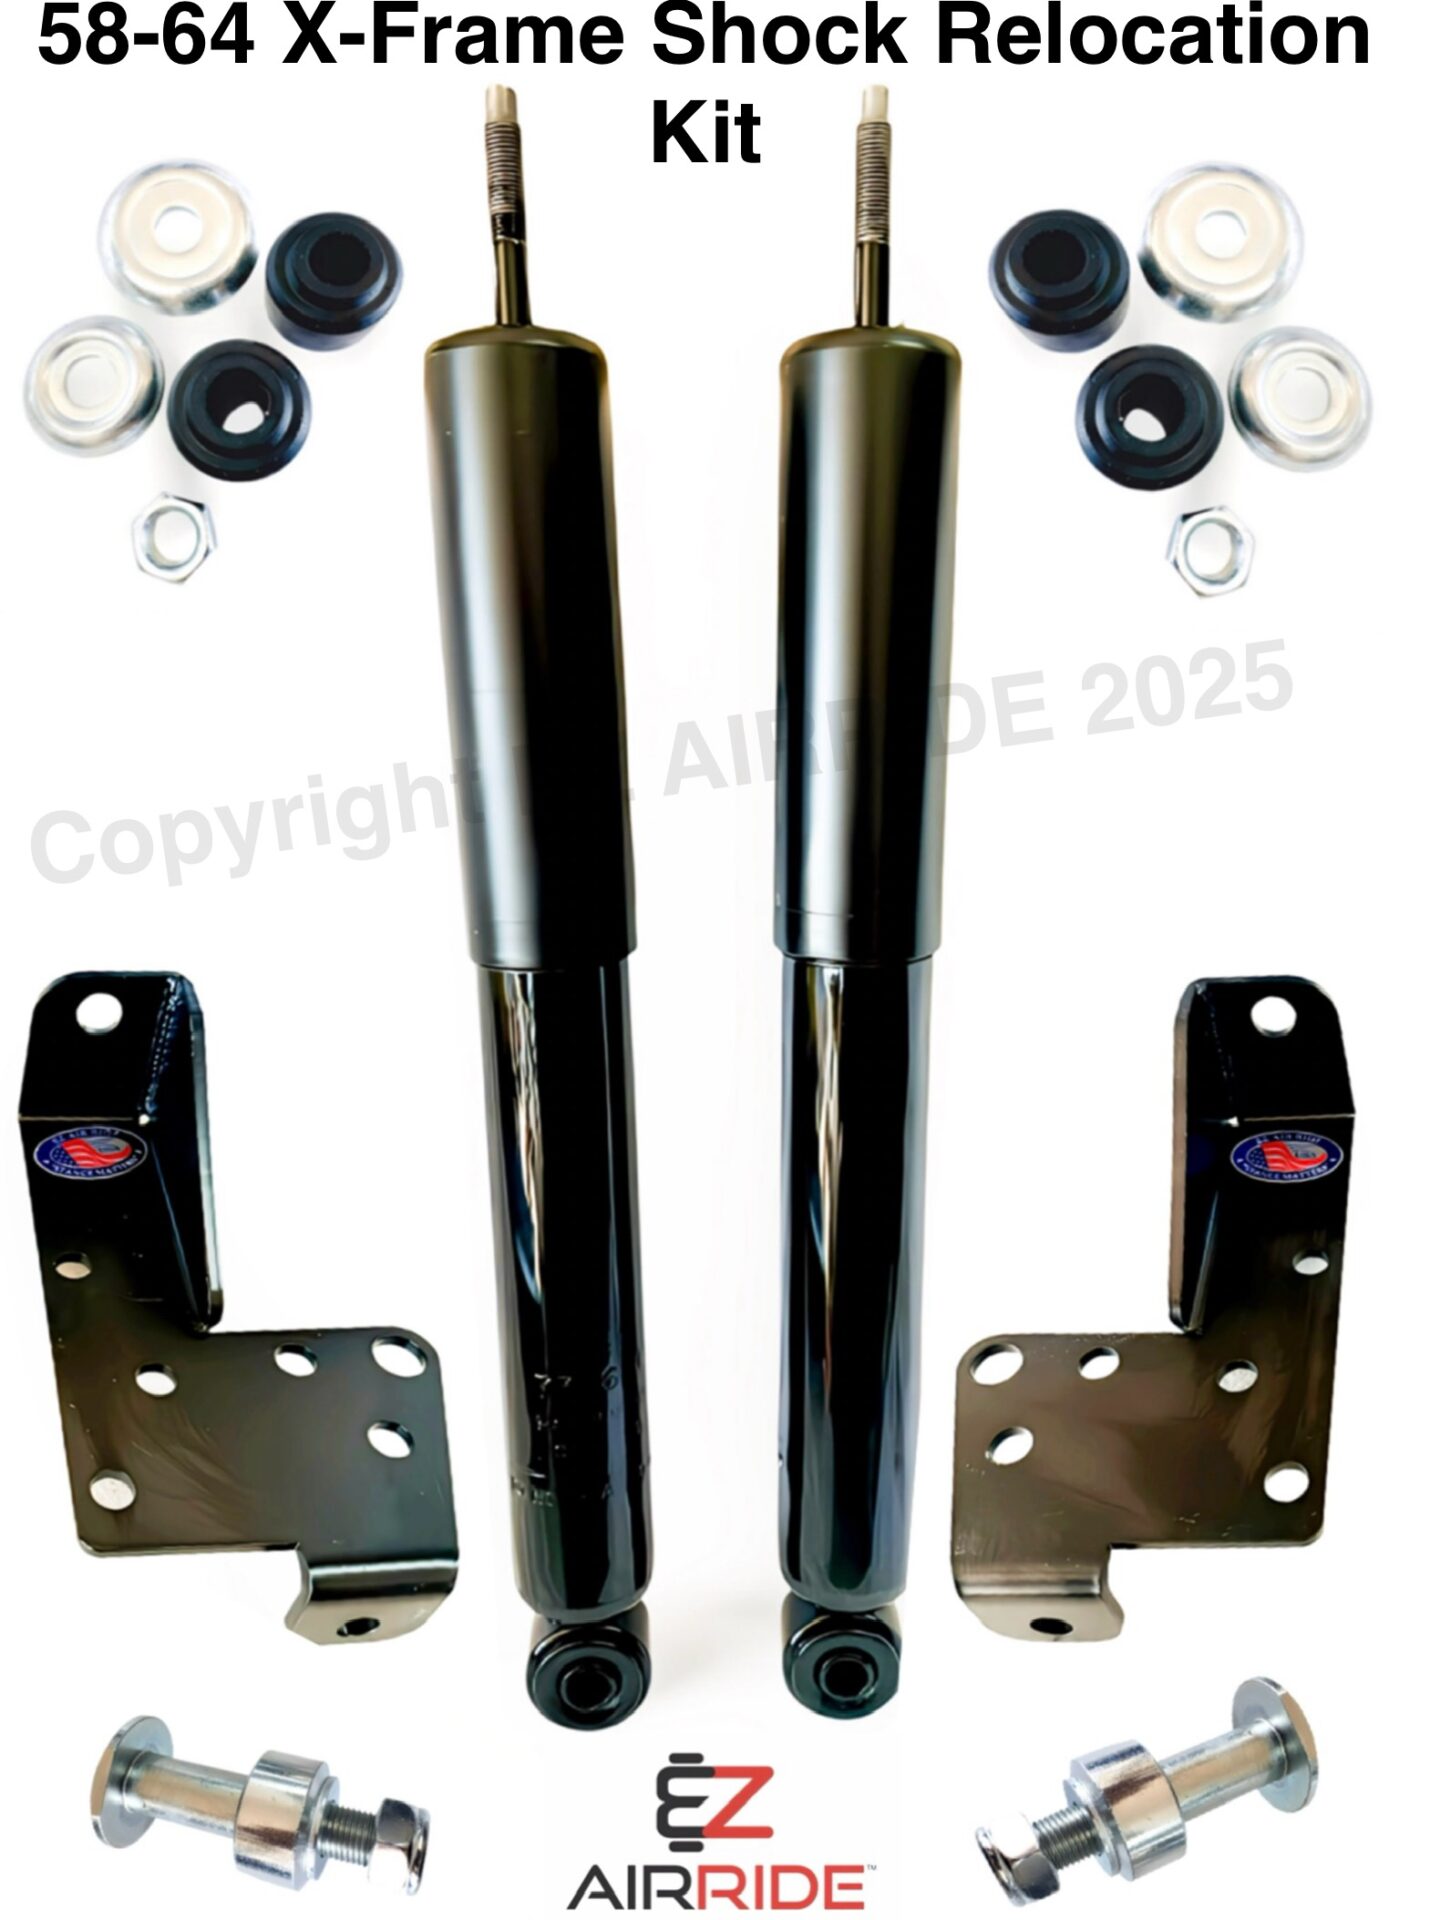
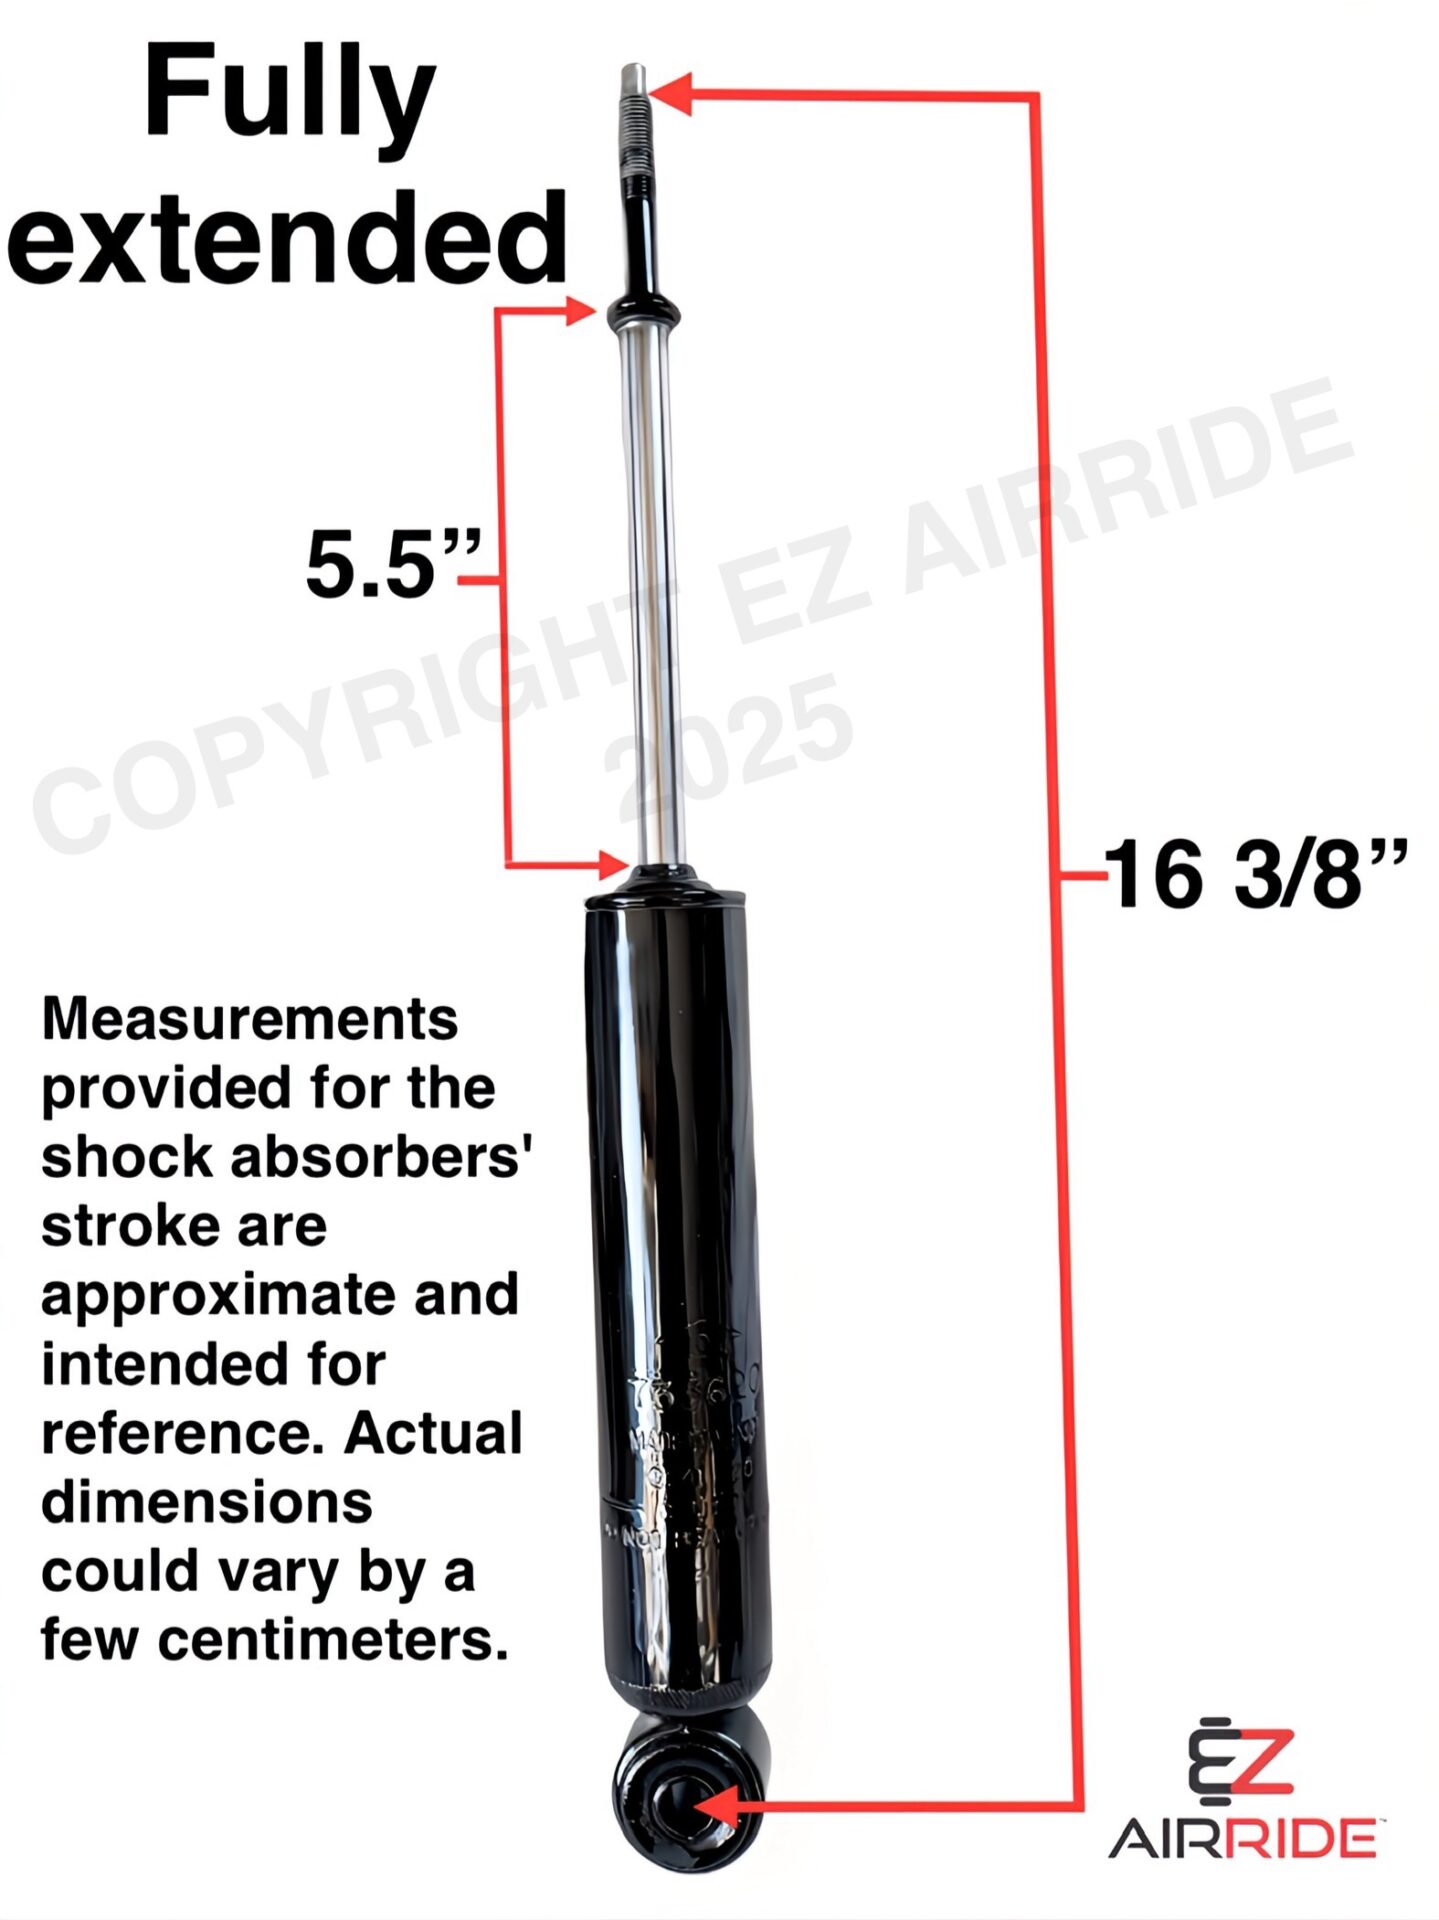
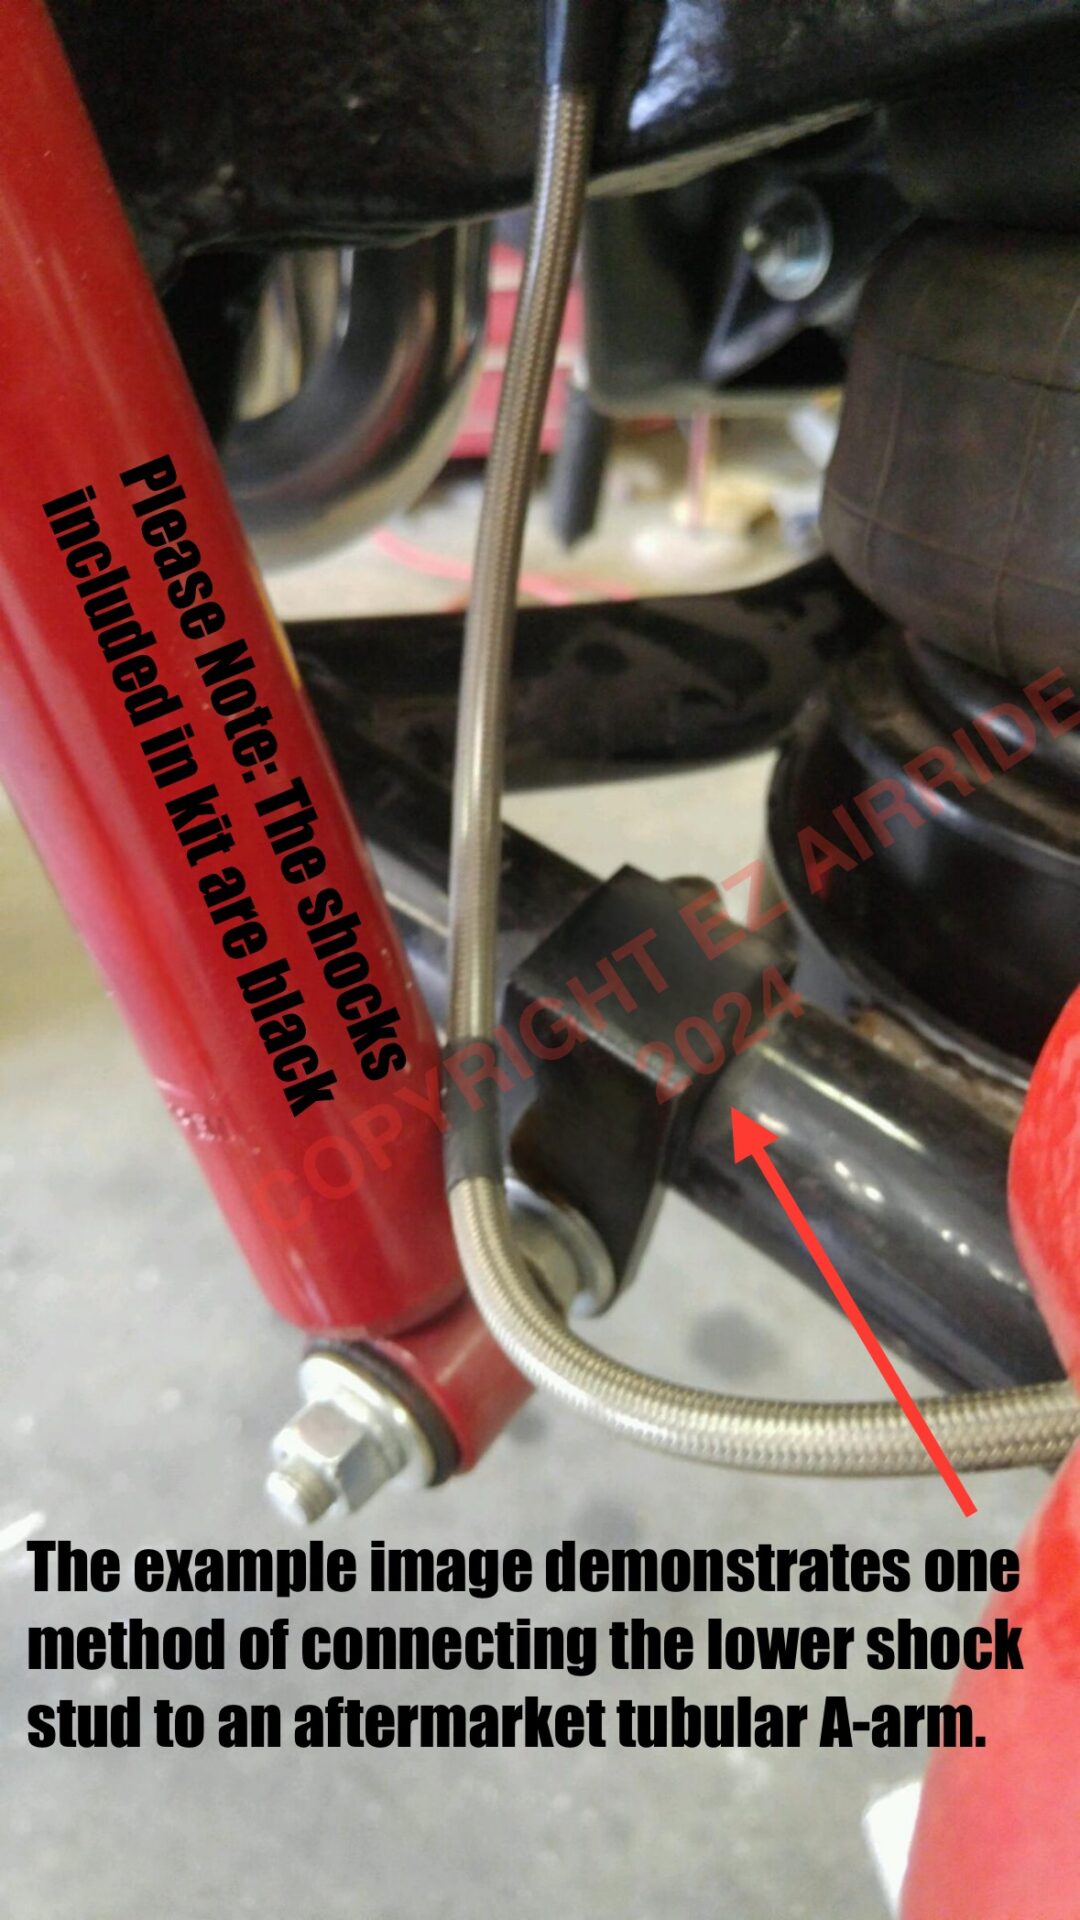
- FRONT SHOCK RELOCATION PACKAGE: Shocks, upper frame towers and lower stainless steel studs.
- 3/8″ STAINLESS STEEL BRAIDED MANIFOLD LEADER HOSE: (4) hoses 12″ in length with DOT Fittings to connect to black nylon hoses.
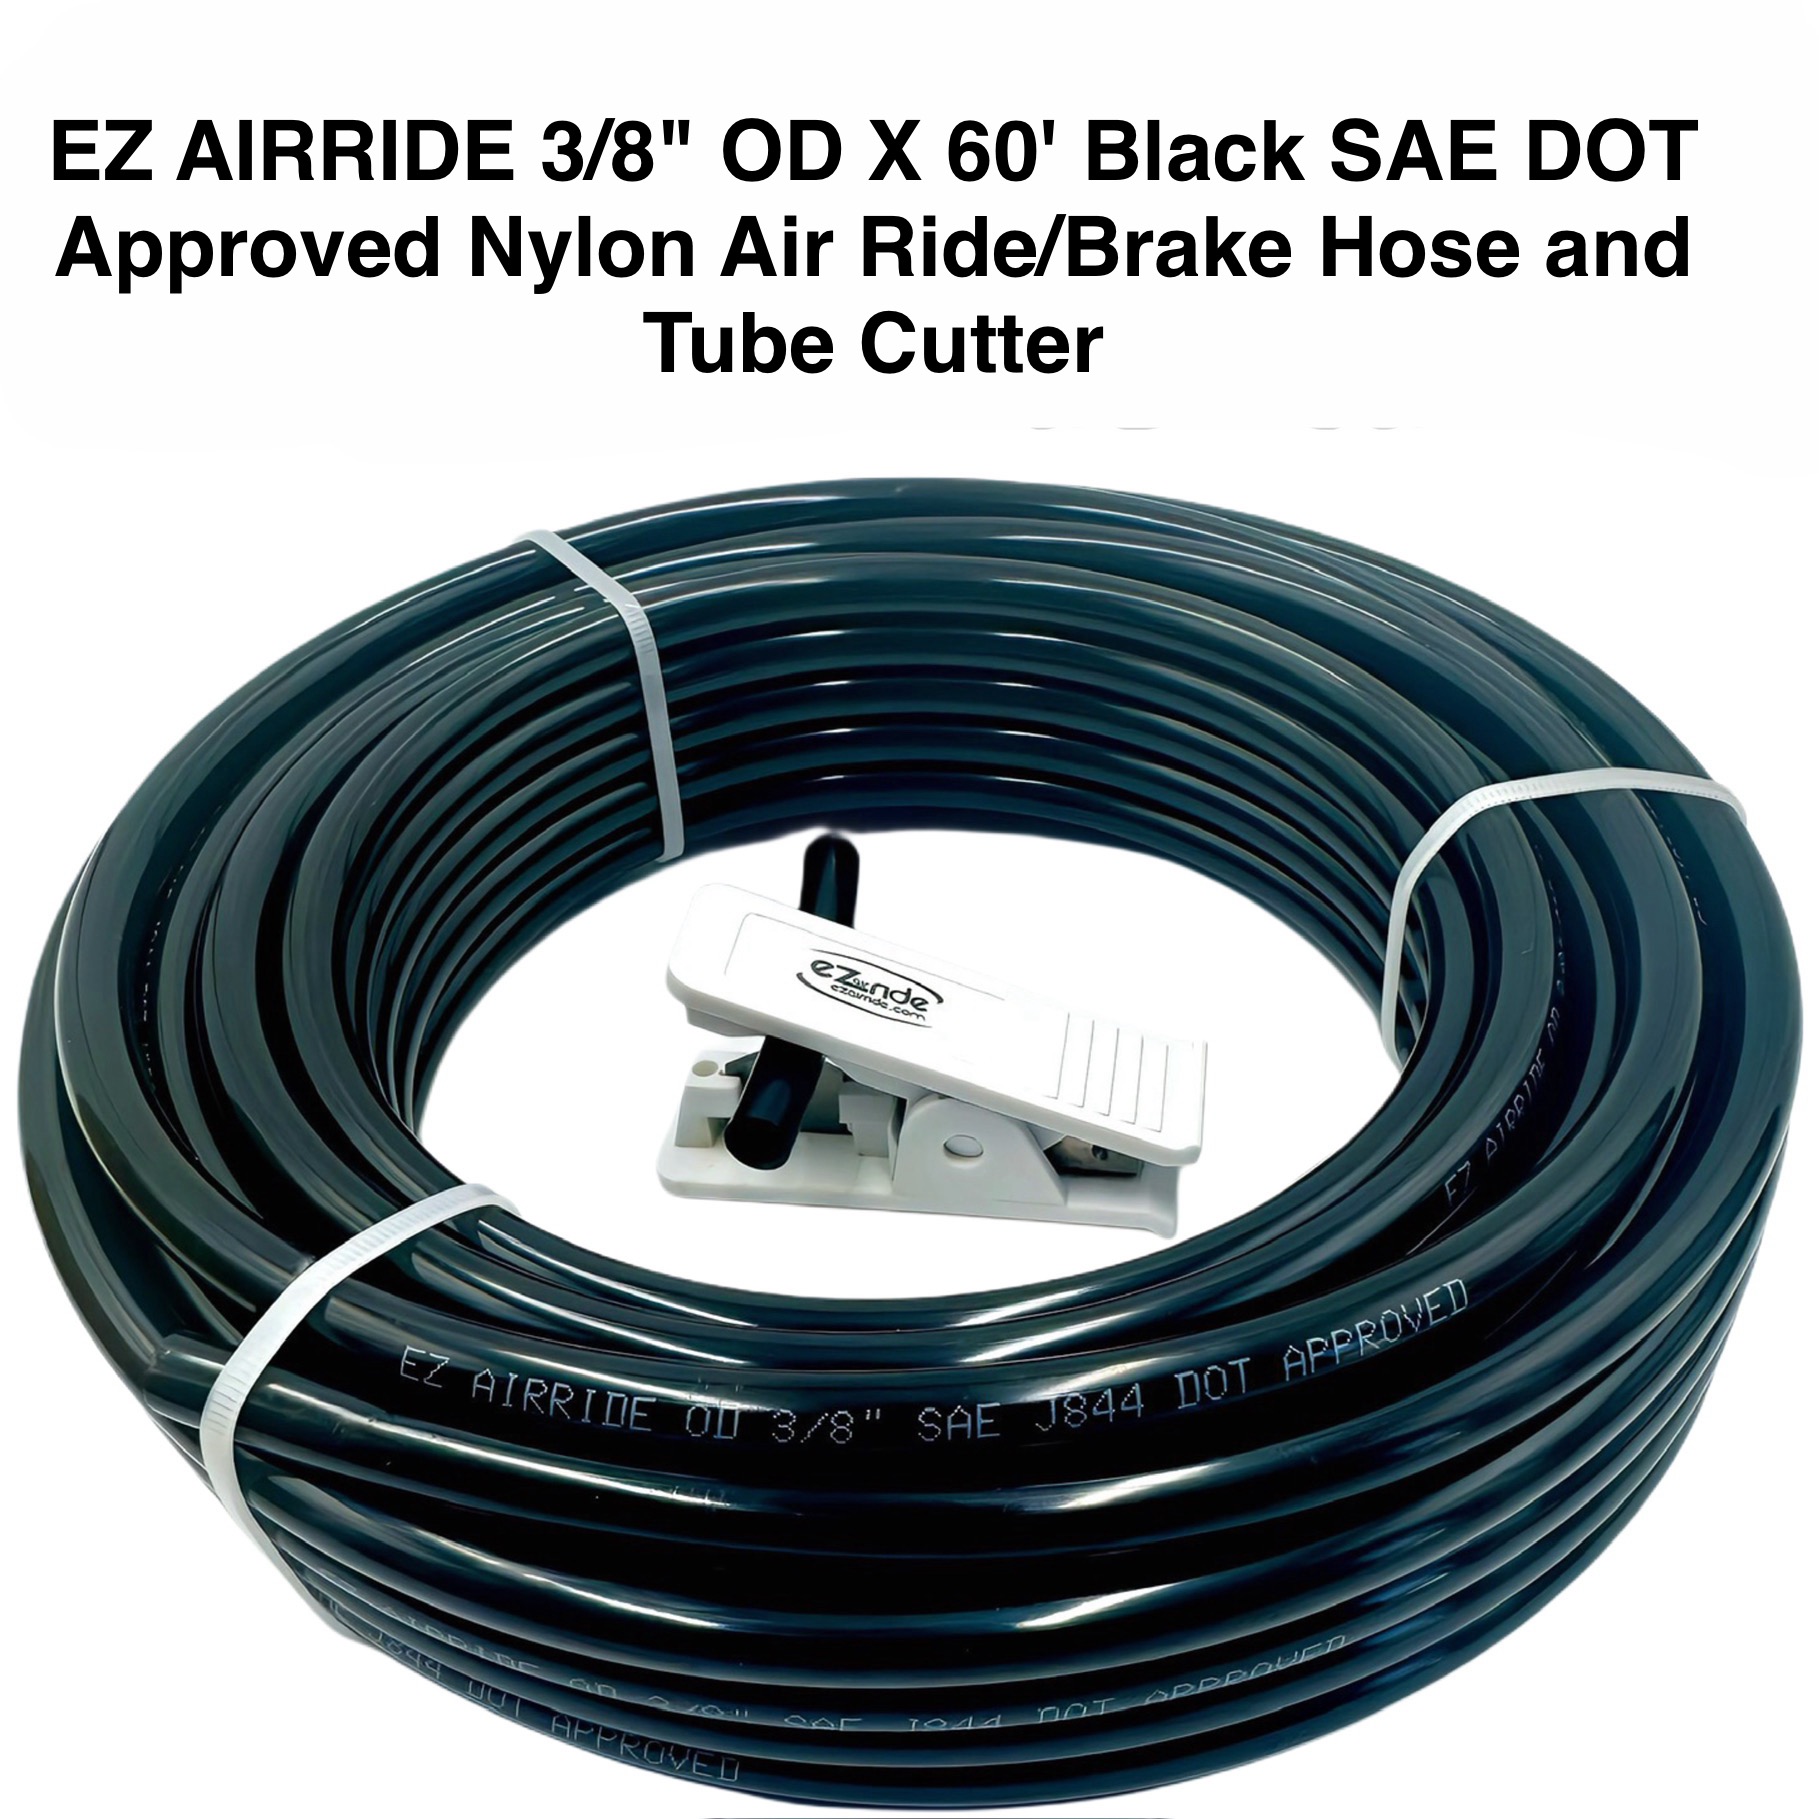
- 3/8” DOT BLACK NYLON AIR HOSE: 60 feet in length.
- 1/4” DOT BLACK NYLON AIR HOSE: “Used to route moisture from the tank valve to outside of trunk.”
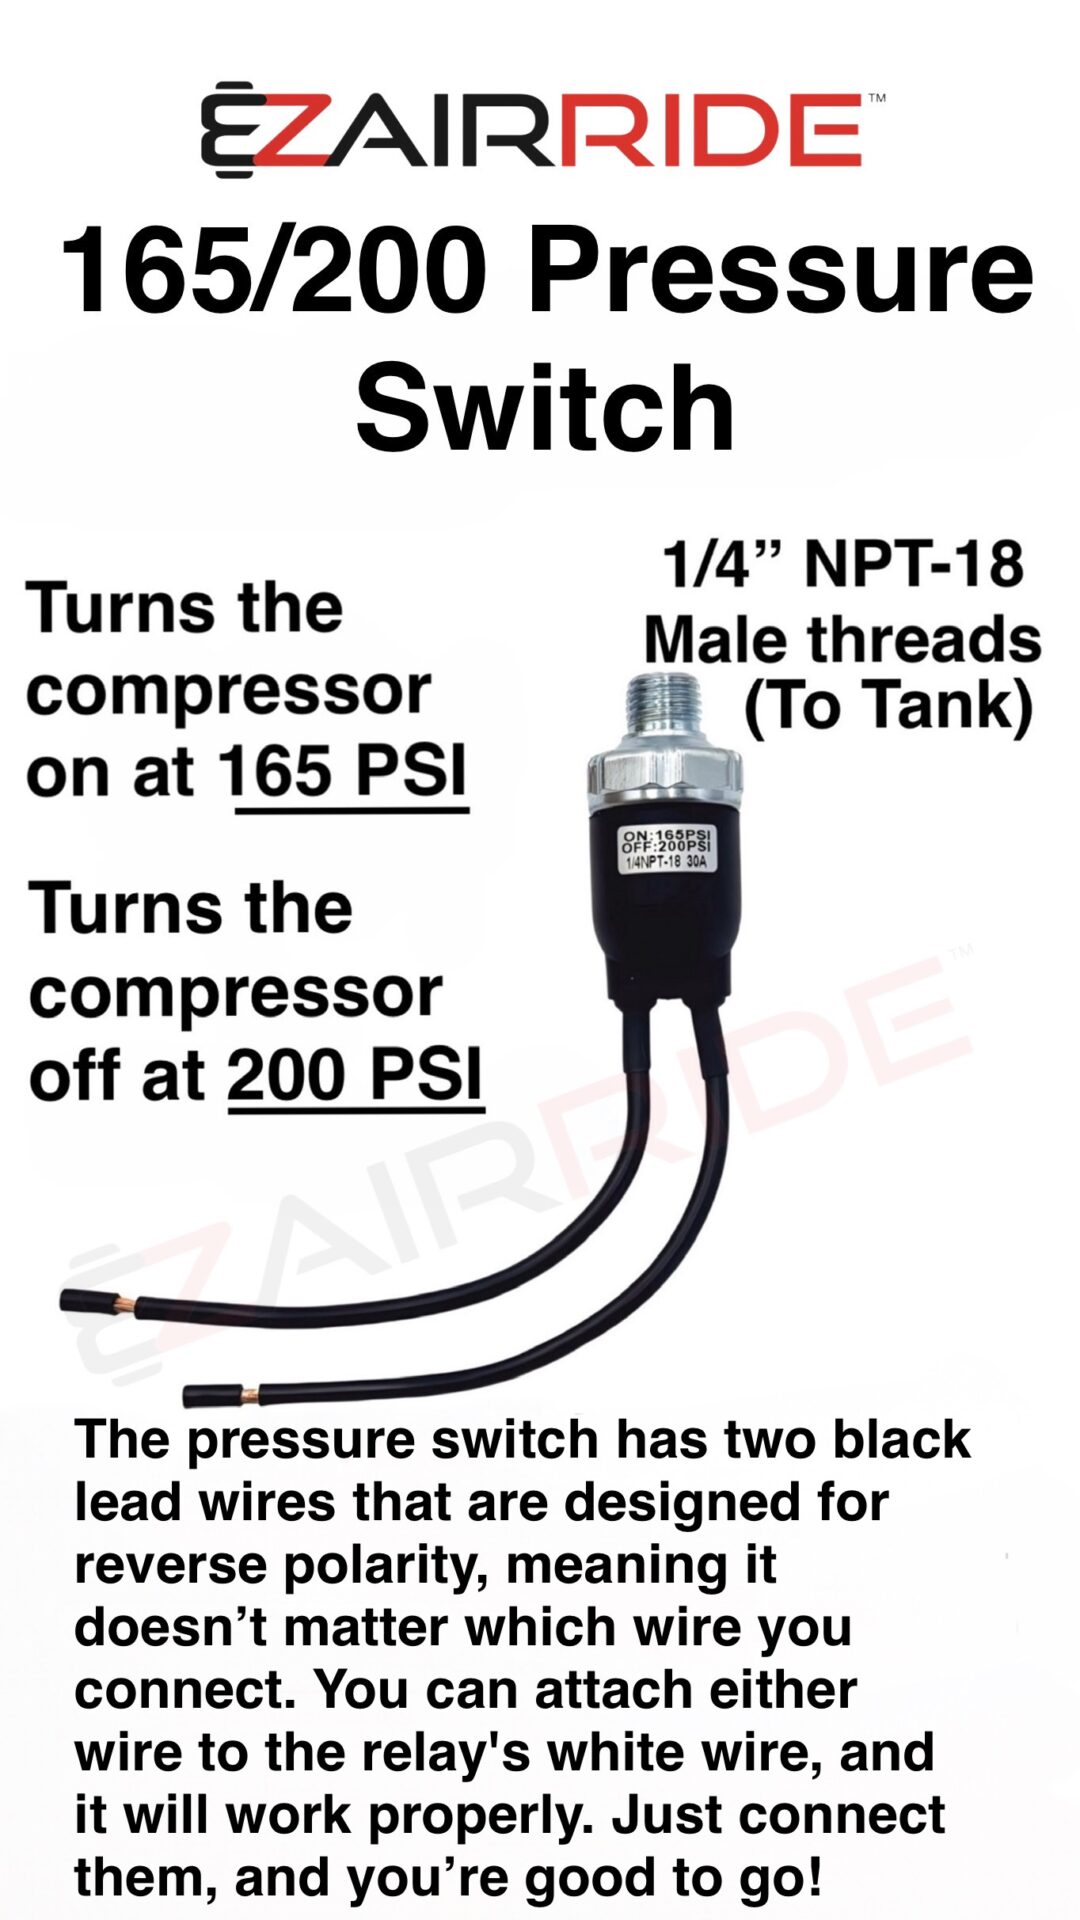
- DOT BRASS FITTINGS: Includes PTC swivel bag fittings, all brass DOT tank fittings, and a 165 on / 200 off PSI Switch with power leads.
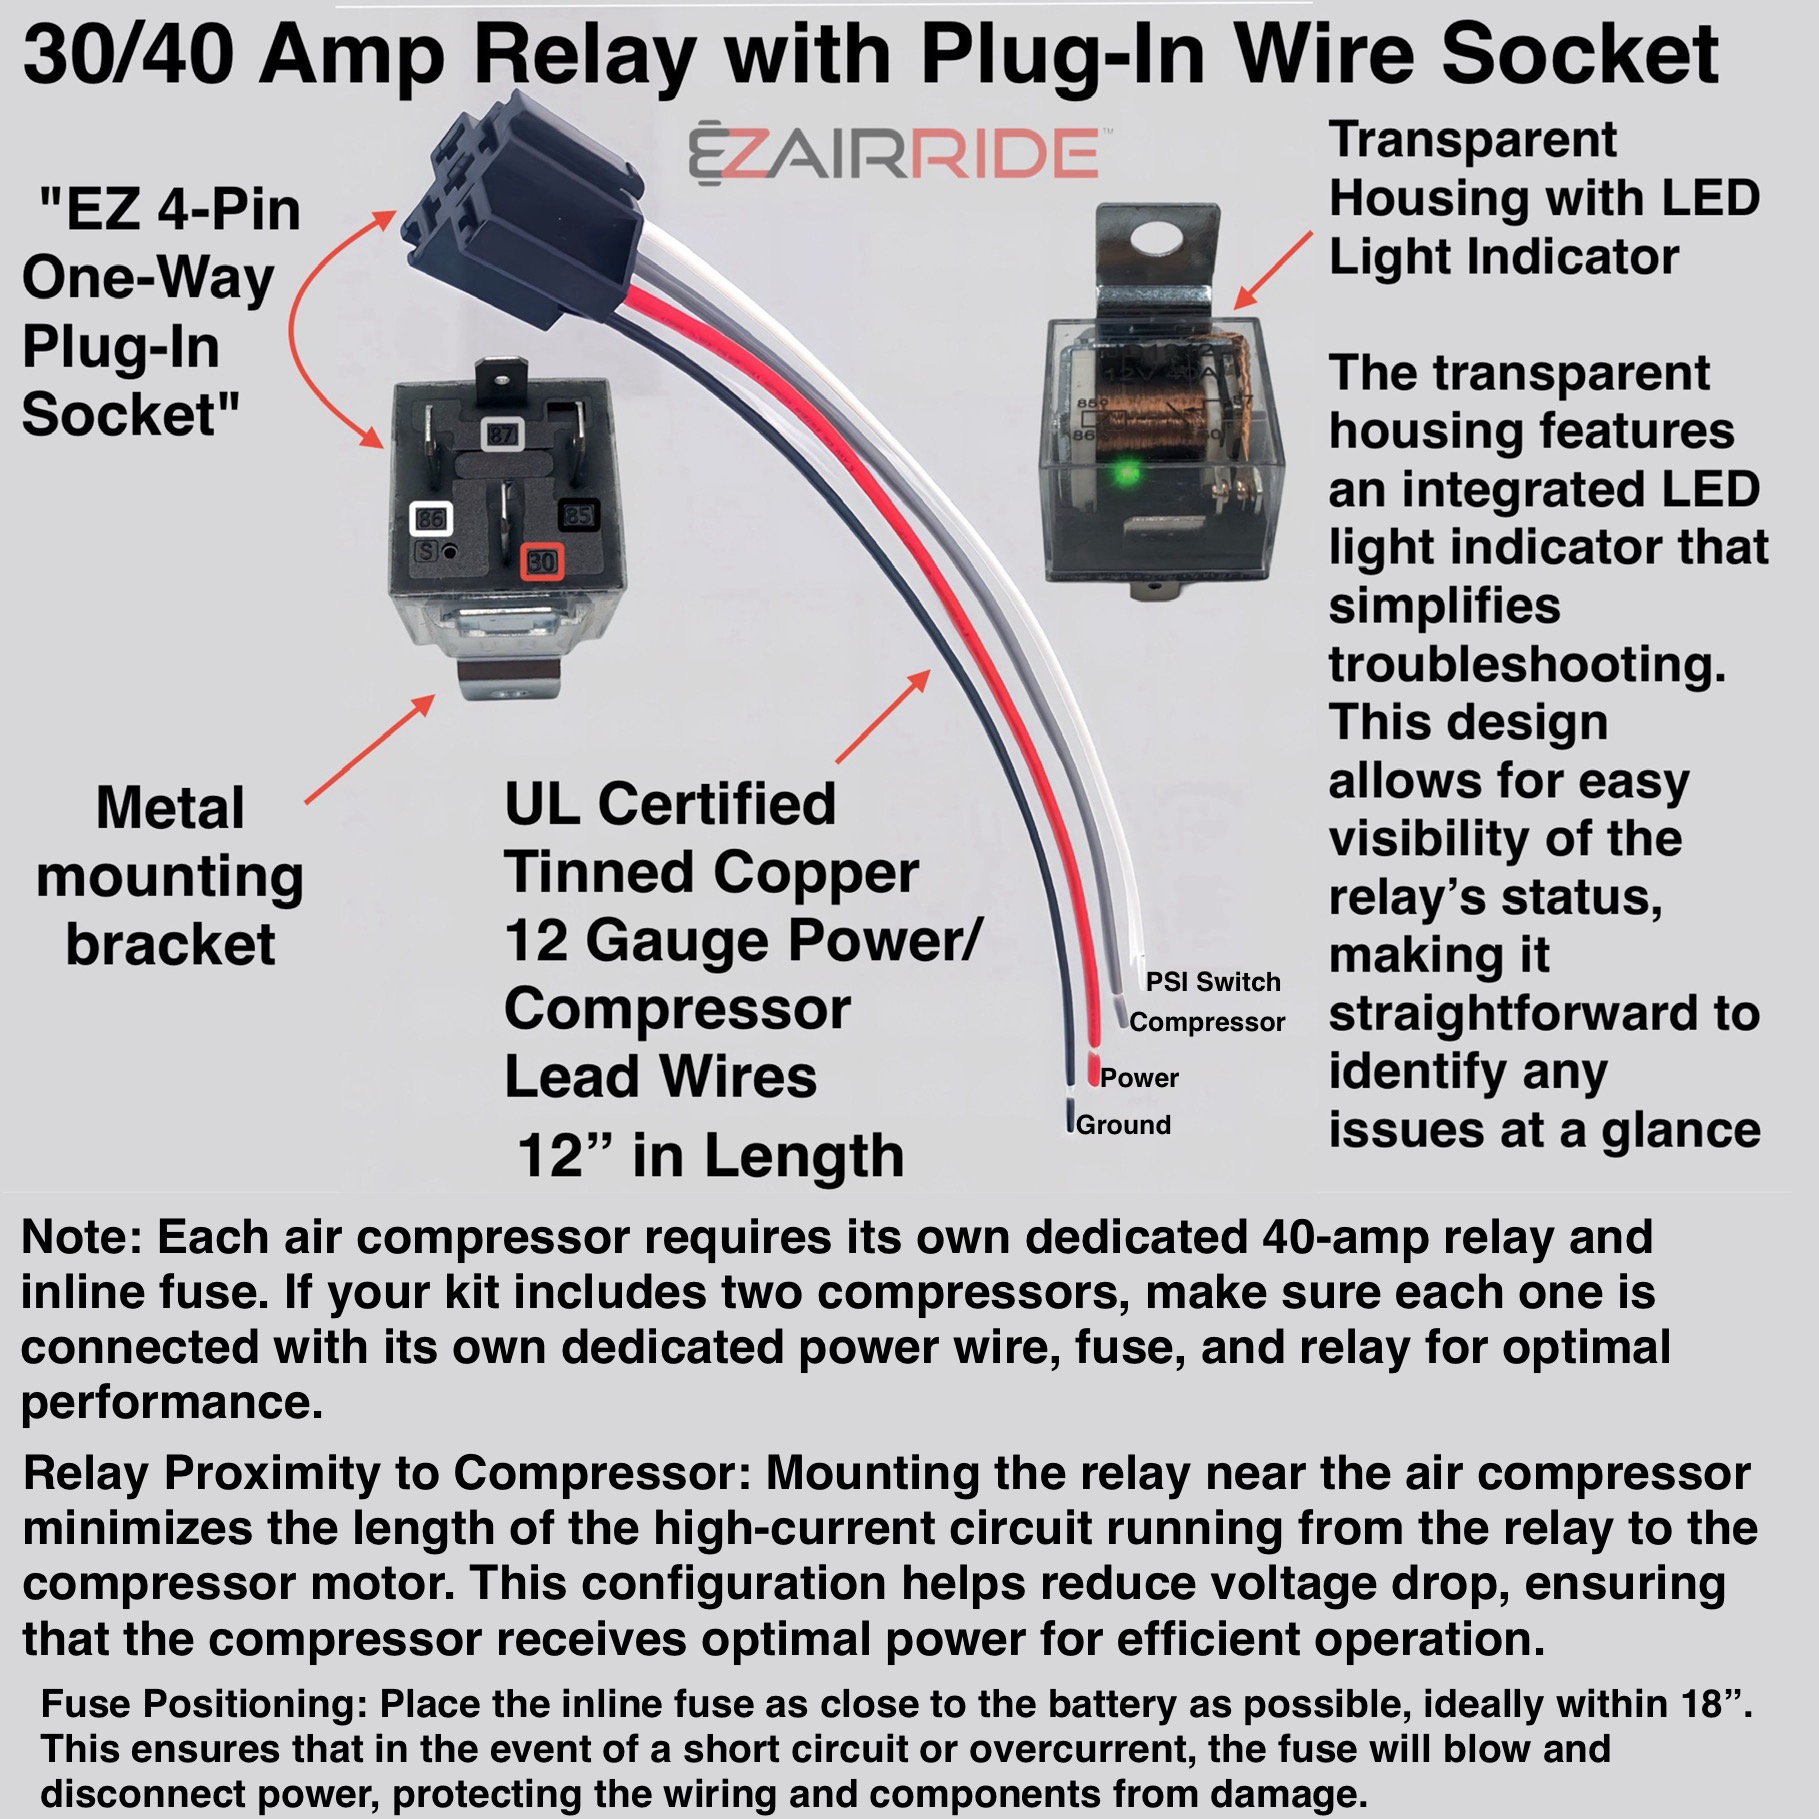
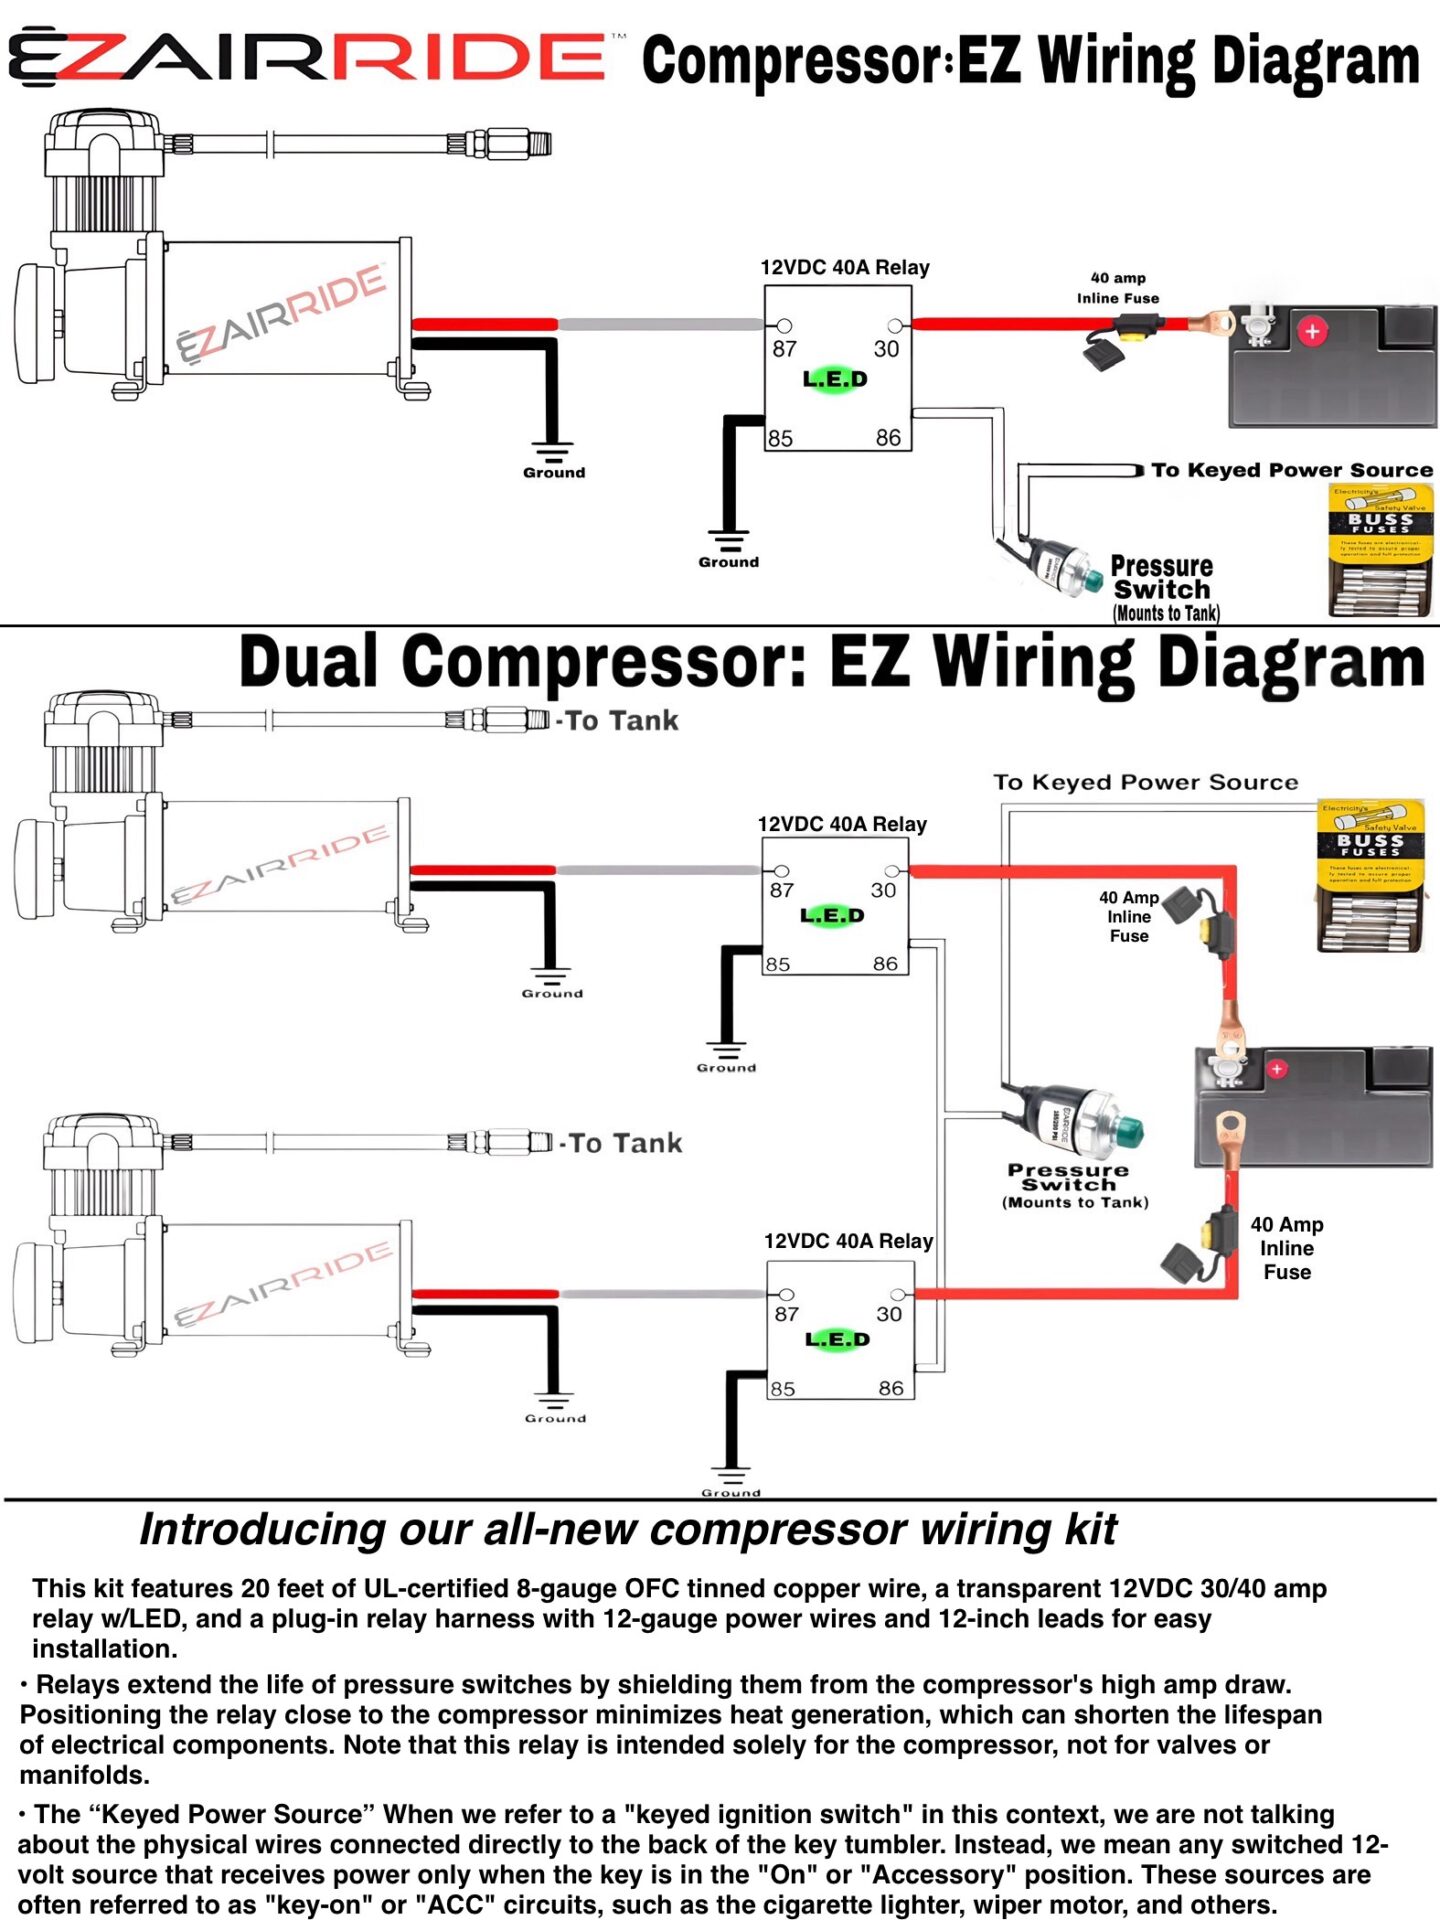
- EZ AIR ESSENTIALS: 20’ 8 gauge UL Certified OFC tinned copper power wire, 30/40 amp transparent relay with LED light indicator, Plug-in relay wire harness featuring 12” heavy-duty OFC tinned copper wire leads, EZ Airtite 360 Sealant and 8 gauge 3/8″ ID copper lugs with a complimentary “Hammer Down Crimper Tool” and a Tube Cutter.
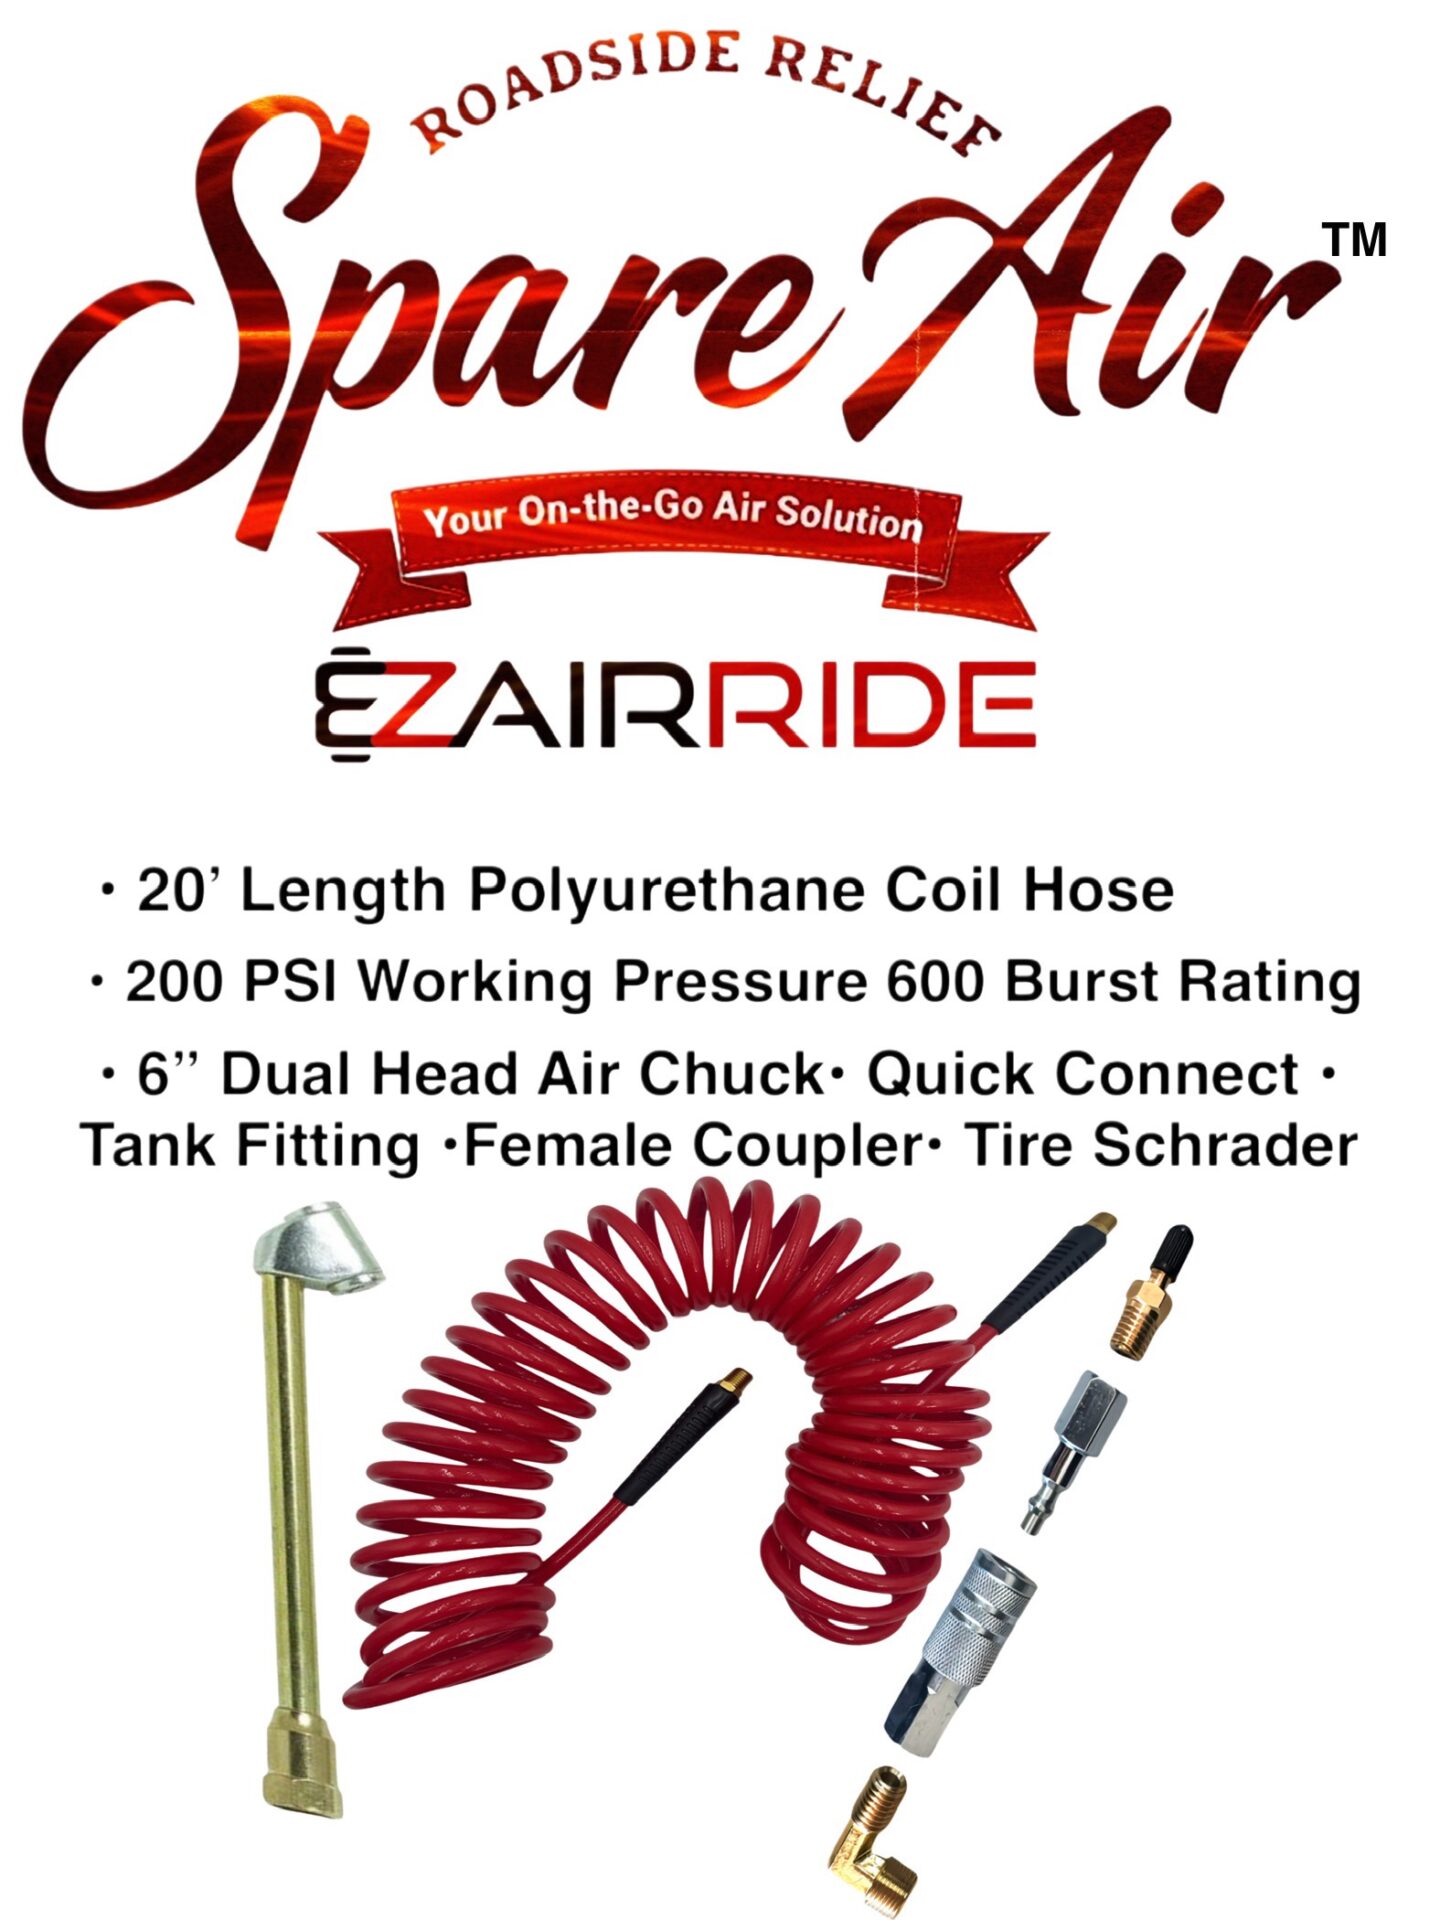
- SPARE AIR/ROADSIDE RELIEF KIT:™ Featuring our exclusive 20′ air coil hose which includes a 6” dual-head tire inflator, quick connect coupler, tank fitting and a tire Schrader.
- “THE MOST COMPREHENSIVE KITS ON THE MARKET!”
HERE’S A CLOSER LOOK AT THE ELITE PLUS KIT: Discover more below about the additional features and installation information that make it the perfect choice for your El Camino. The Elite Kit distinguishes itself with many key features that set it apart as the superior choice for enhancing your suspension with an AIRRIDE system.
THIS KIT INCLUDES OUR SLEEK HANDHELD SWITCH BOX WITH KEYED LOCKOUT: For effortless suspension adjustments, complimented by our exclusive Elite Digital air gauge panel w/ LED readout on all 4 corners and tank pressure for precise air pressure monitoring in the bags. Tailored for DIY enthusiasts, this kit removes the necessity for complicated components like levelers, sensors, computers, complex wiring and calibration. We refer to this straightforward control feature as “Driver Seat Calibration,” which allows you to make adjustments based solely on your visual assessment – much like monitoring your speed with a speedometer and controlling it with your gas pedal. The Elite gauge operates similarly: just press the rocker switch with your thumb to modify your vehicles height while observing the digital psi readout to reach your desired pressure and ride height. Enjoy effortless adjustability with just the touch of a switch!
THE ELITE PLUS DIGITAL GAUGE PANEL: Paired with our switch box, provides complete control over your vehicle’s suspension. Whether you need instant adjustability to cautiously back out of your driveway without dragging your headers or to tackle painful potholes on back roads, this system has you covered. Lay it low for the next car event or adjust it to your desired pressure for a more dynamic ride quality. You’ll feel like your driving a brand new car.
THE ELITE PLUS KIT IS A FOUR-CORNER CONTROL SYSTEM: Often referred to as FBSS (front, back, side, side). While it may seem like a flashy addition intended for show, it’s essential to understand that this system goes beyond merely impressing onlookers at stoplights by bouncing side to side (stoplight shenanigans). It serves a more practical purpose: Precise four-corner control is vital for enhancing stability at each corner of your classic vehicle while minimizing body roll. Whether you’re accelerating up a freeway on-ramp at 60 mph, navigating painful potholes on a backcountry road, or accommodating extra passenger weight, having refined corner control is crucial for achieving optimal performance and combating the dreaded “Chevy Leans.”
AND IF YOU’RE CURIOUS ABOUT THE LIFT SPEED: You can count on our Elite kits to respond smoothly, getting you up in less time than it takes to say “one thousand one!” The lift speed is so buttery smooth that it won’t jolt you out of your seat, or rattle your fillings; in fact, if you had a cup of coffee in your lap with no lid, it wouldn’t stir a ripple.
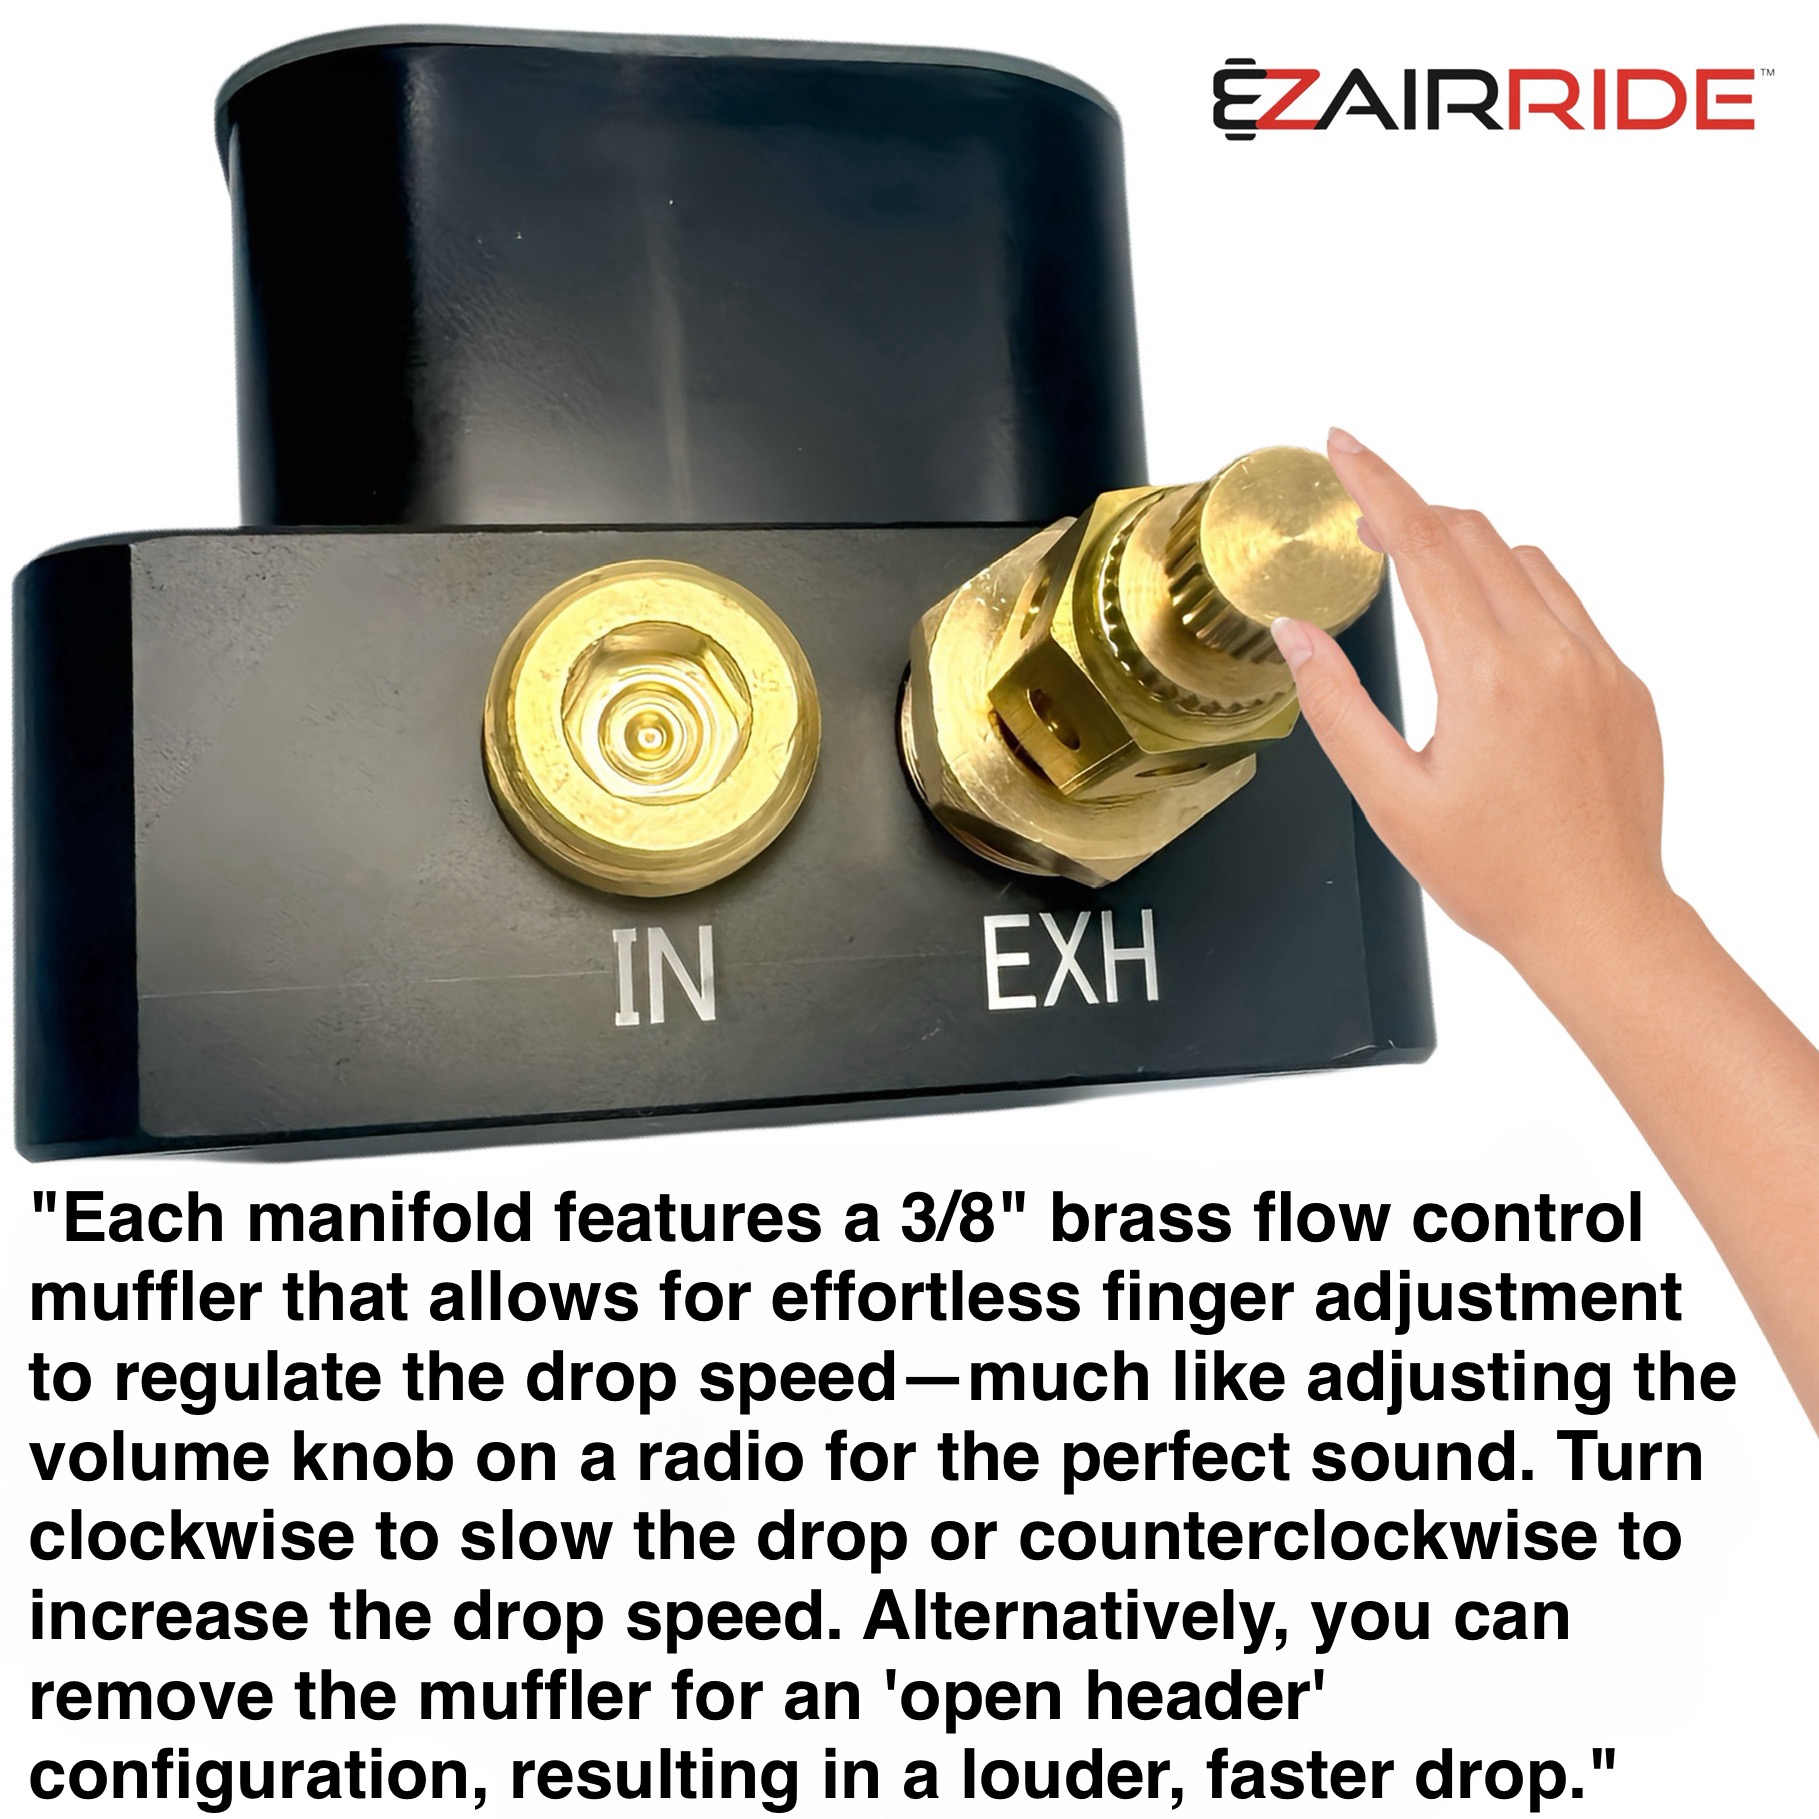
WHILE MANY OF US CRUISE OUR CLASSICS WITH YOUR FAVORITE CO-PILOT OR THE LITTLE ONES: Who will undoubtedly want to take charge of the switch box because it’s just fun!—the enjoyment can fade quickly if they hold down the drop button for too long. This can cause the front end to drop abruptly, resulting in the chassis thudding against the pavement. But there’s no need to worry—your pipes and oil pan are well protected! Our Elite manifolds feature EZ-flow brass slow-down exhaust mufflers, allowing you to effortlessly adjust the drop speed with a simple twist, just like turning down the volume on your stereo. Dial in your drop speed with ease, and enjoy smooth, controlled adjustments!
WHAT’S INCLUDED: Introducing our exclusive EZ AIRRIDE™ airbags & brackets, specially designed for all 1958-1964 X Frame Cars, Wagons & El Caminos. Our 2500 series airbags offer more stroke than traditional 2500 series airbags, compressing down to 2.8 inches and extending to 10.5 inches, providing useable stroke of nearly 8 inches. This increased stroke results in lower pressure within the bags, ultimately delivering a more dynamic ride quality. Whether you’re planning an LS swap, have a 454 big block engine, or want to fit 20″ rims on your ride, our airbags can handle it all. Each 2500 series airbag has a max load rating of 2,096 lbs. @ 100 psi. Whether you’re laying it on the lawn at a car show, preventing your pipes or oil pan from scraping along the driveway, or scrubbing the tires on turns due to extra passenger weight, the Elite Kit ensures optimal clearance and performance.
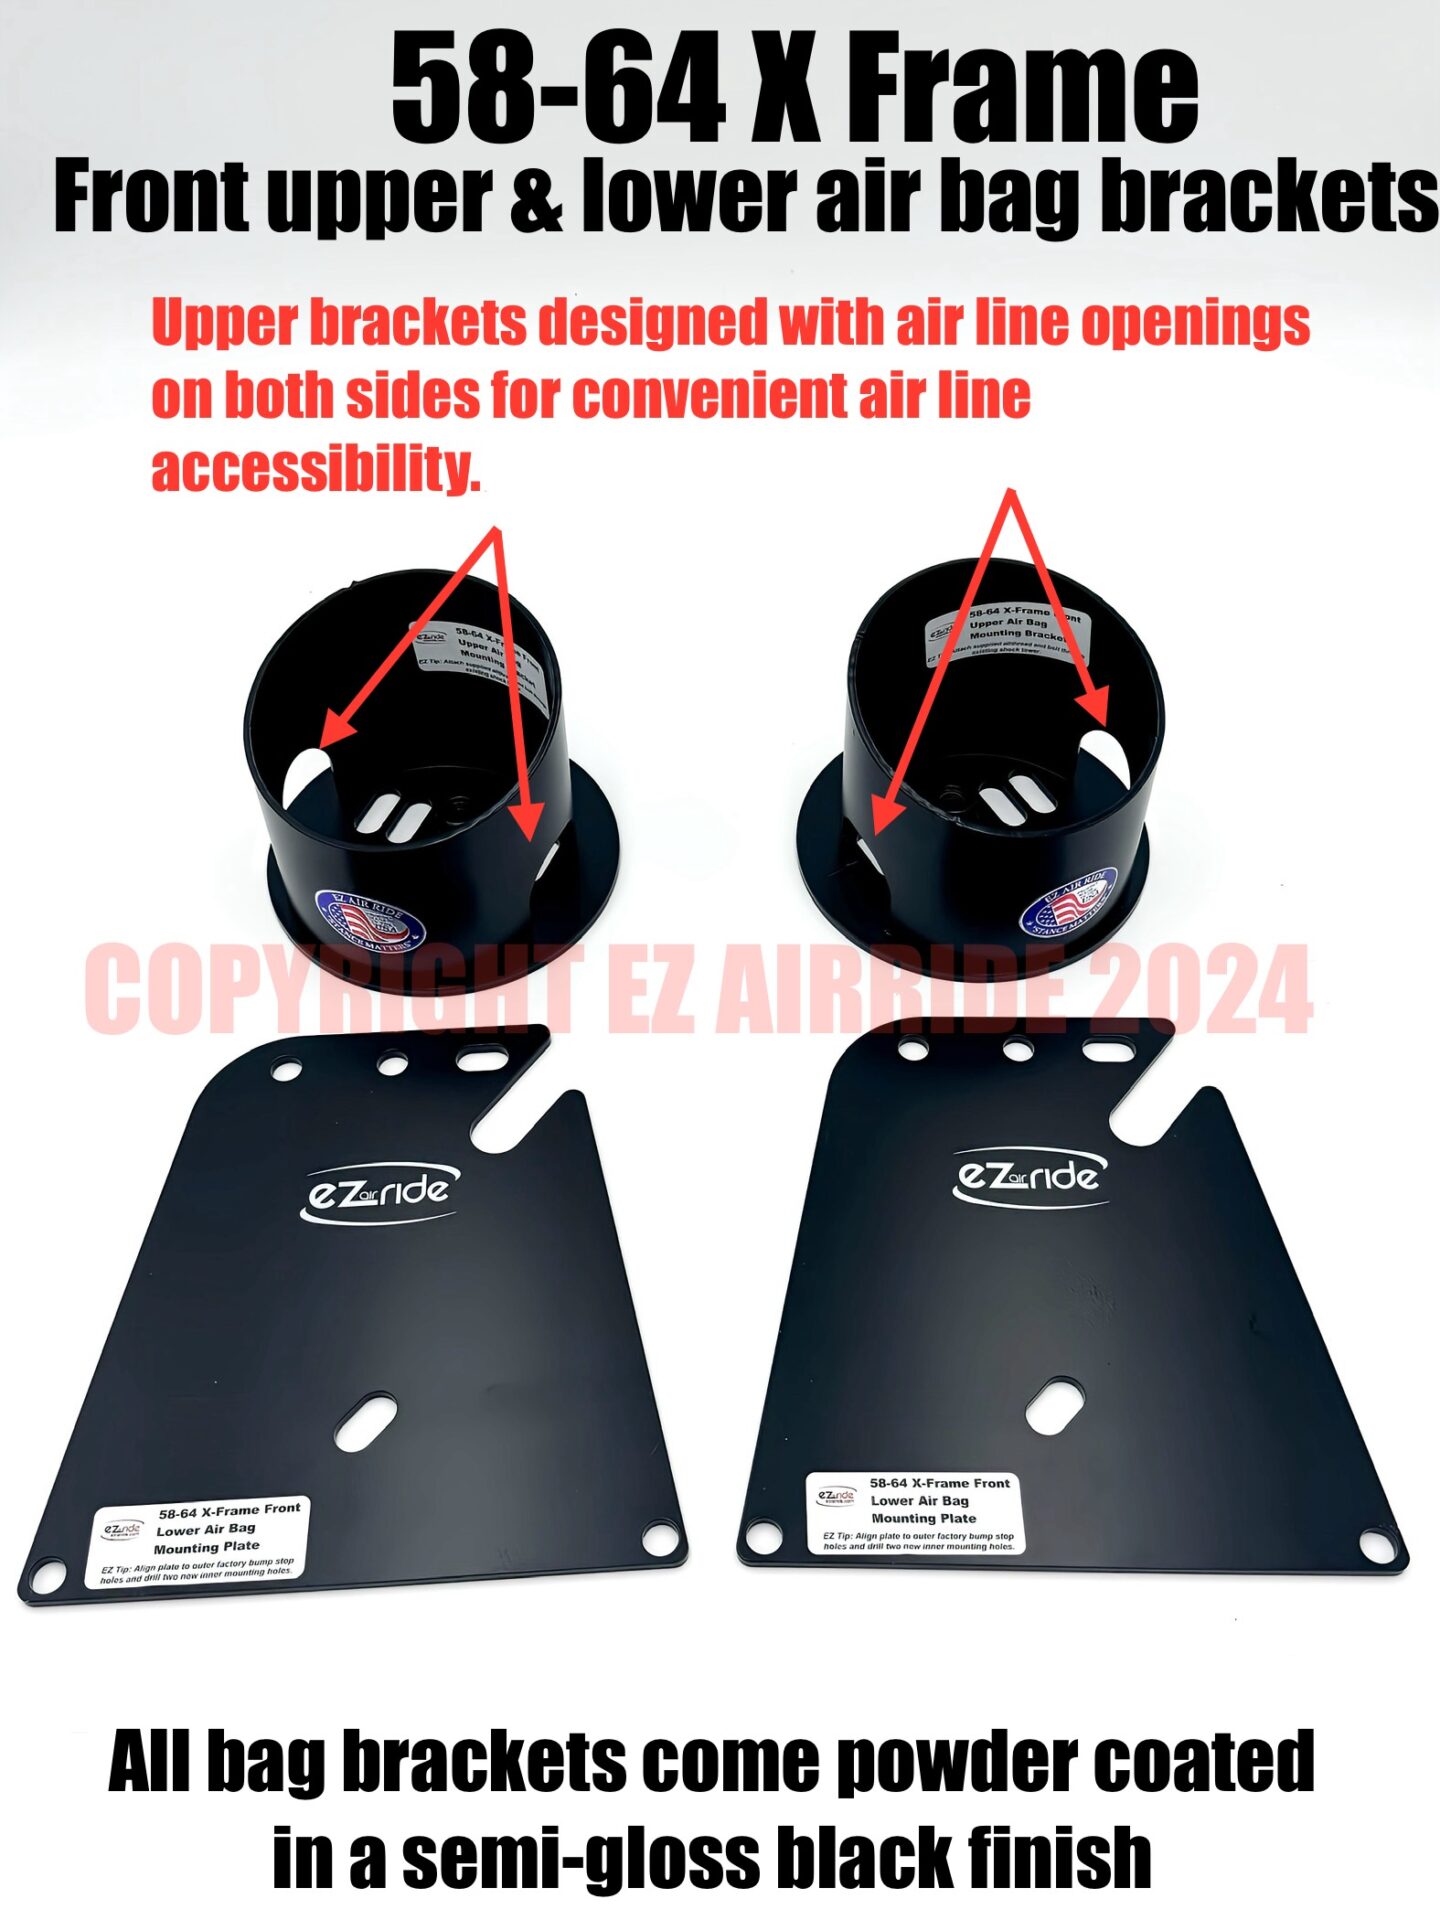
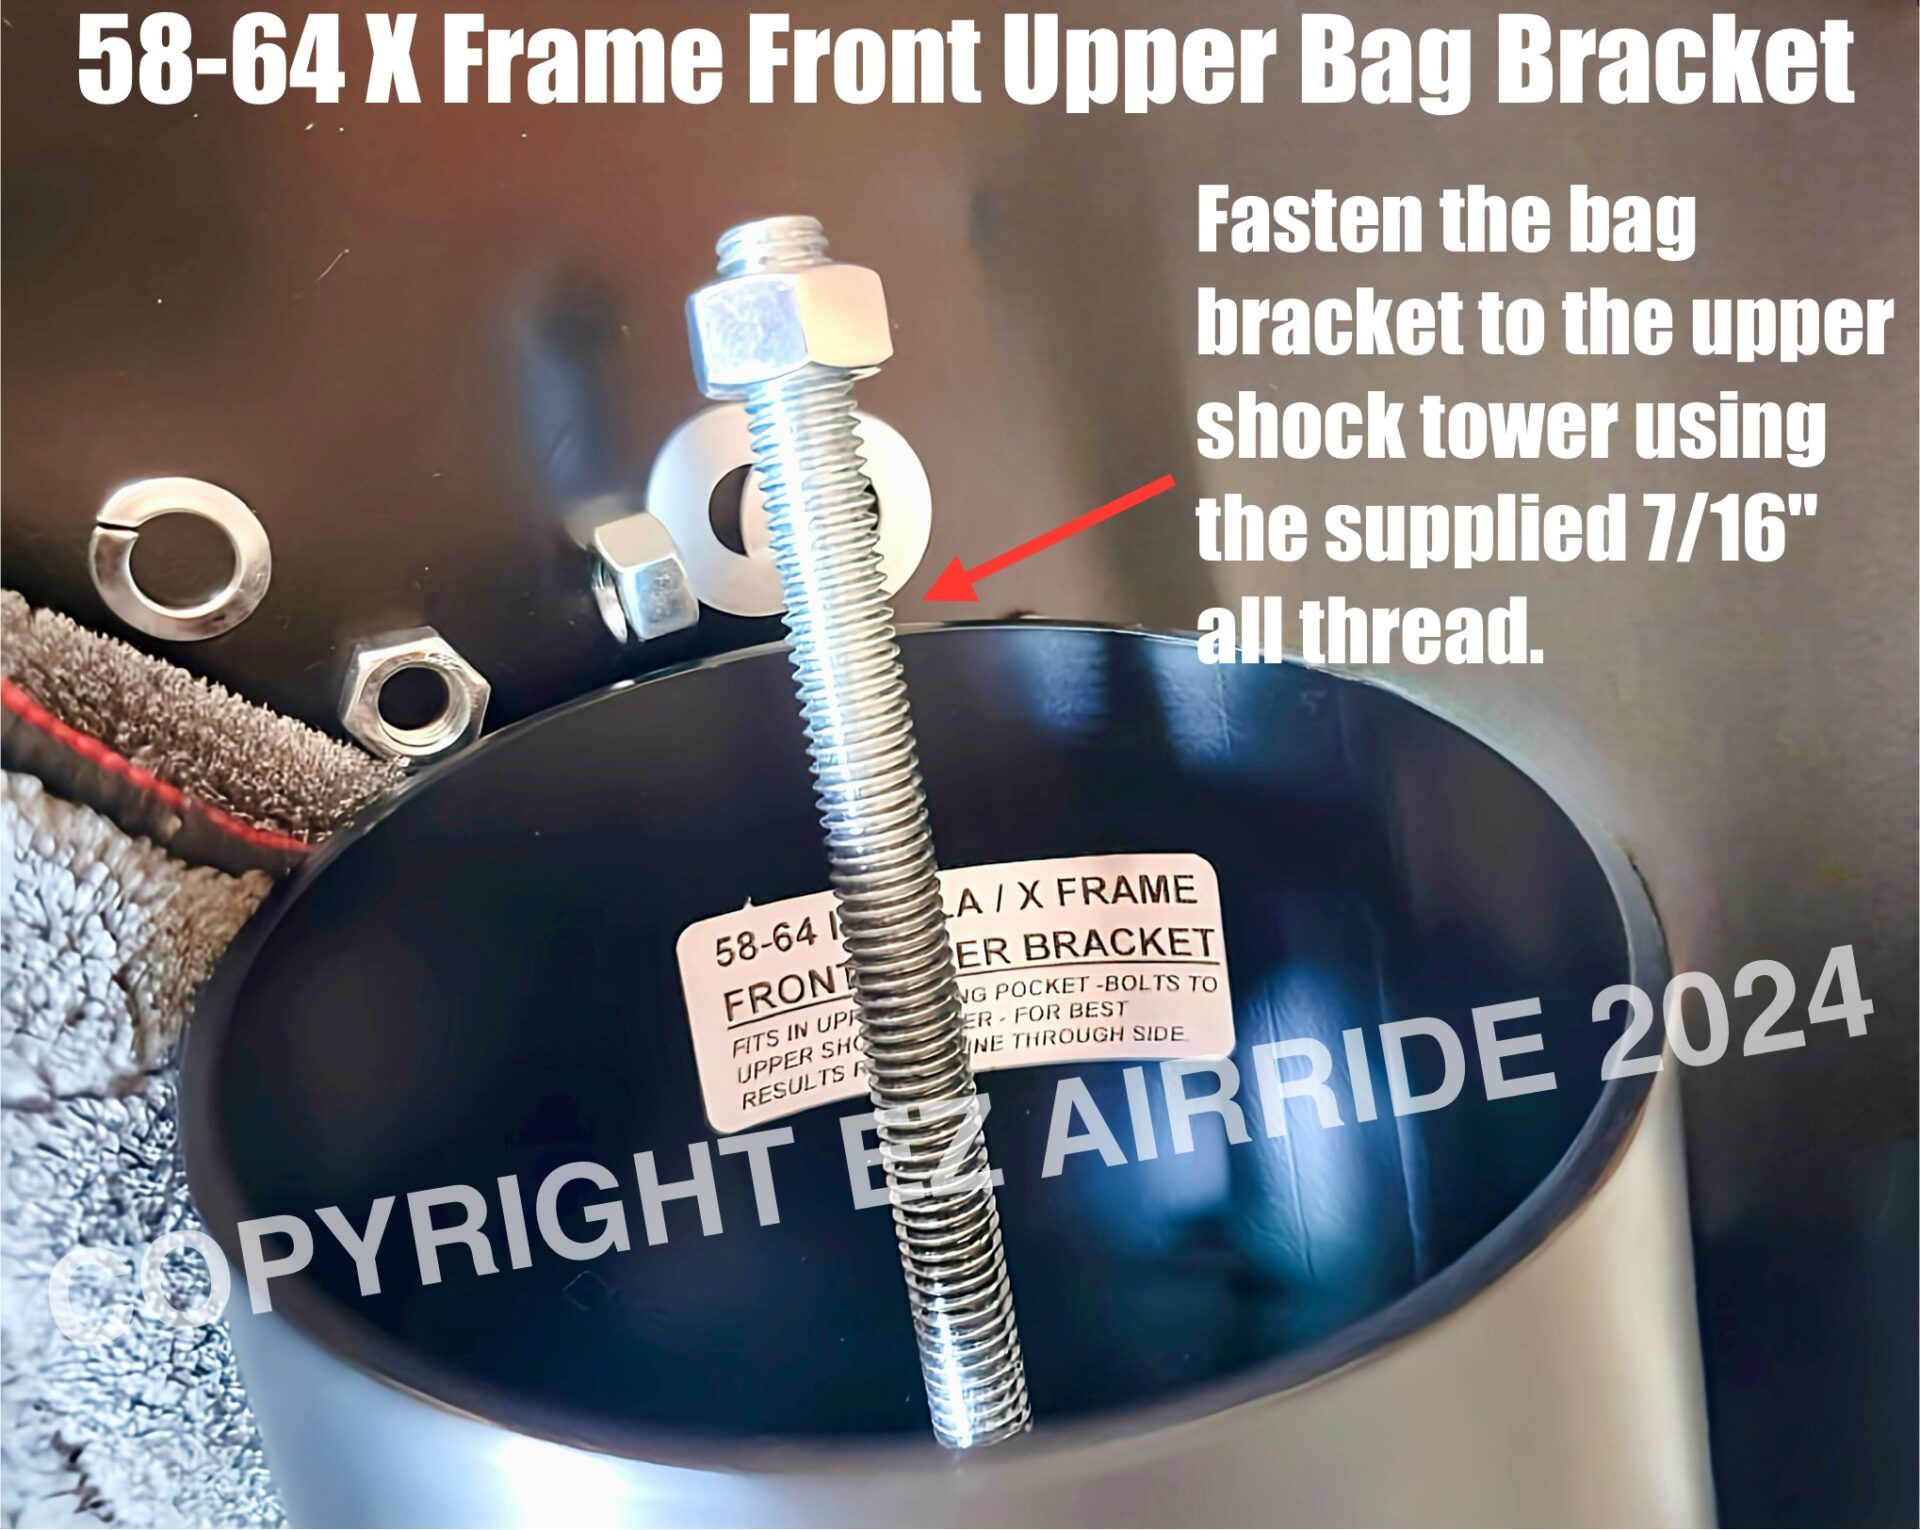
EASE OF INSTALLATION OF THE BAGS & BRACKETS: Simplify your air ride installation with our 1958-1964 X Frame brackets – the easiest setup you’ll find. Our airbag brackets feature powder-coated finishes to enhance durability and provide added protection. All necessary airbag/bracket hardware, including nuts, bolts, washers and the required 7/16″ all-thread is included. No need to break out the heavy-duty tools-just grab your socket set and drill and you’ll be good to go.
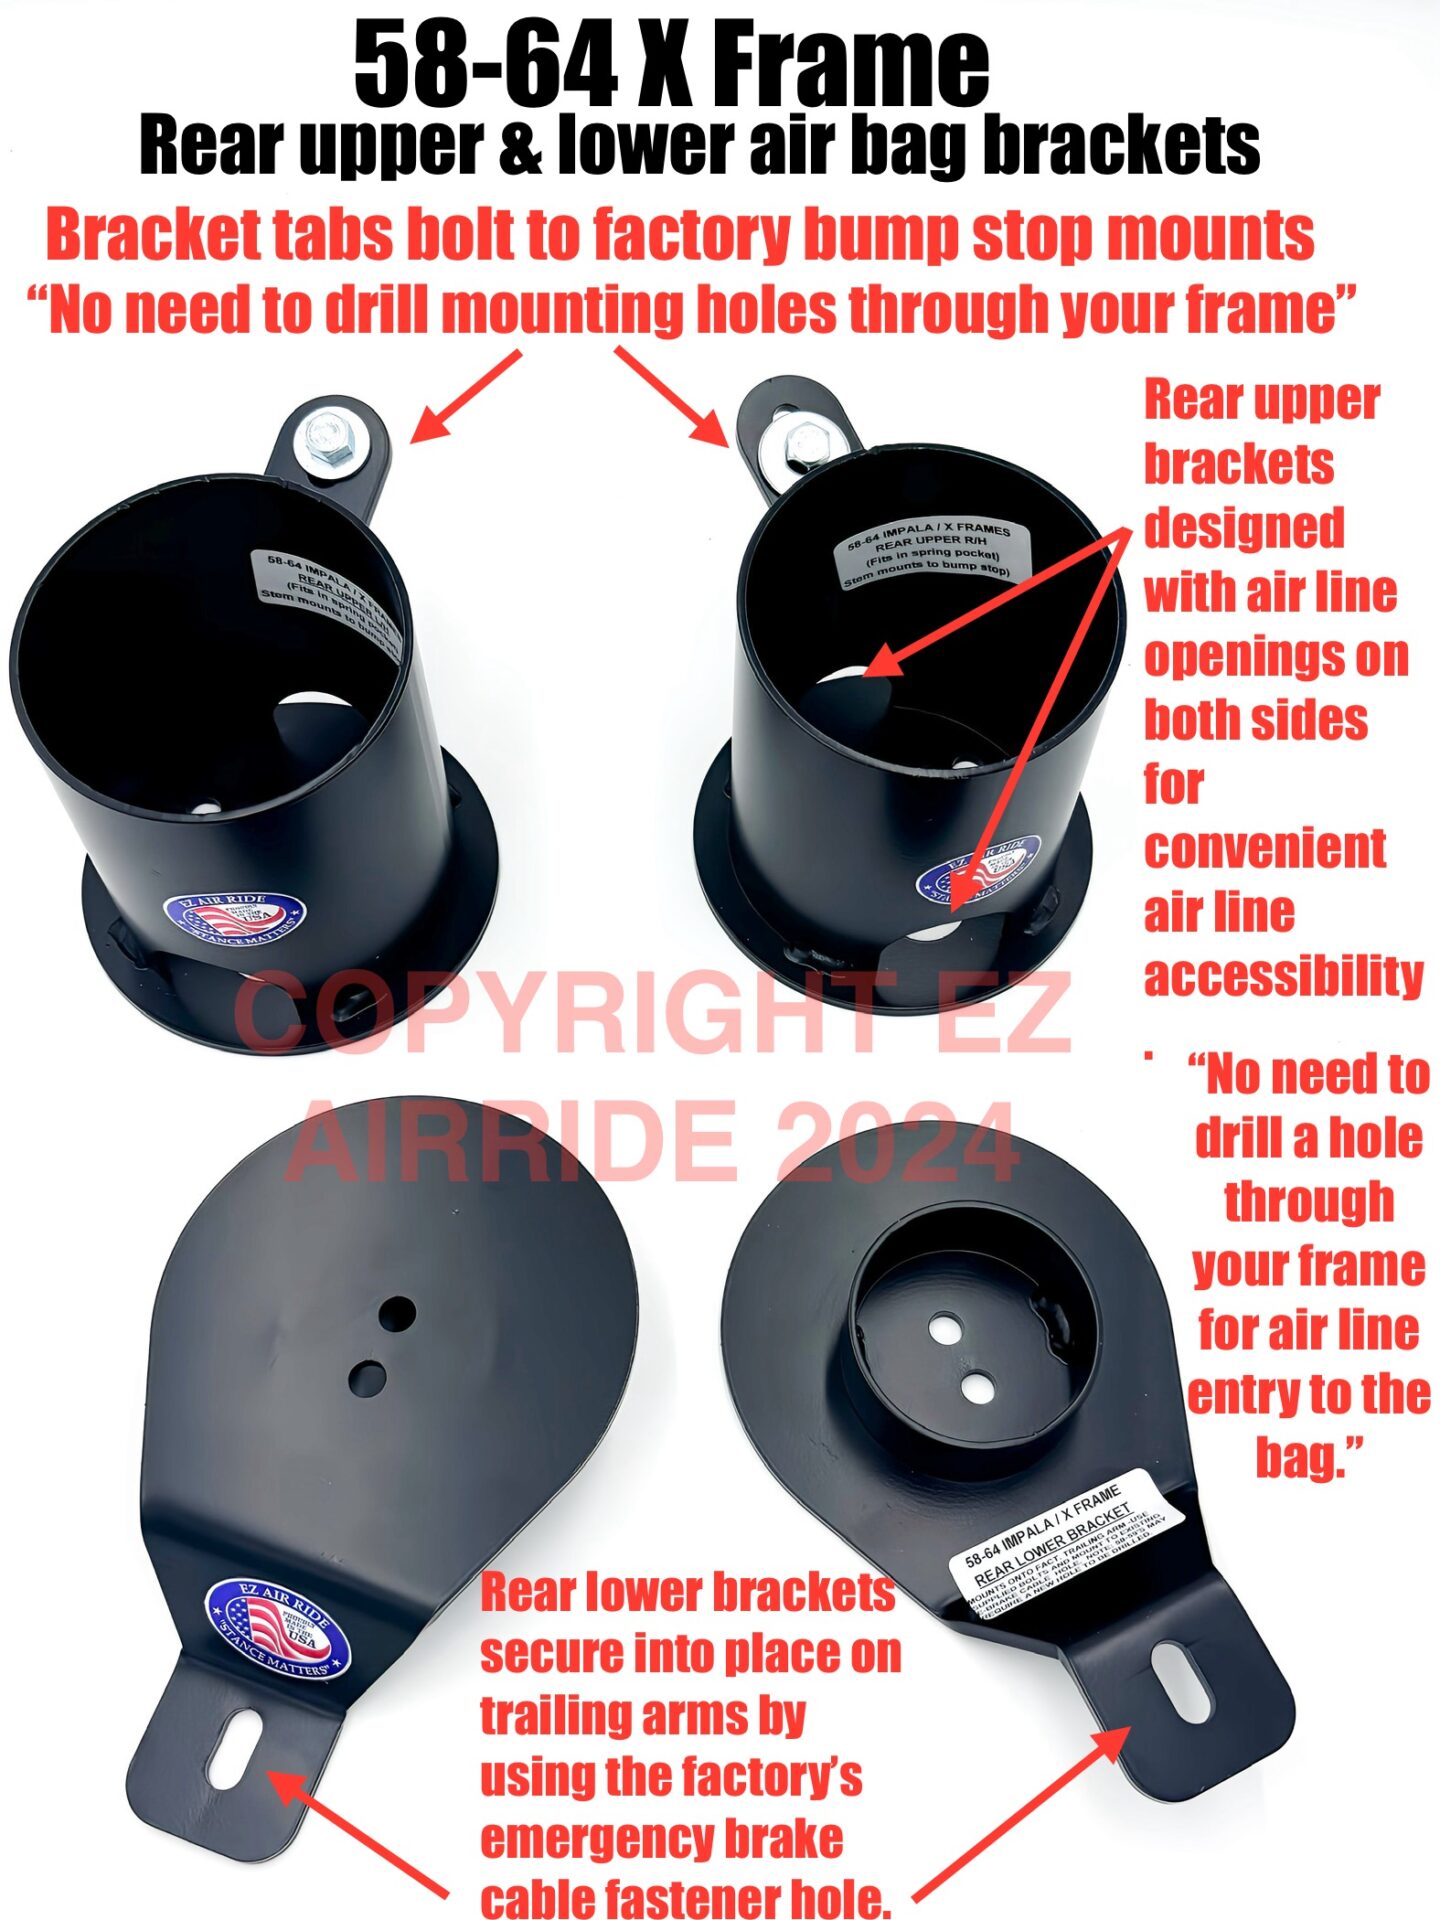
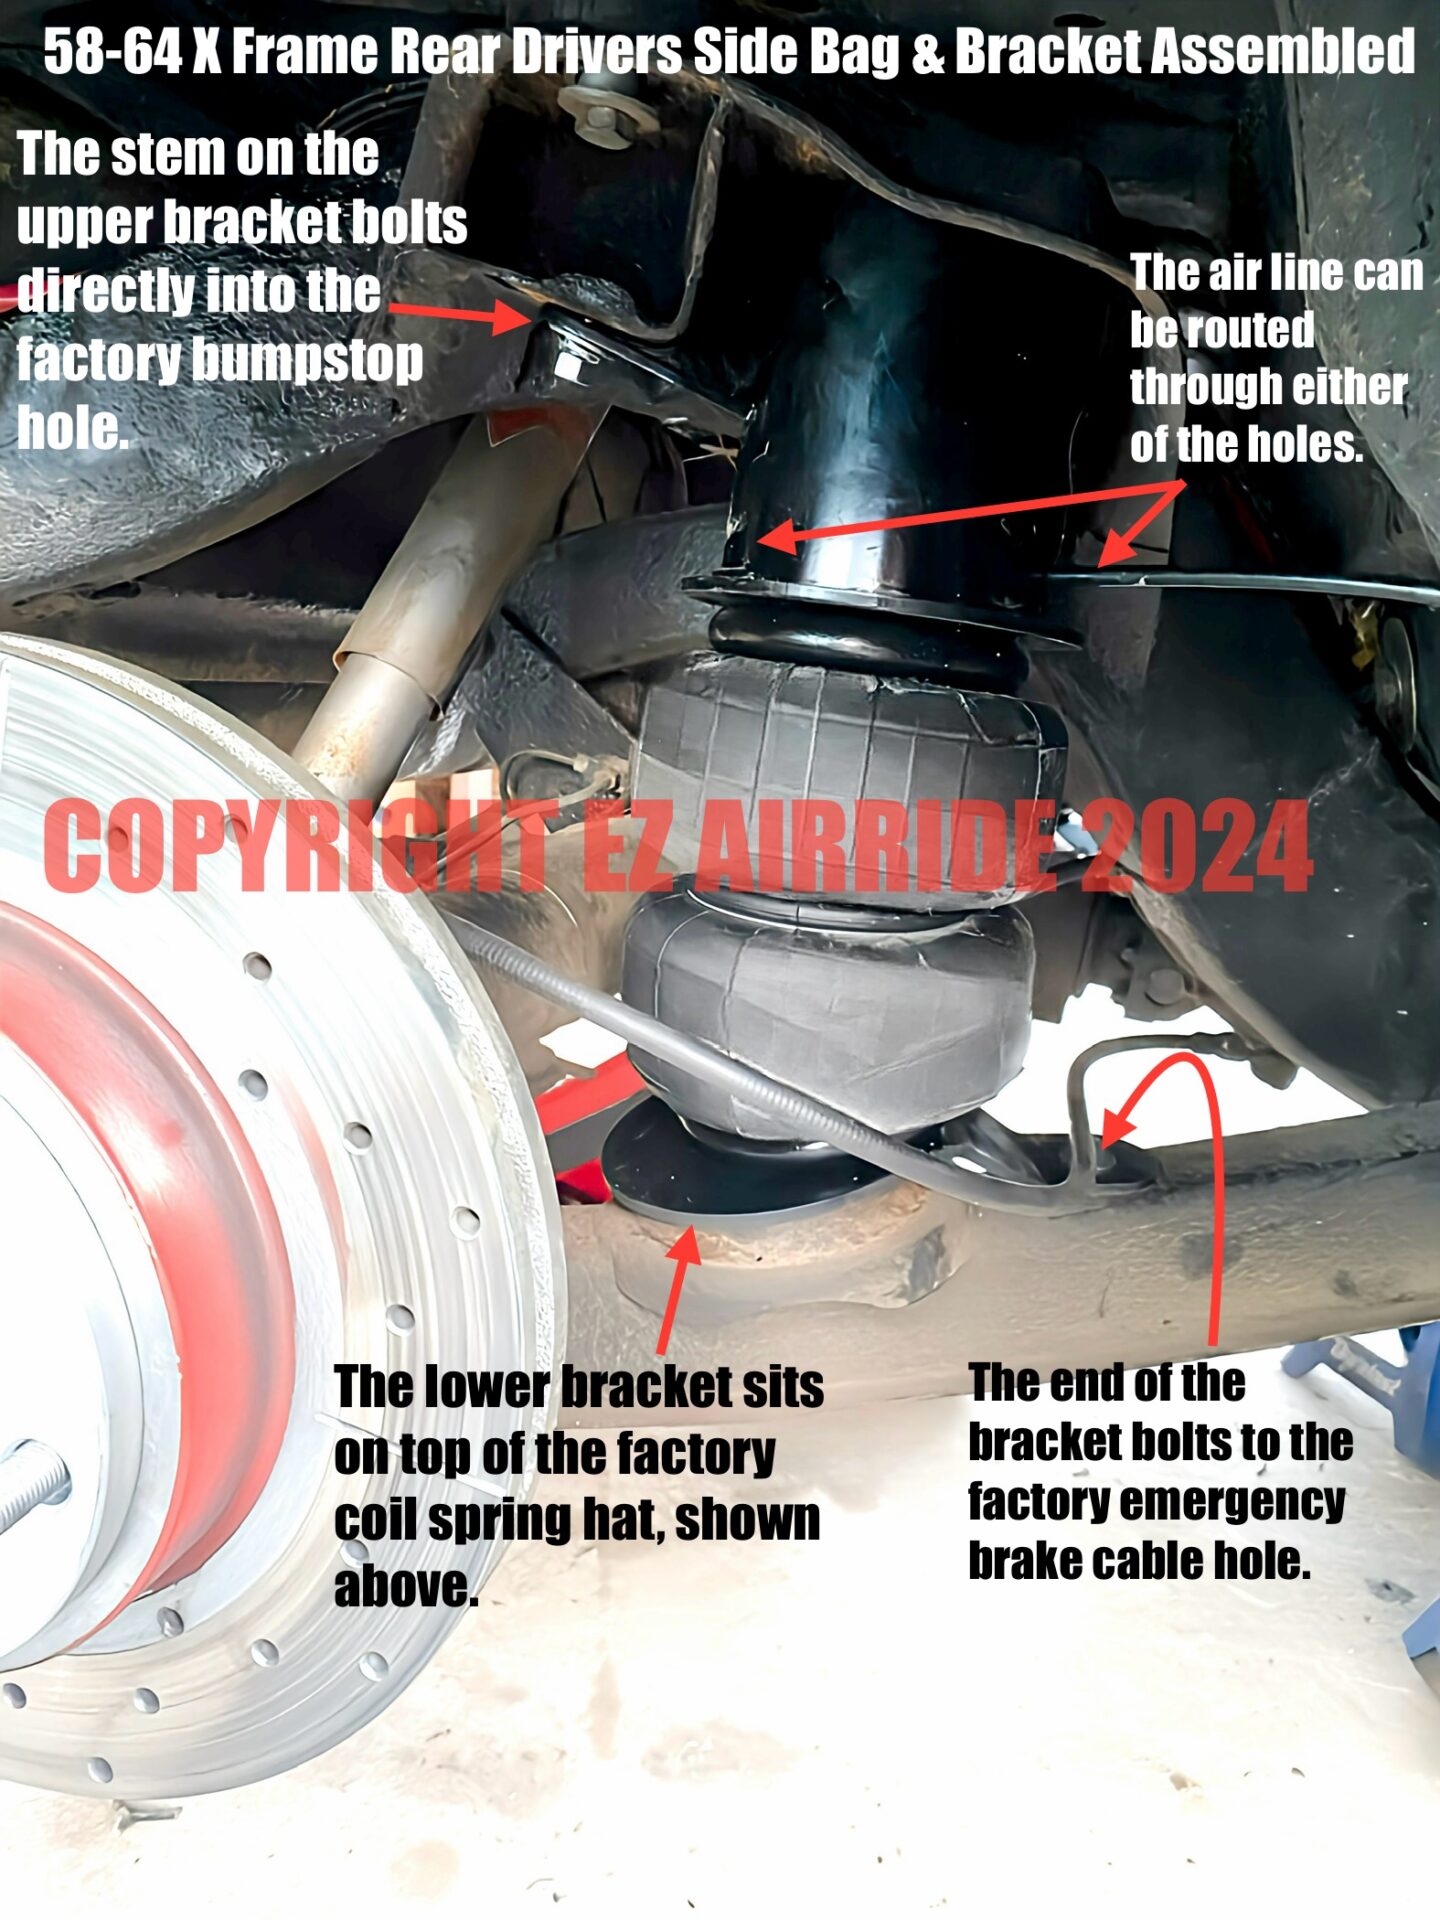
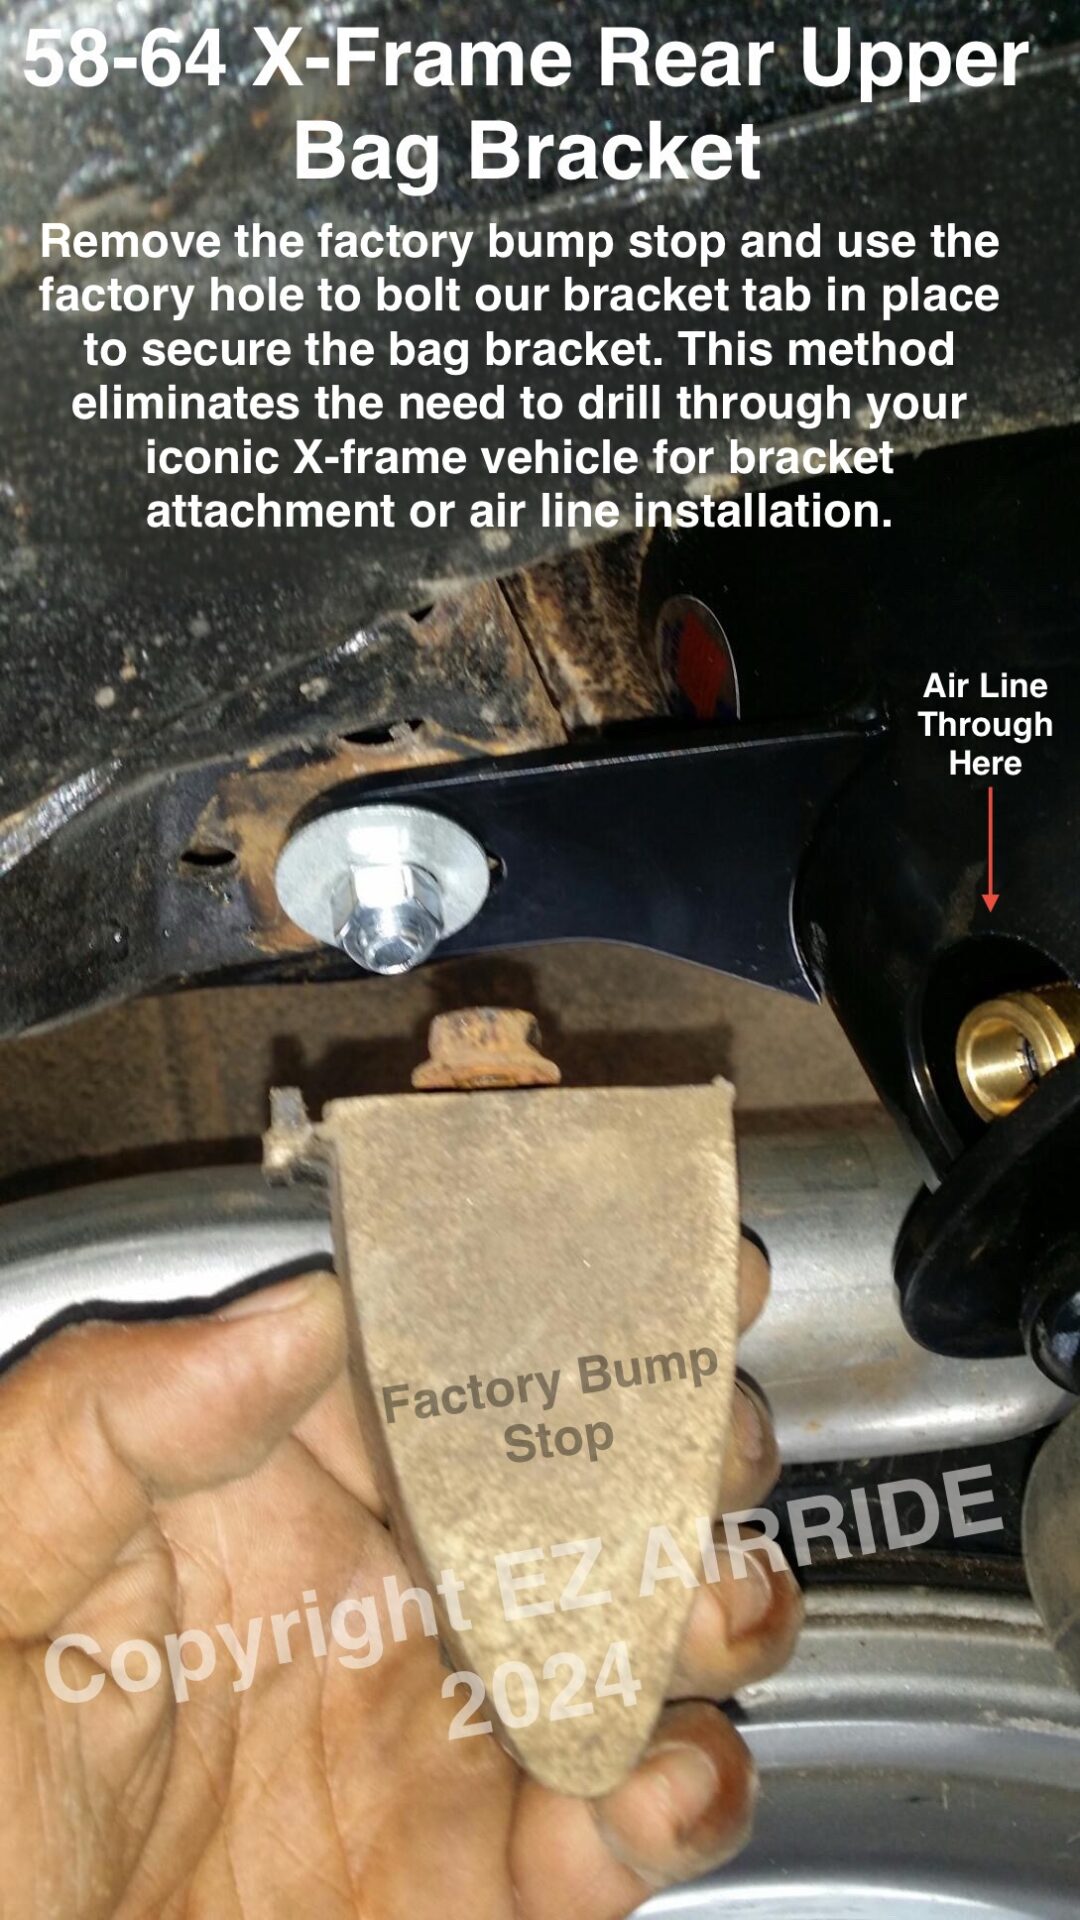
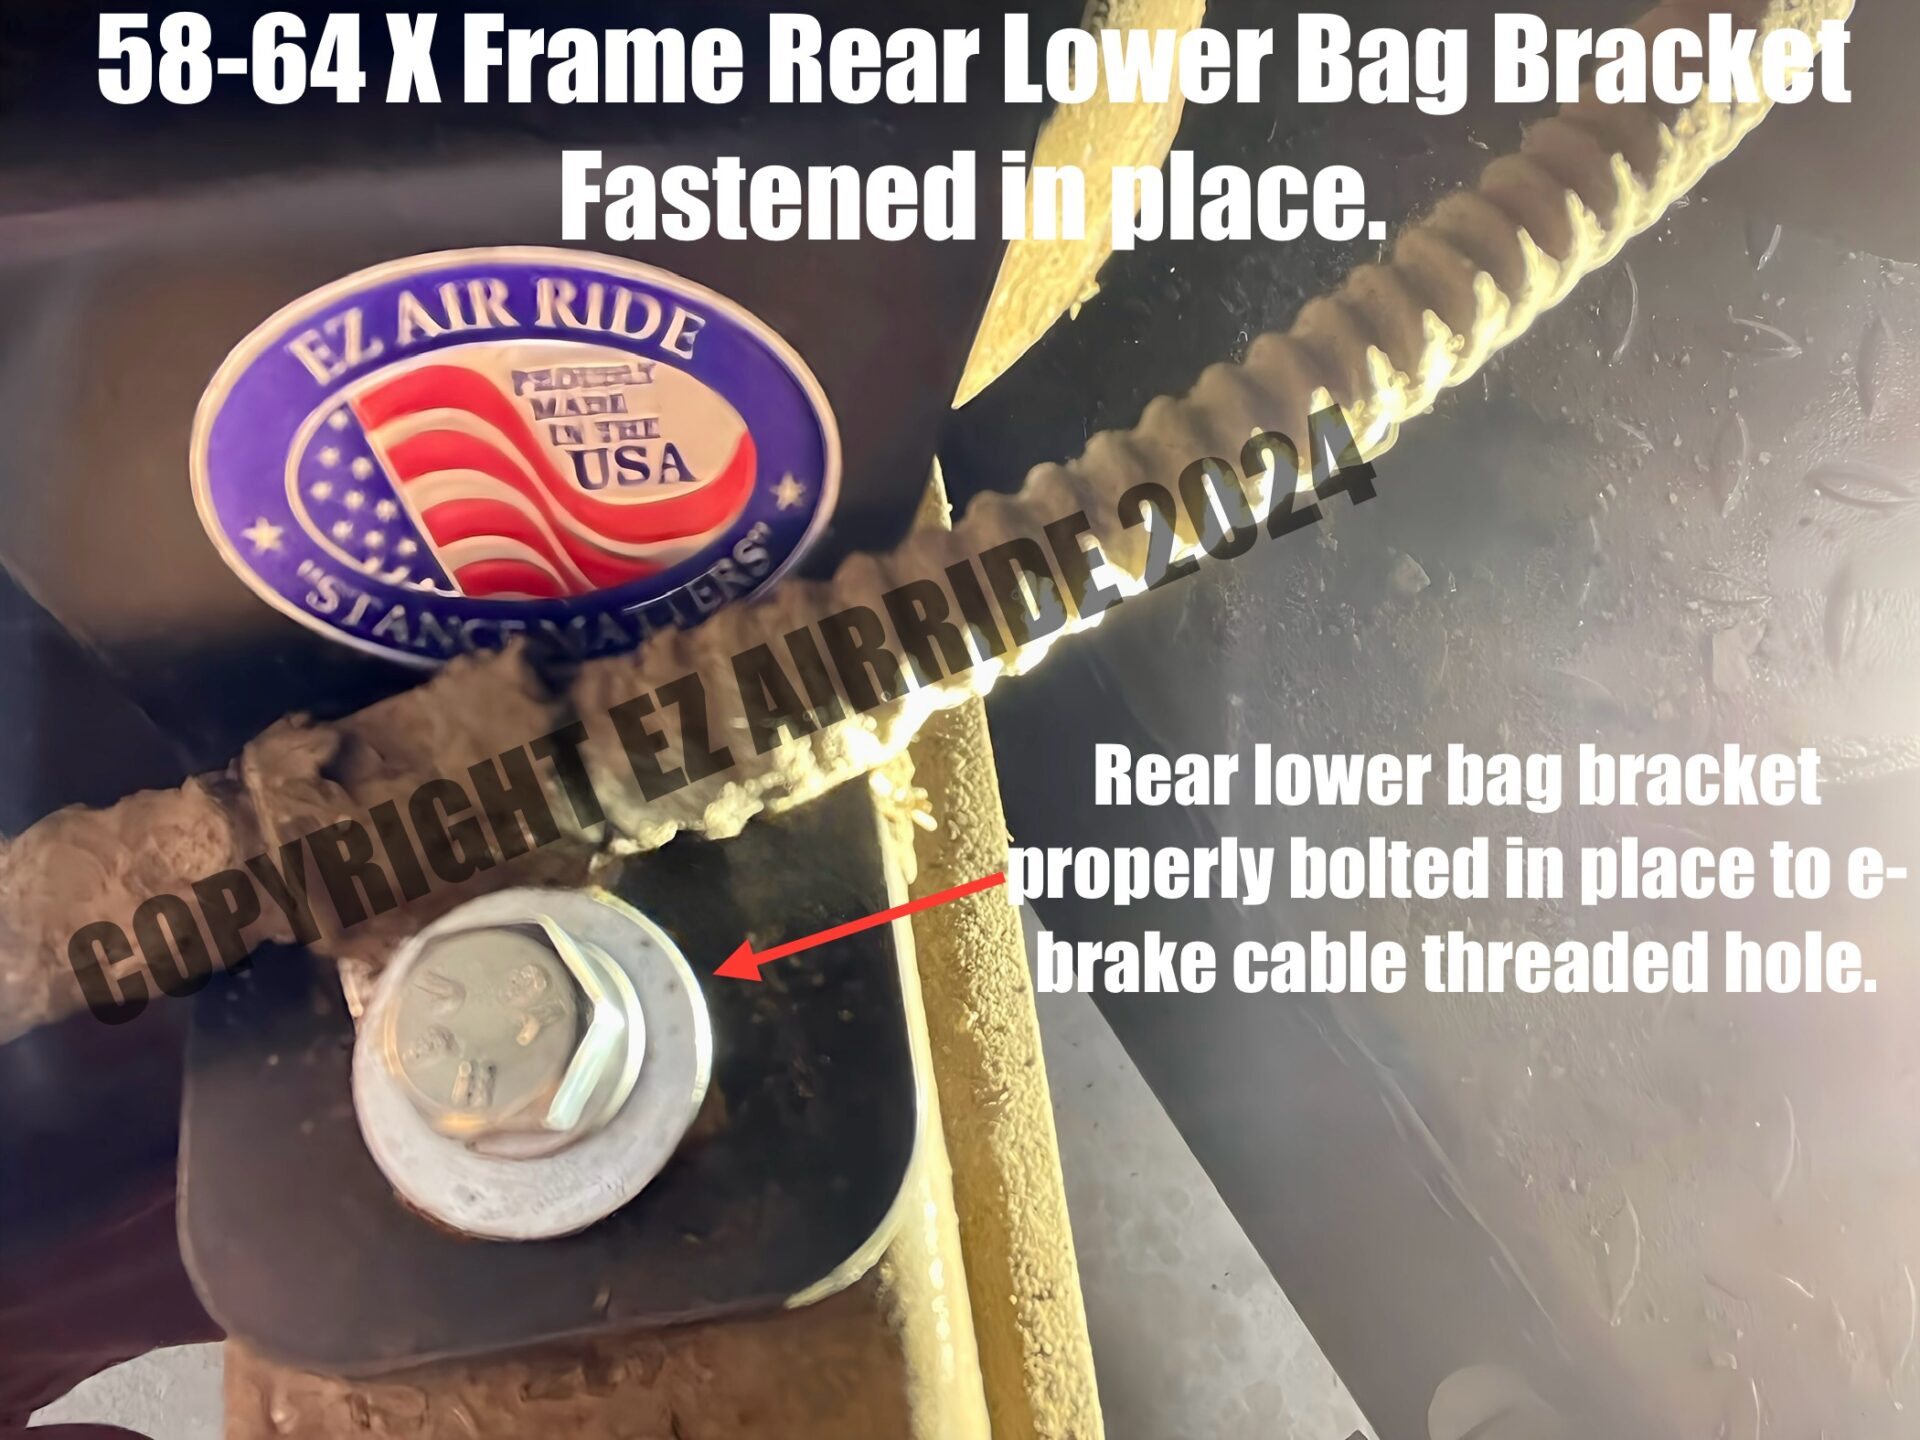
STARTING WITH THE REAR: Simply attach the lower bag bracket to your trailing arm and secure it to the factory e-brake hole. The upper bag bracket is just as straightforward; just attach it to the frame and secure the outer stem of the bag bracket to the factory bump stop using the supplied bolts – no drilling necessary. We’ve also simplified the process of running the air line by incorporating precision-cut mouse holes into the upper bag brackets. This design enables you to easily route the air line through the bag bracket itself, eliminating the need to drill additional holes in the frame for air line passage.
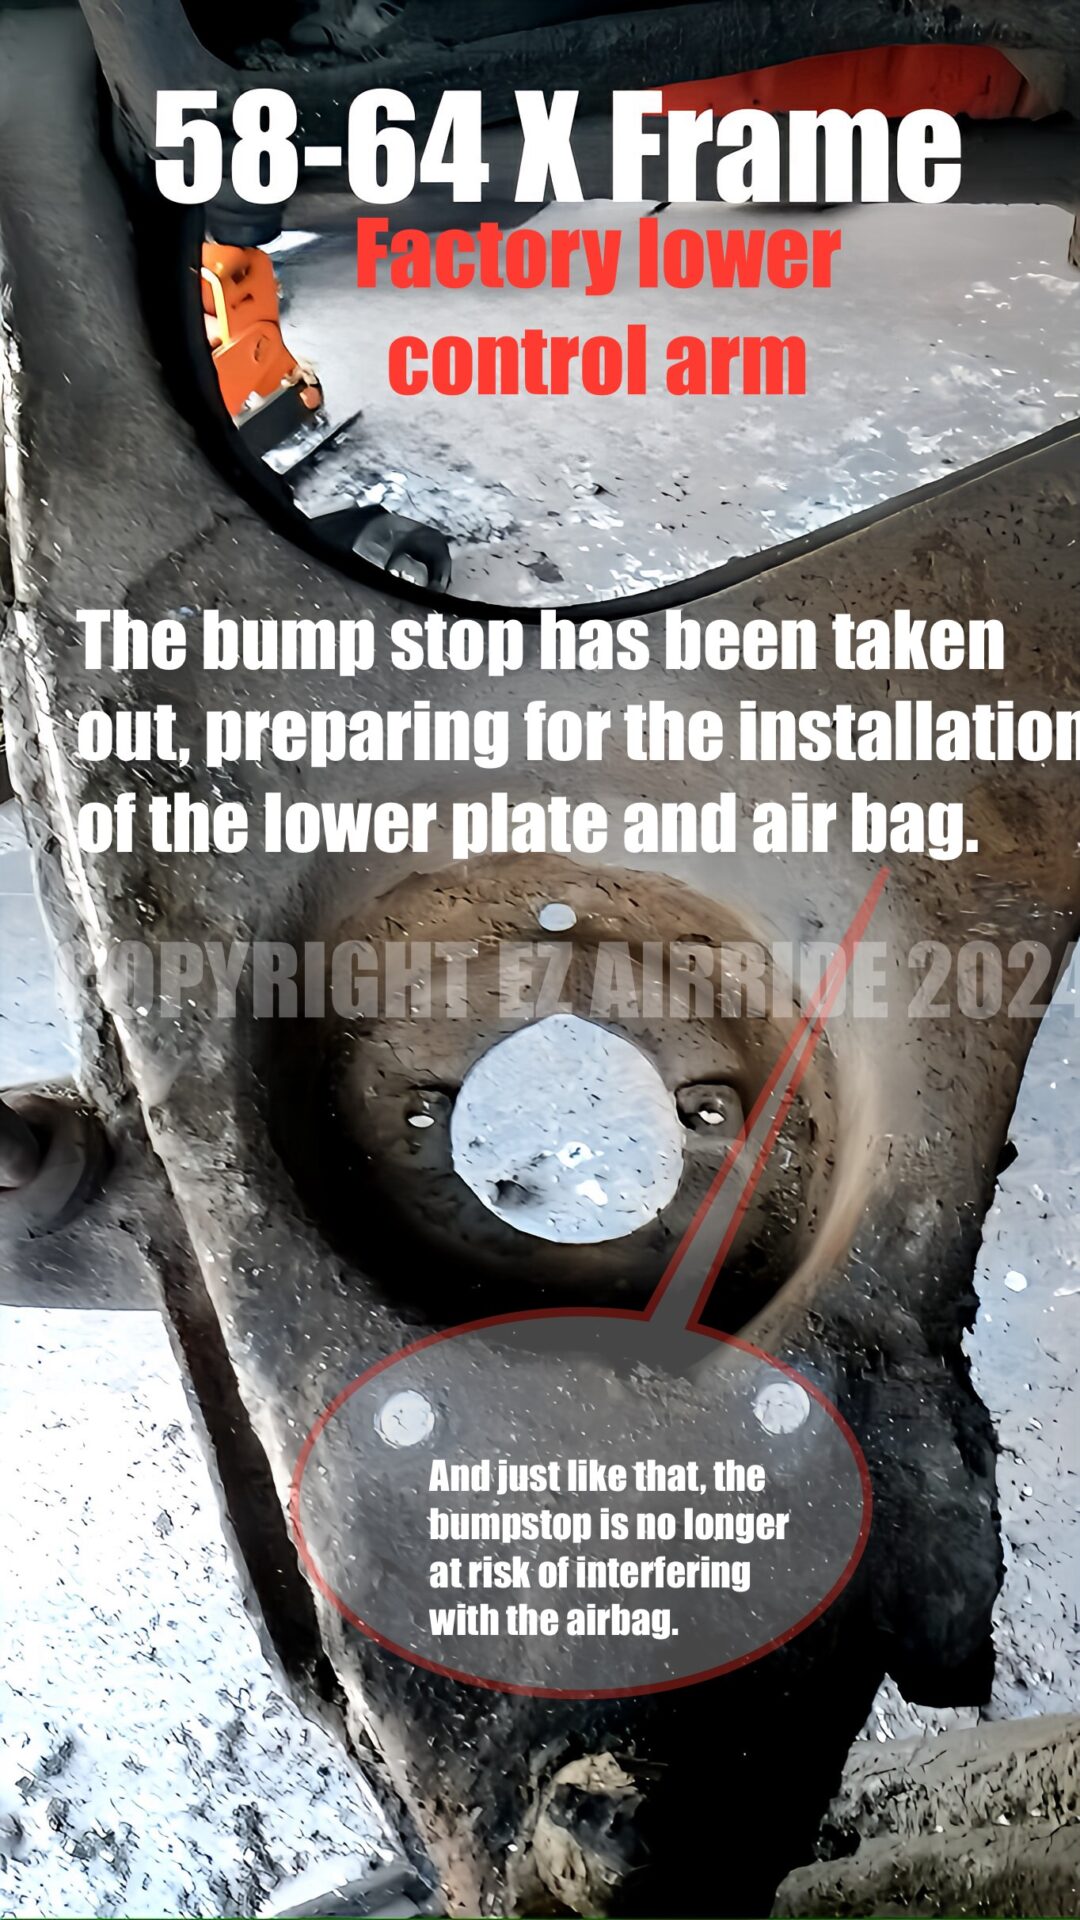
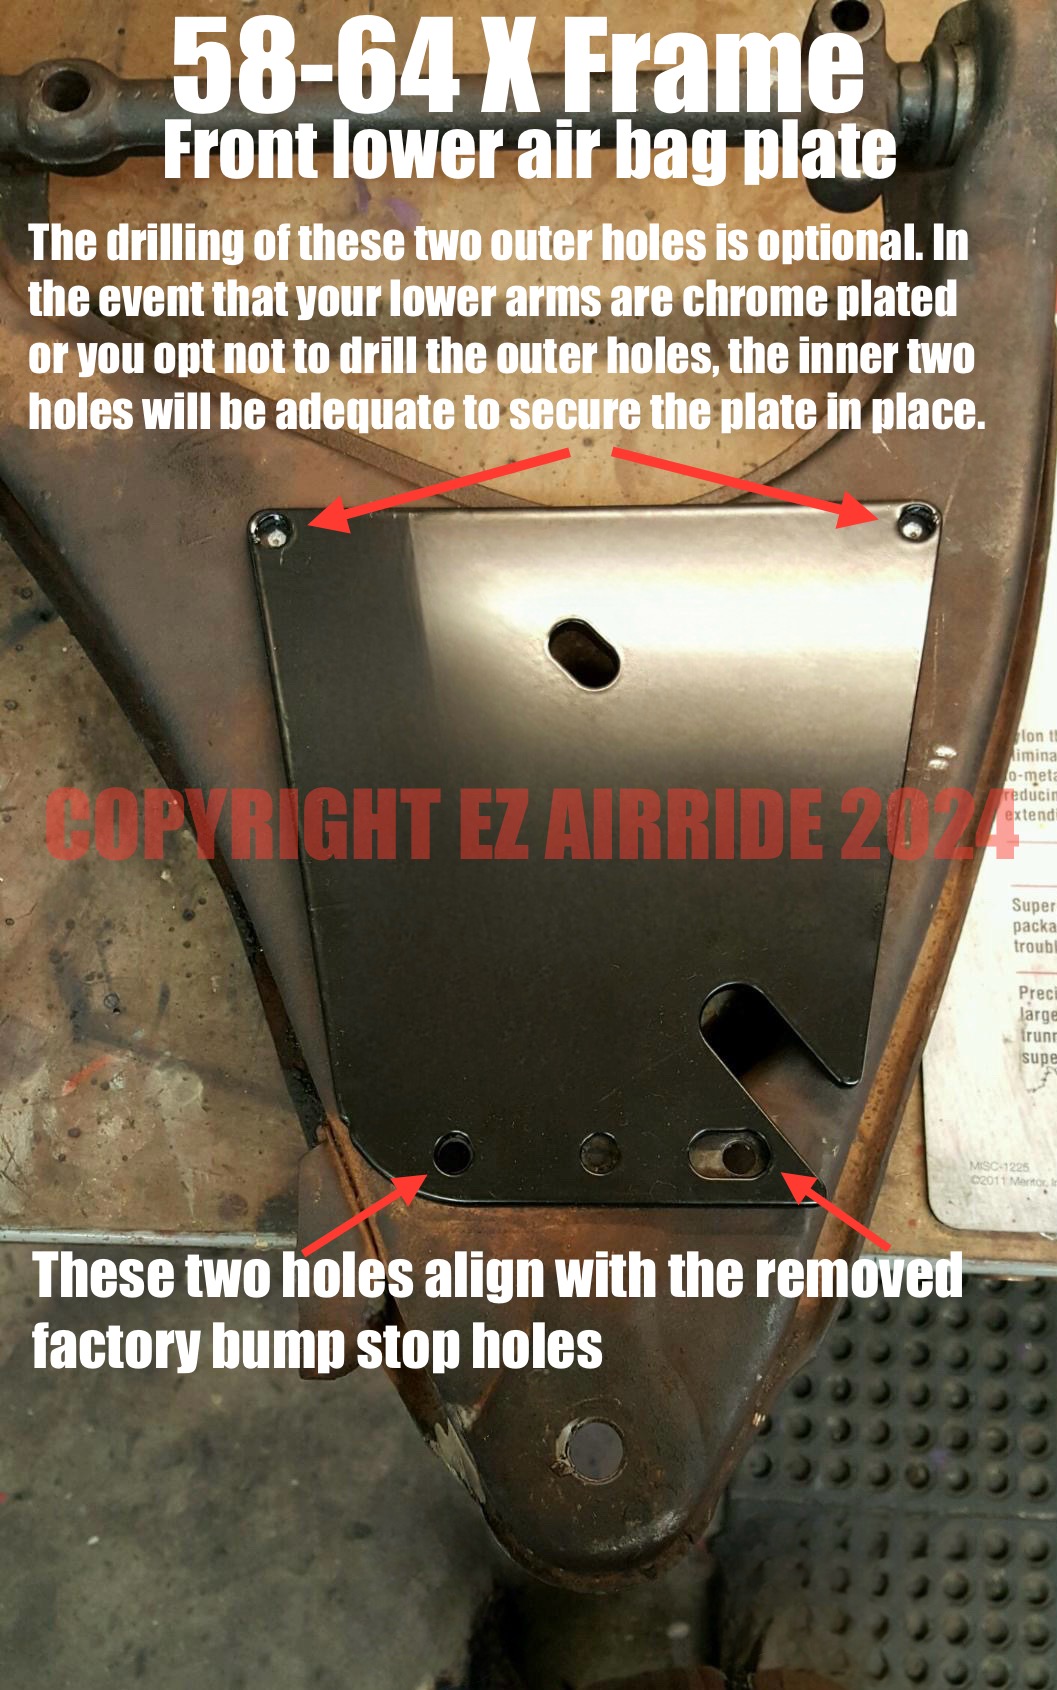
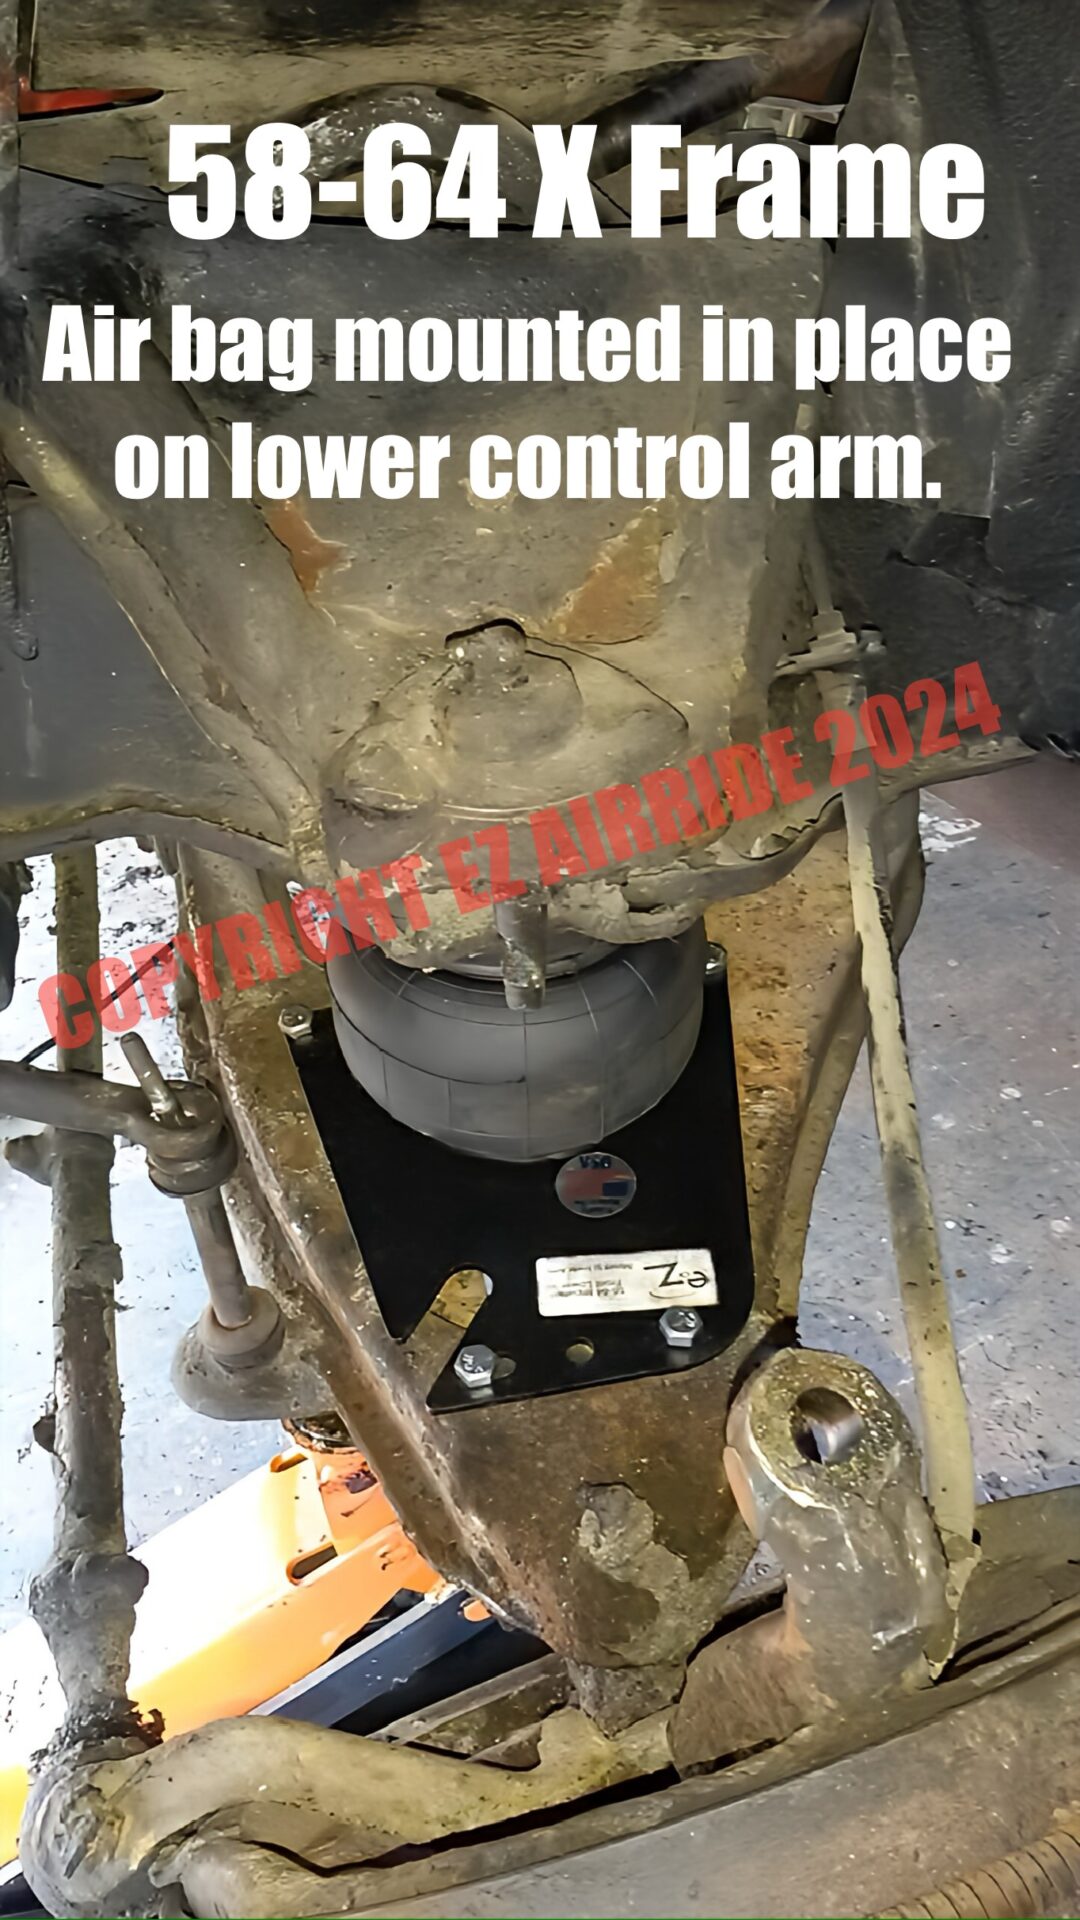
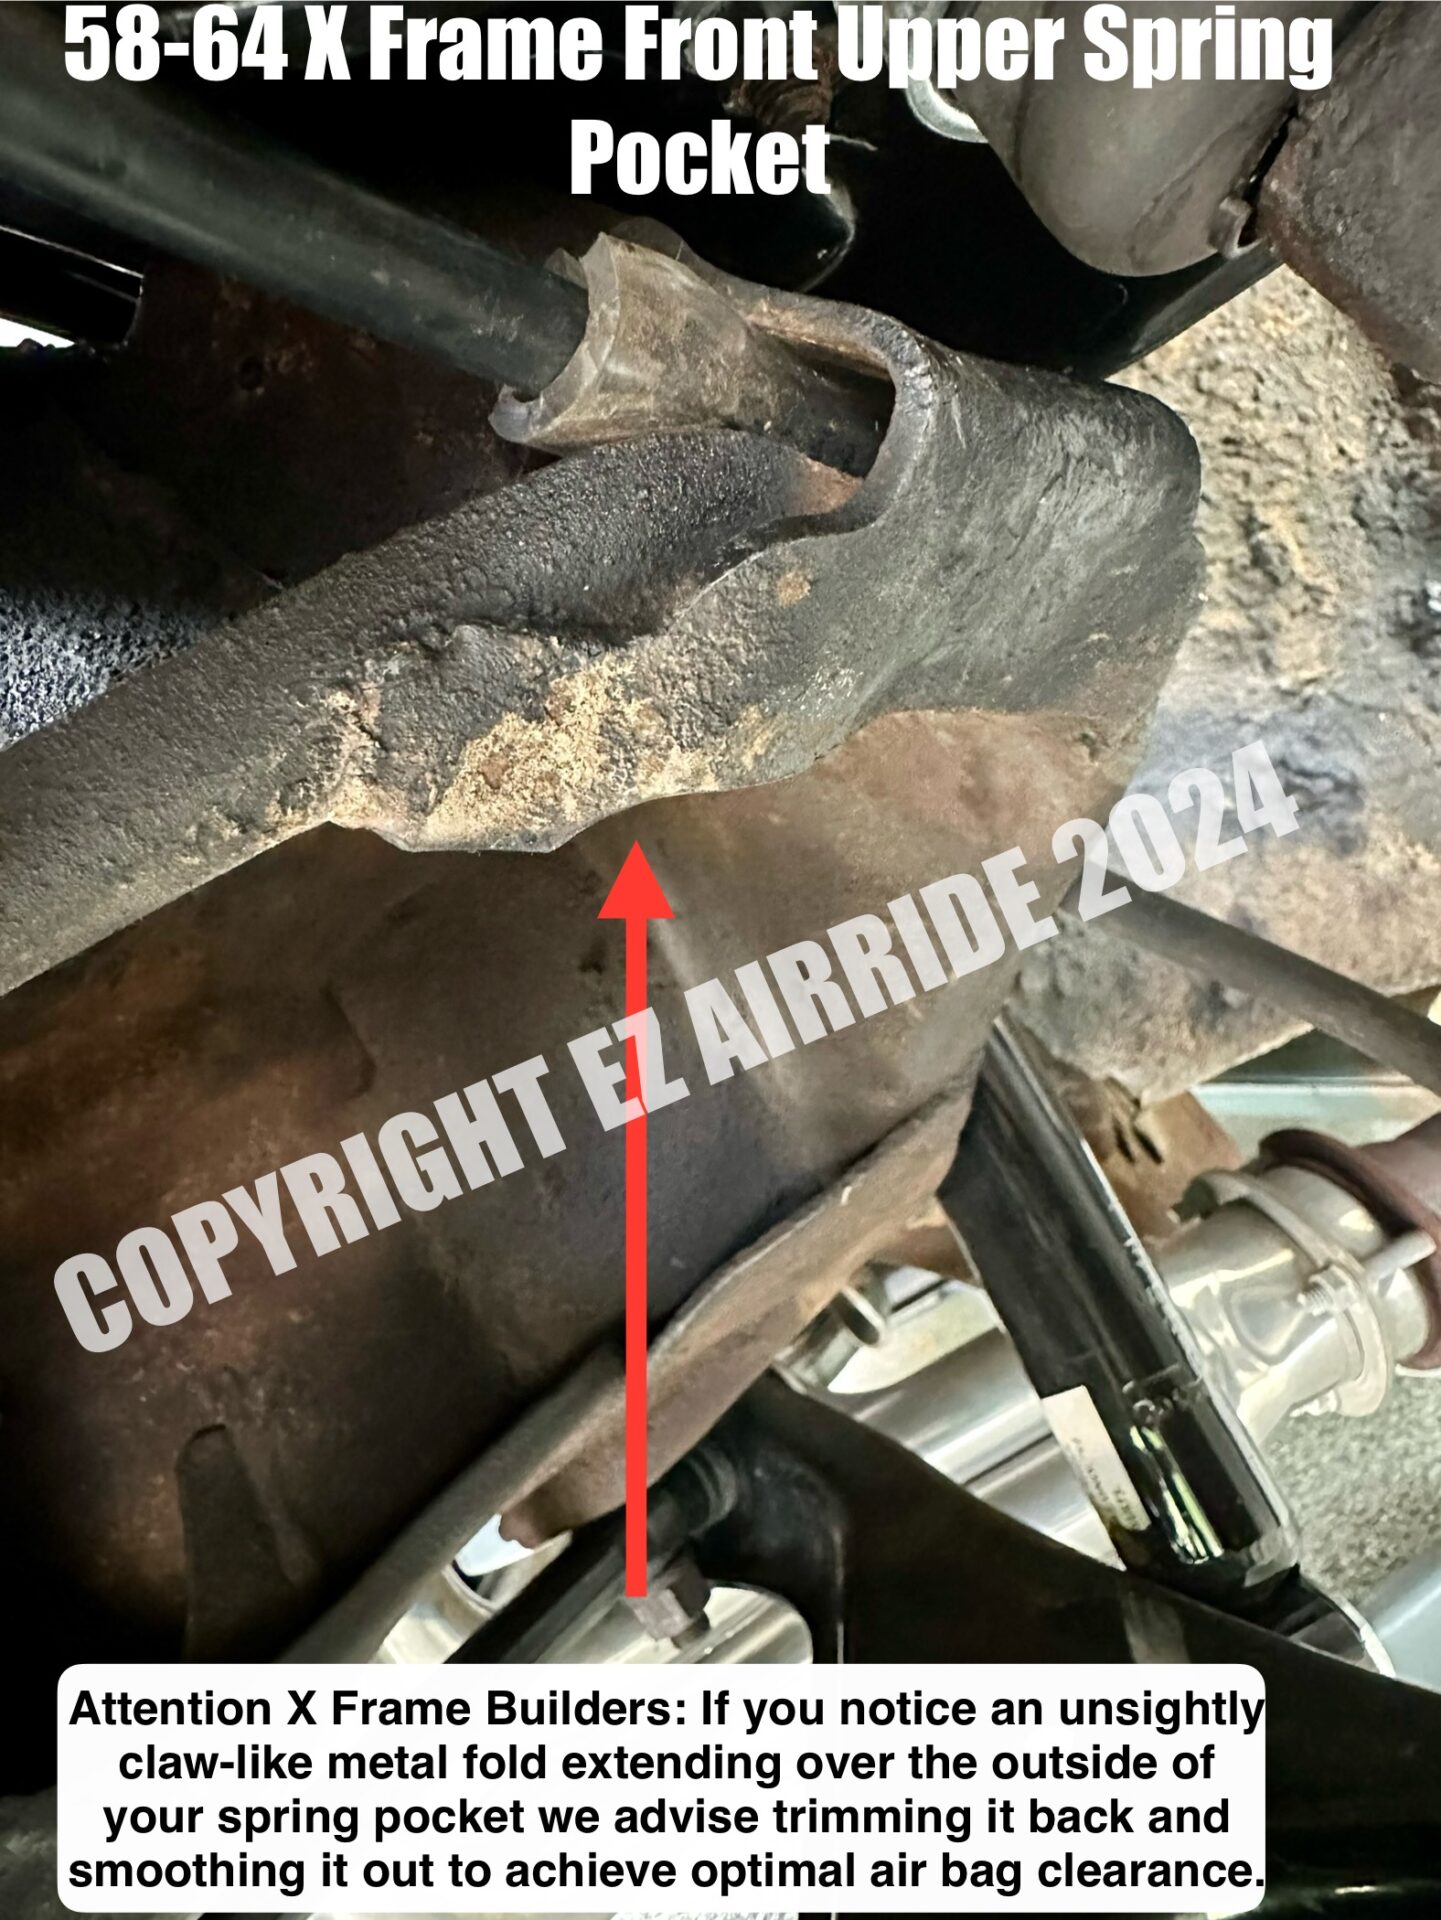
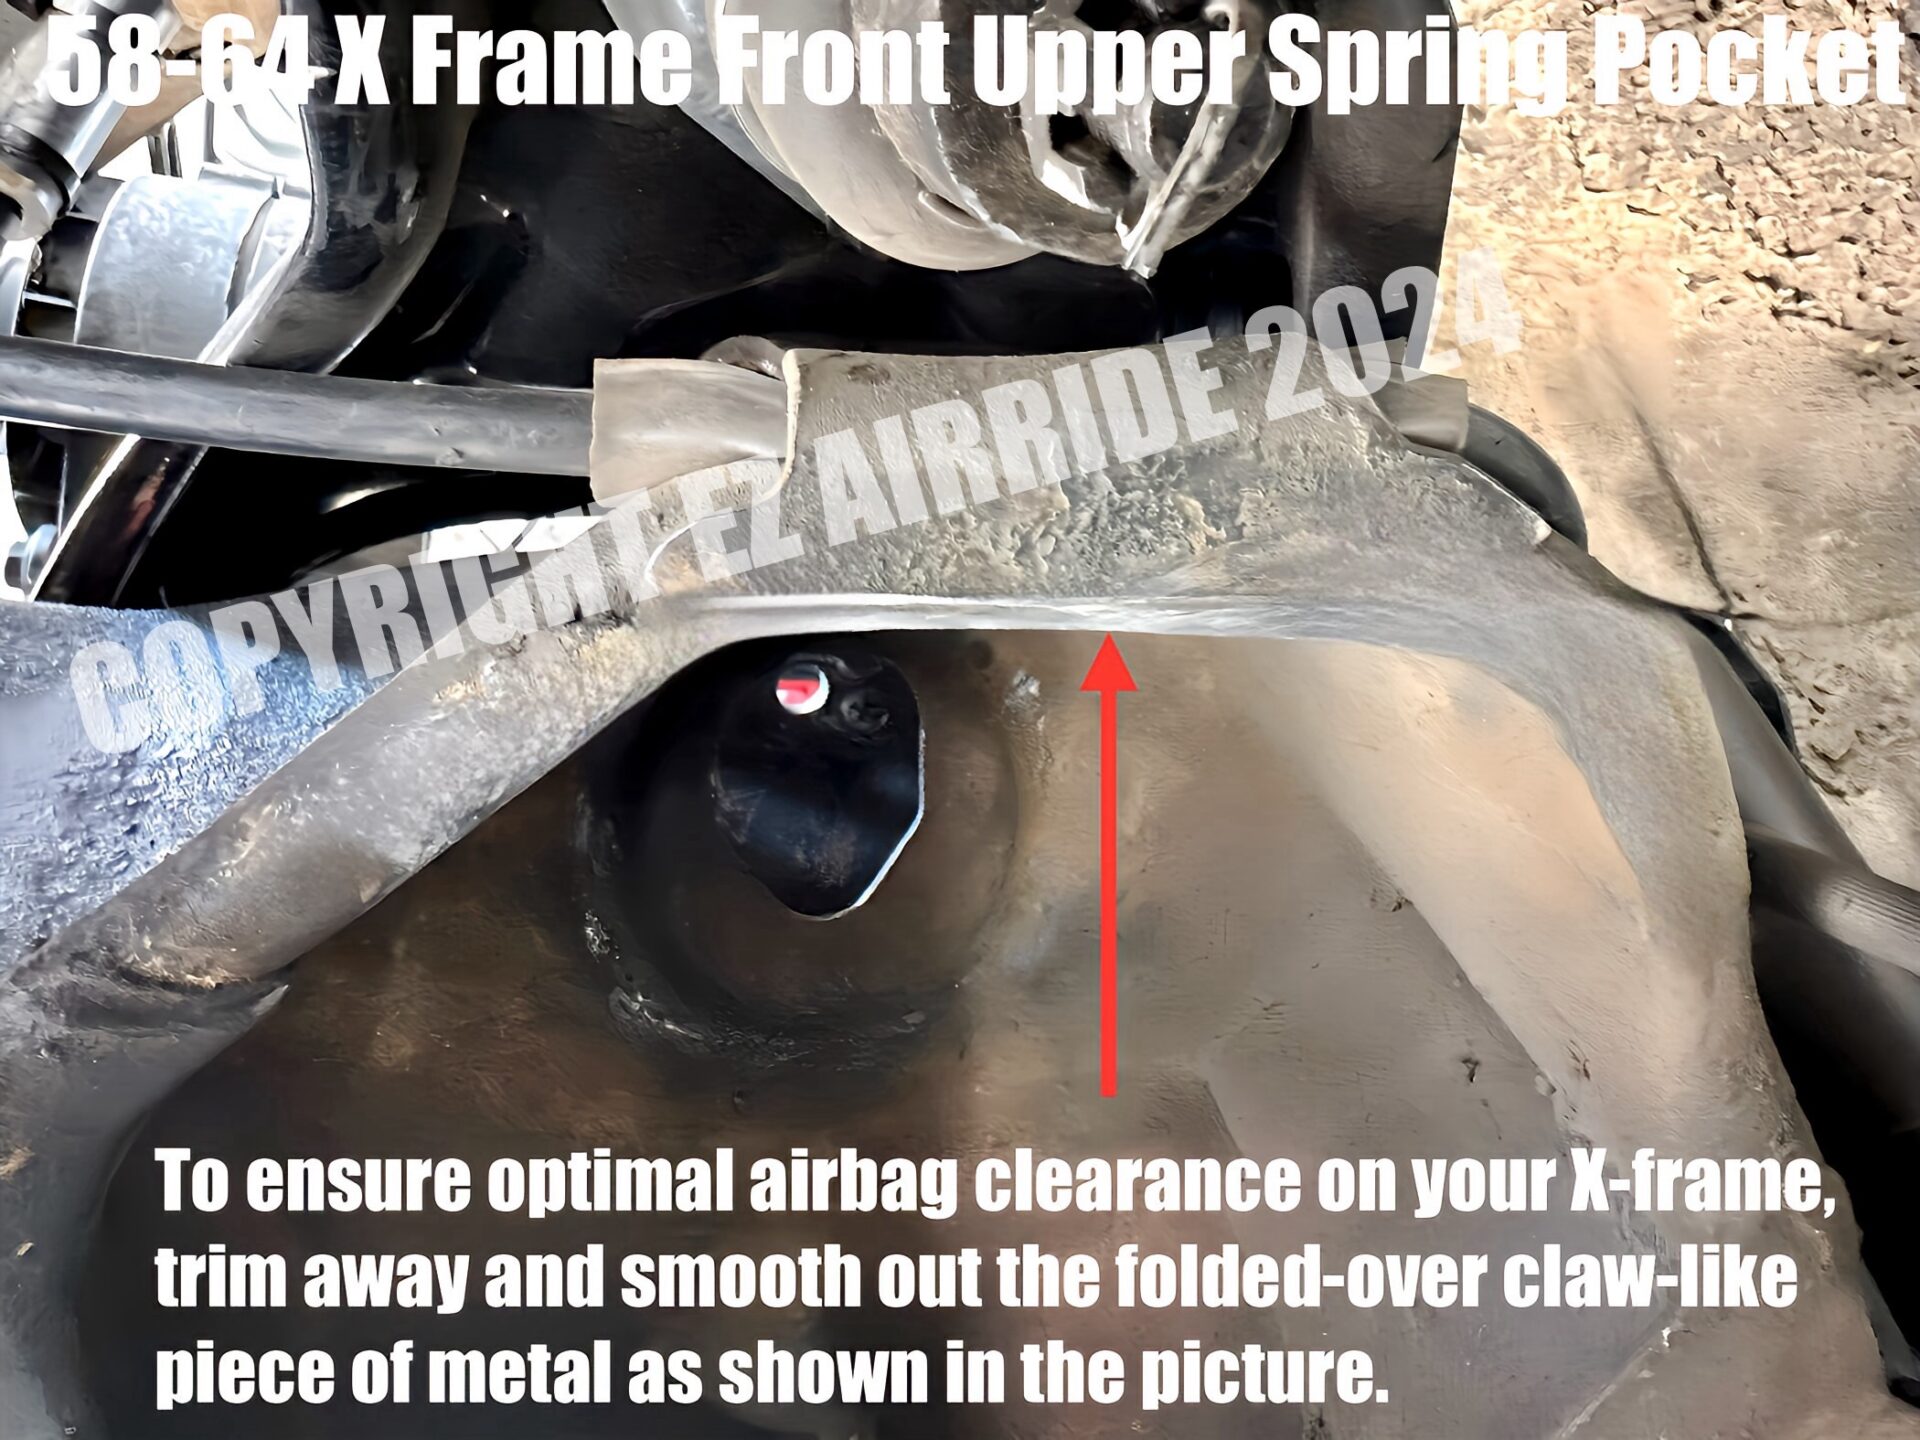
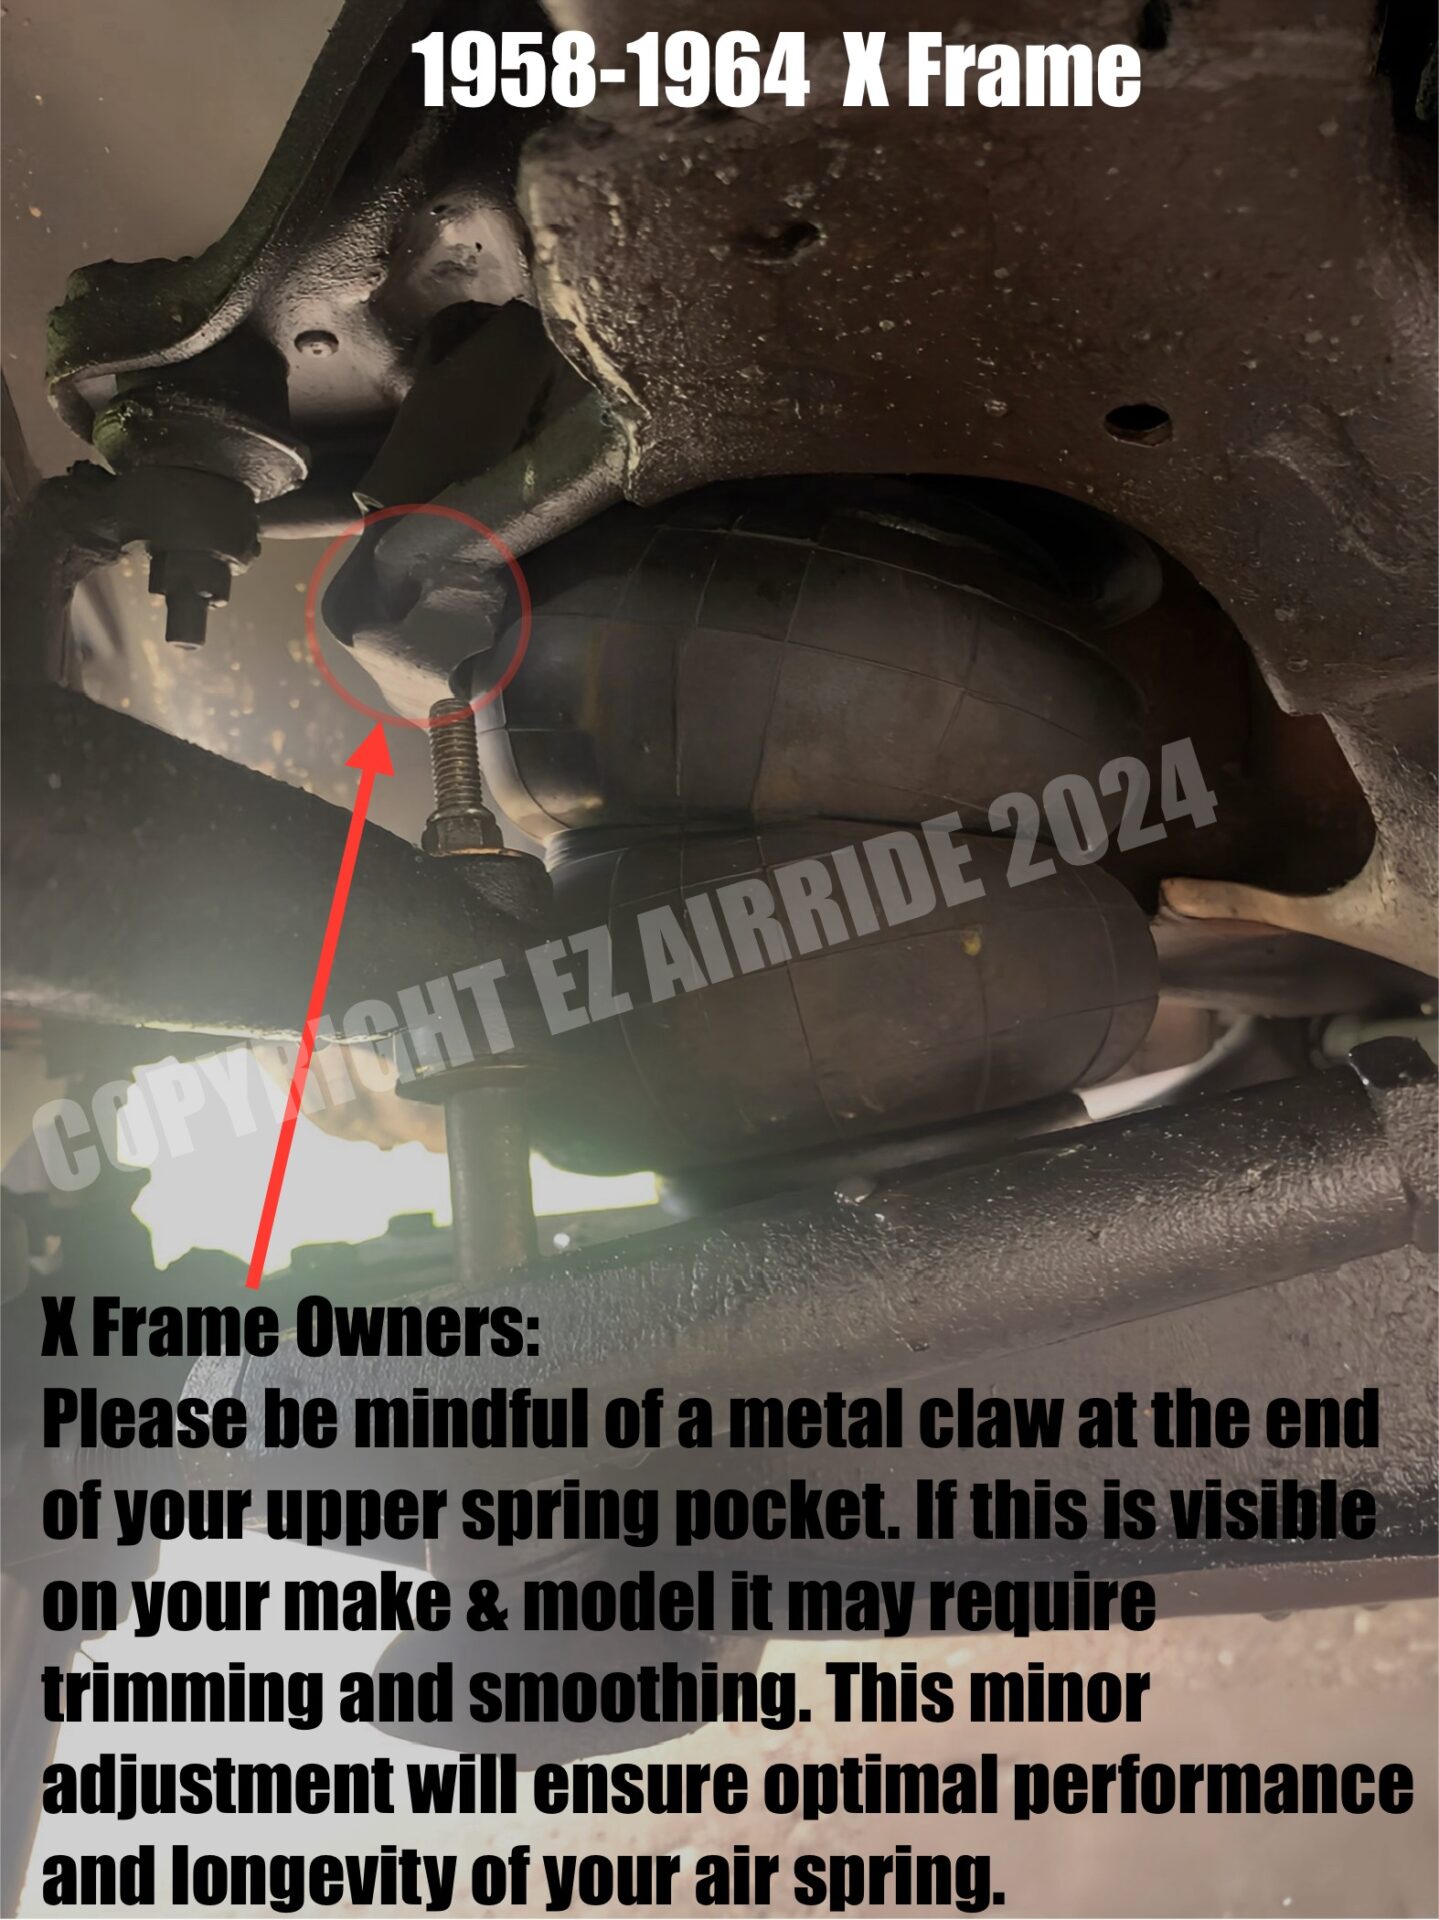
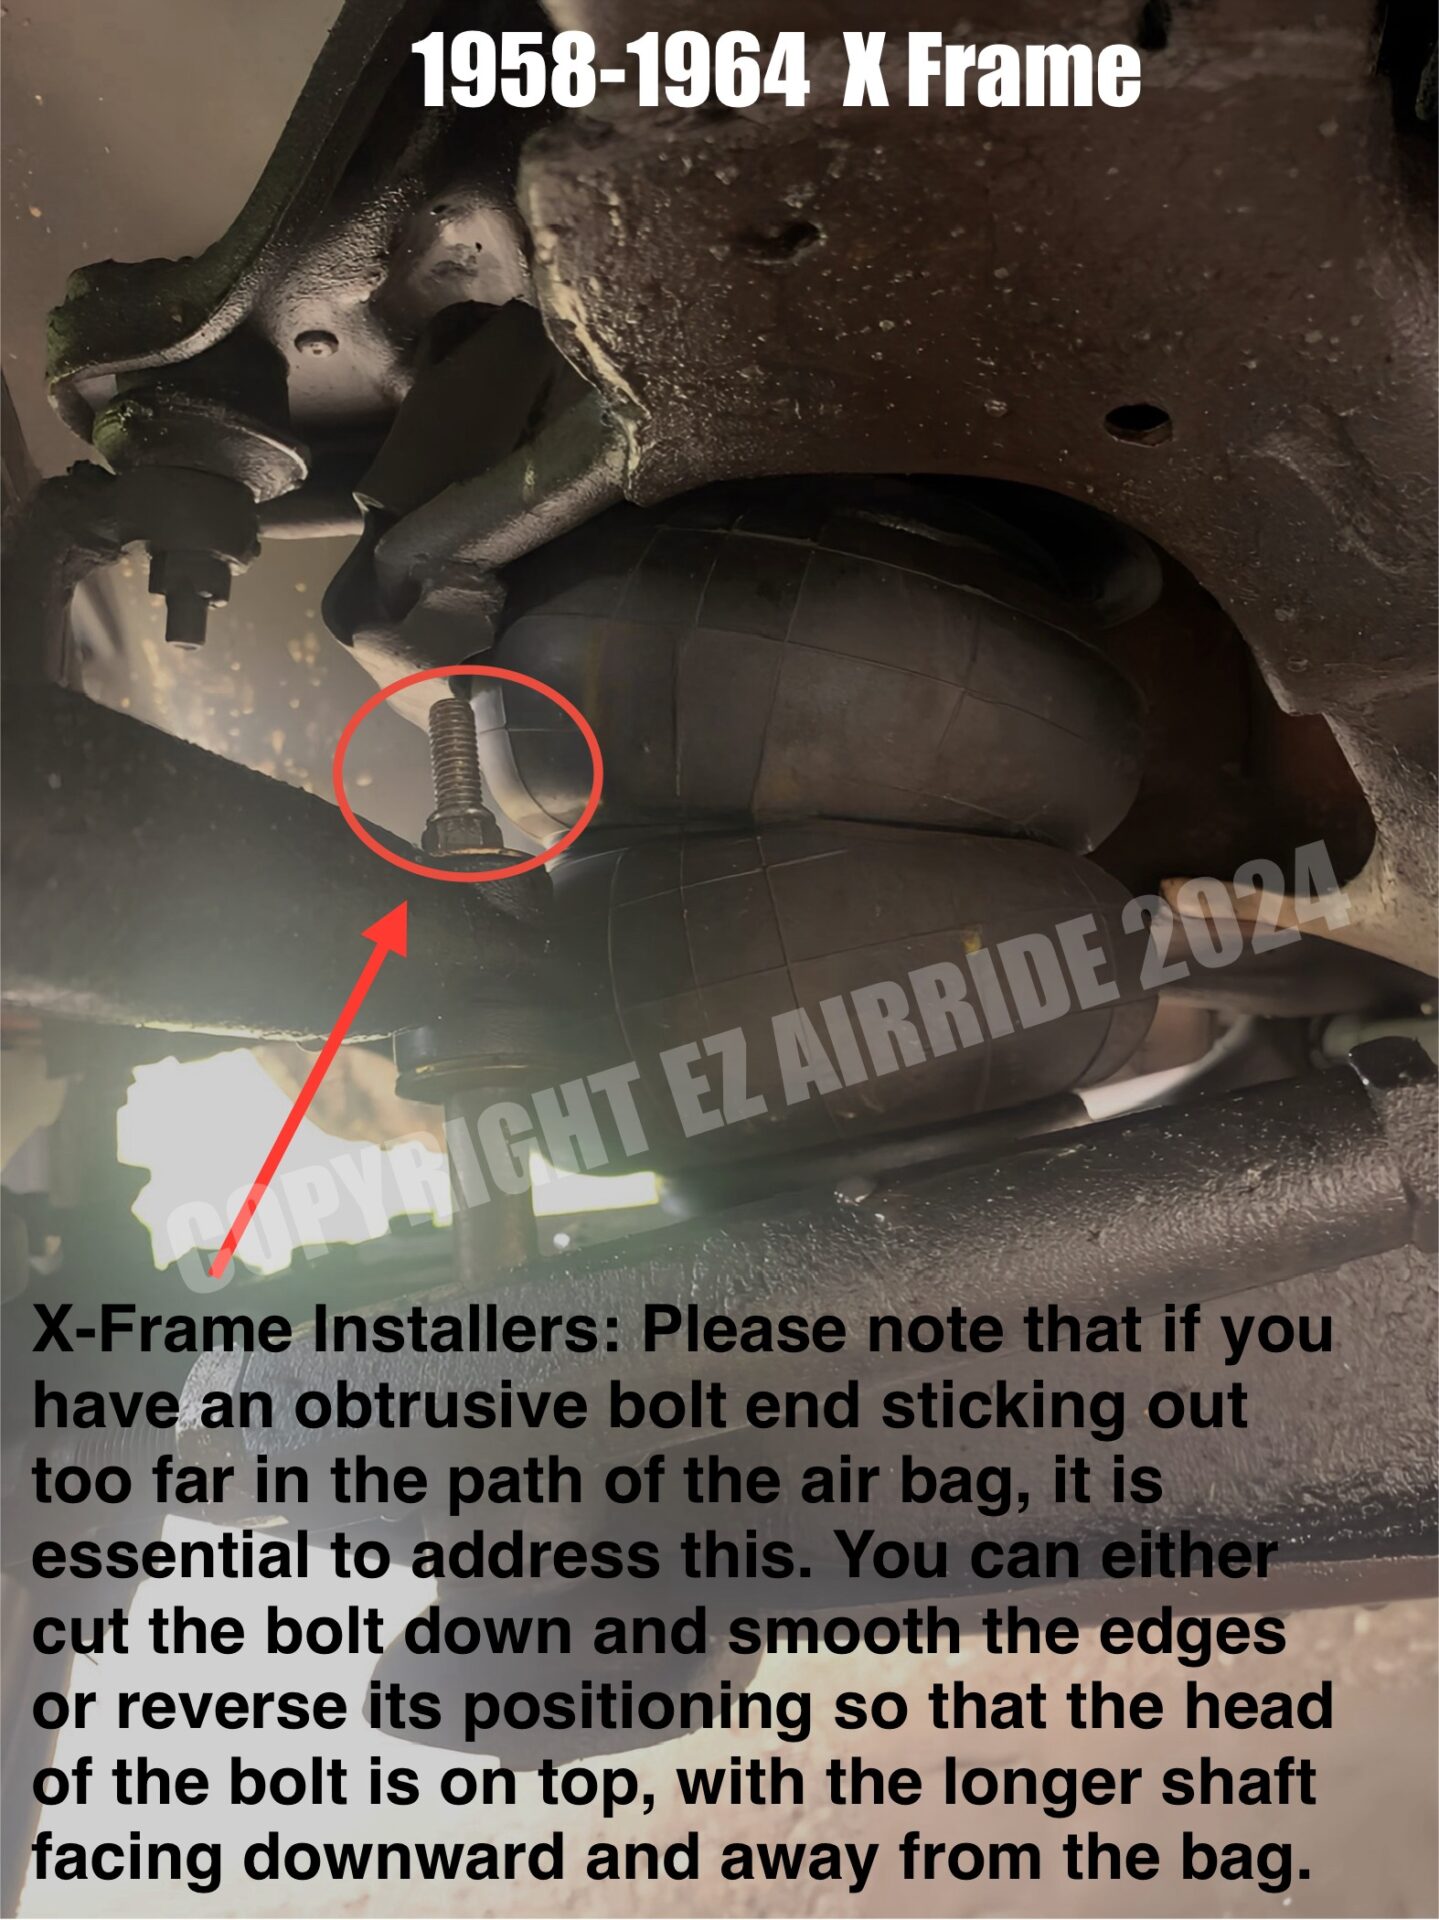
FRONT BRACKETS: The front lower plate effortlessly bolts onto the factory lower control arm. By utilizing the two bump stop holes after removing the bump stop, you could complete the installation without any drilling. If you opt to bolt the outer two holes on the plate to the lower arm, then drilling becomes necessary. The upper bag bracket mounts into the upper frame pocket and bolts into the existing shock mount hole. So, in theory, if you had chrome-plated lower arms and preferred not to drill the outer plate holes at all, there would be no drilling needed, whatsoever, for the bags & brackets. If you’re using front aftermarket tubular control arms, just give us a heads up and we’ll provide custom drop-in style brackets to fit seamlessly at no extra charge.
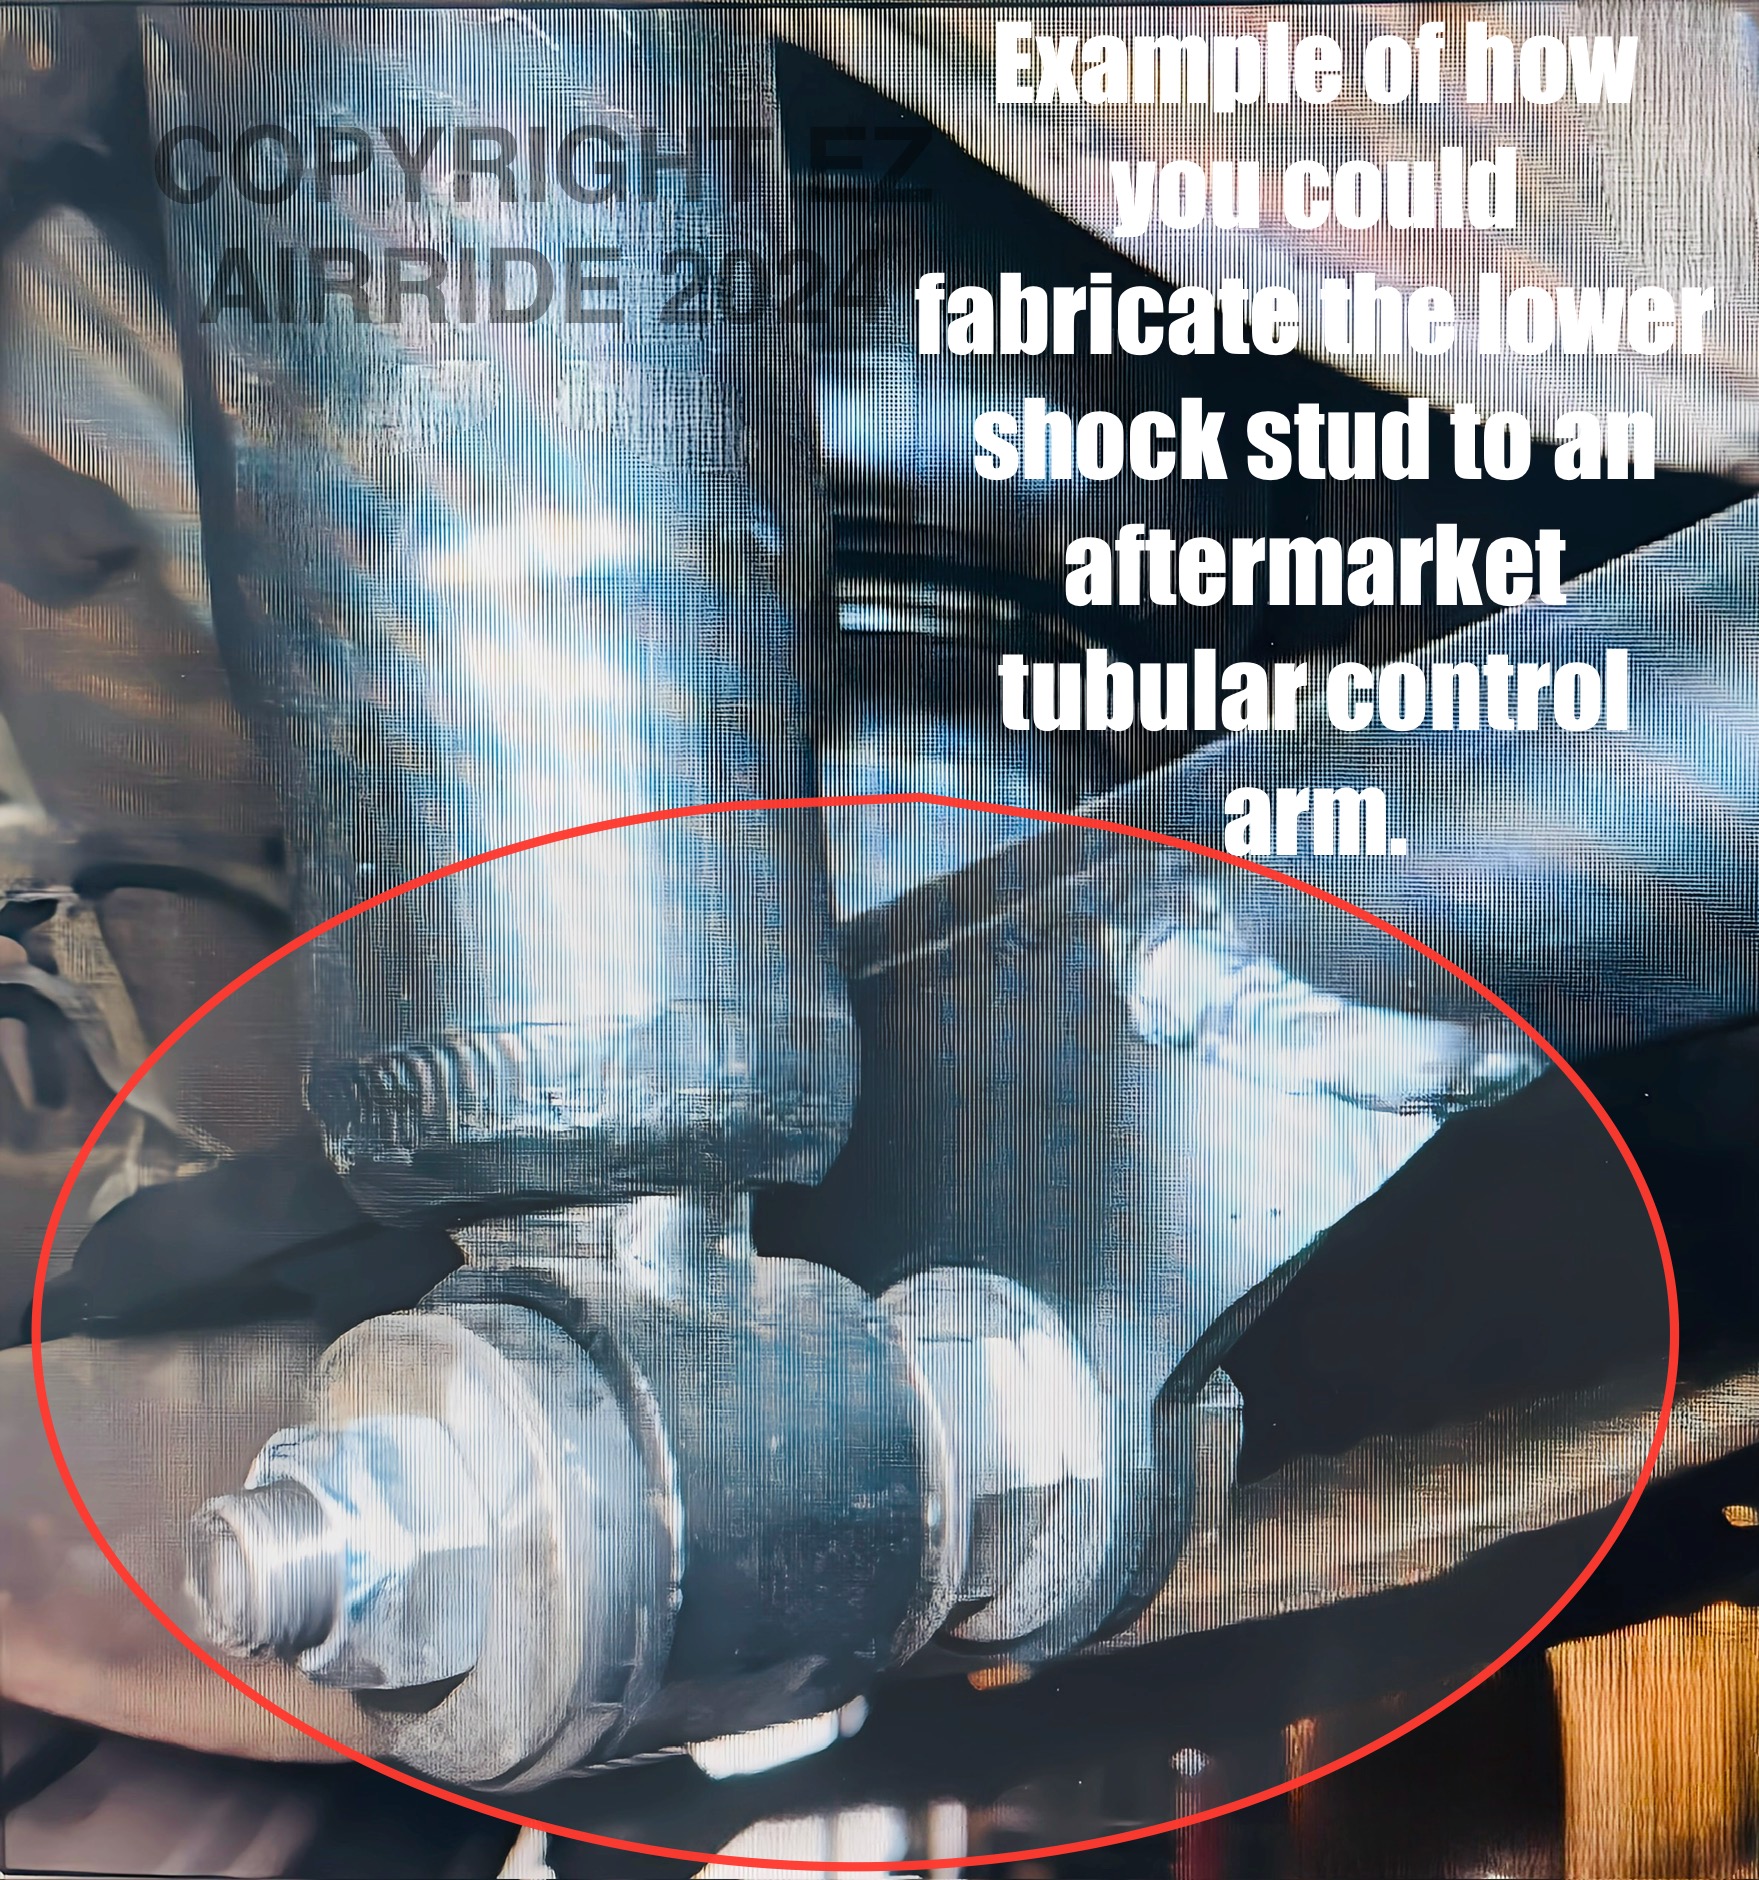
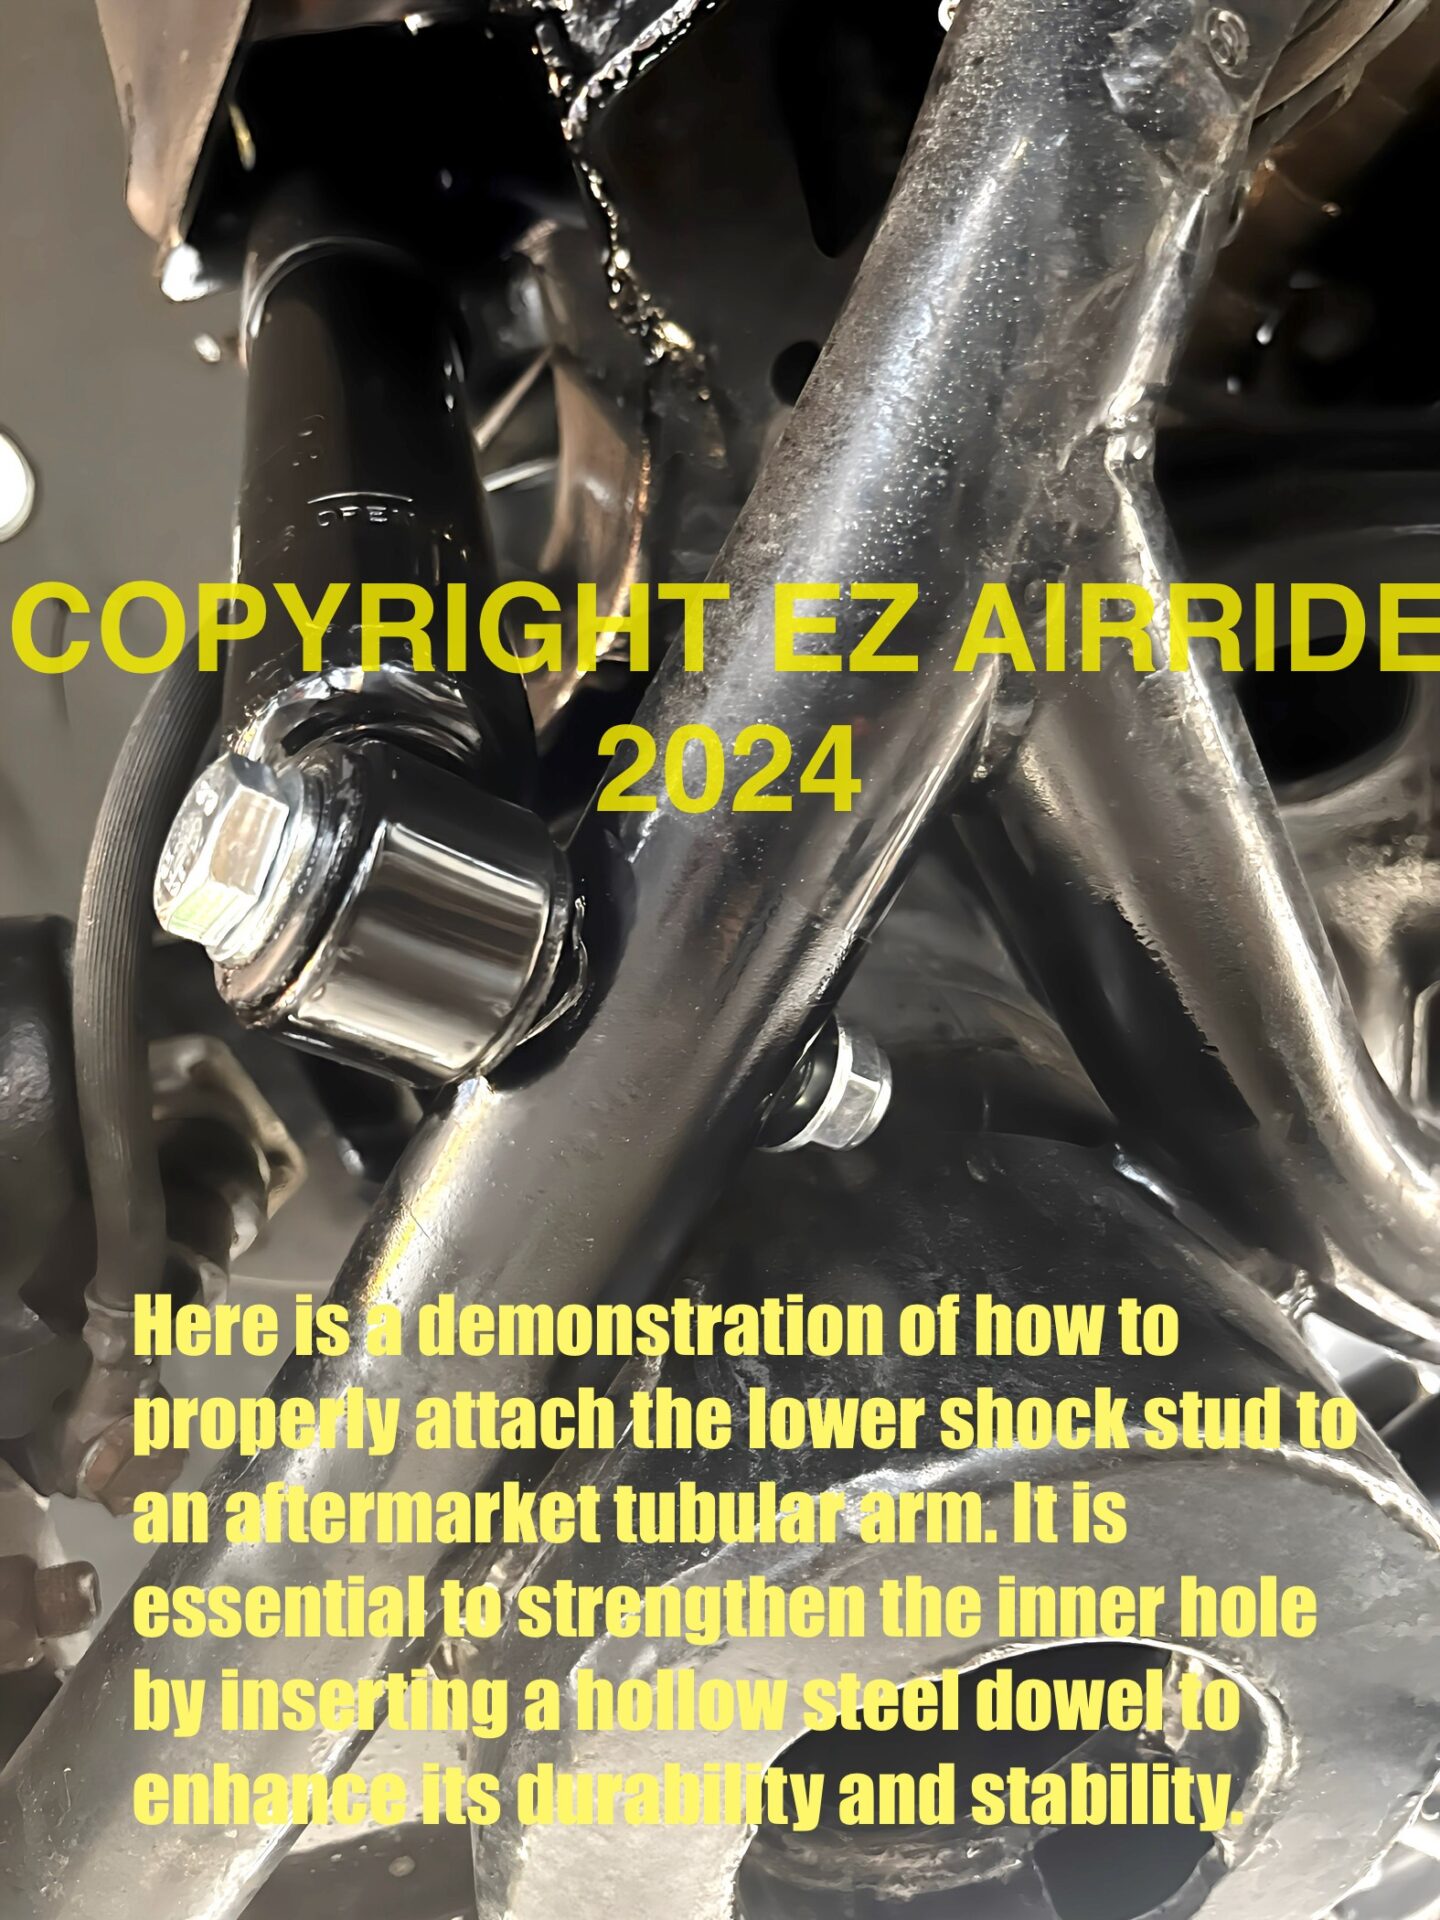
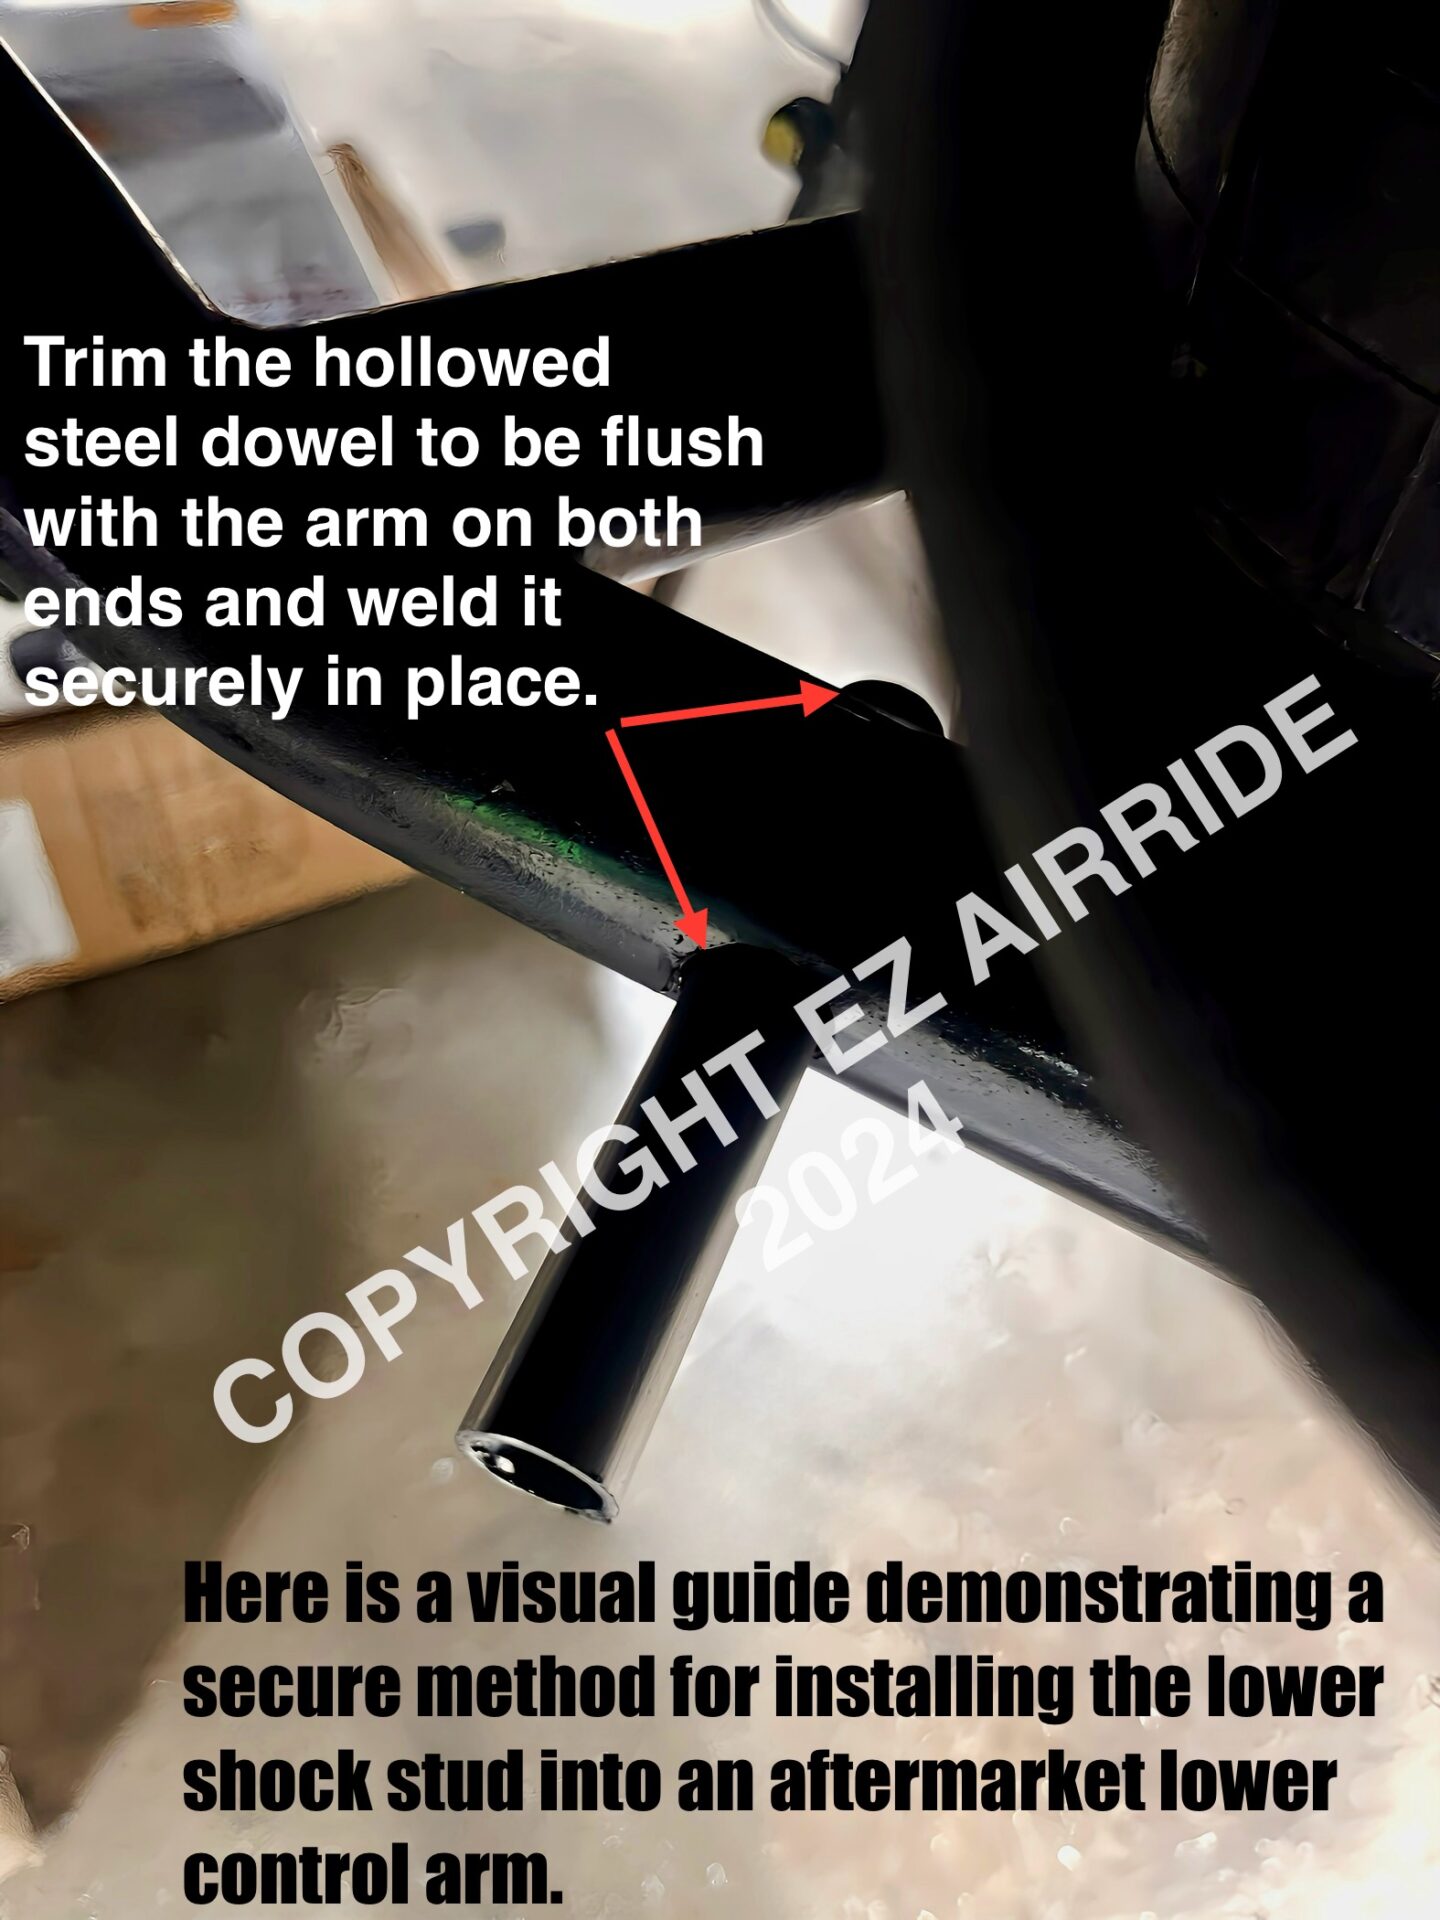
AFTERMARKET TUBULAR CONTROL ARMS: If your vehicle has aftermarket lower arms, or you’re planning to use aftermarket tubular lower arms, some light fabrication will be necessary to secure the lower shock stud to the arm. This process would involve drilling a hole through the aftermarket tubular arm and inserting a DOM tube of the correct size to support the lower stud, which will then need to be welded in place. Alternatively, you may explore fabricating tabs on the underside of the tubular arms to secure the stud. If you haven’t already purchased those fancy tubular arms, we recommend refurbishing your original arms by painting them and possibly equipping them with new ball joints. This approach simplifies the process of having to grind off the new powder coat and welding onto those new lower tubular arms, potentially saving you a few hundred dollars. However, if your primary goal is to showcase your vehicle’s new front lower tubular arms at a car show, they will certainly look impressive to the onlookers who admire them while lying underneath your vehicle.
FRONT SHOCK RELOCATION KIT: The front shock relocation kit is designed to enhance your classic vehicle’s cruising performance. It includes both shock absorbers, dust covers, lower control arm stainless studs, and steel upper shock towers. This kit is compatible with most classic cars that use air springs in the front, primarily serving as a dampeners for the air springs.
The lower shock mounting studs will bolt to the lower control arm, securing the bottom of the shock. The upper shock towers will be welded to the frame, capturing the top threaded shaft of the shock absorber. Keep in mind that each classic vehicle may present unique challenges when relocating and positioning the upper shock towers and lower shock studs. Potential obstacles may include factory sway bars, aftermarket oversized sway bars, brake lines, larger aftermarket disc brakes, oversized wheels, wider offset wheels, etc. Therefore, if you’re a novice builder, consulting with a professional builder or a certified shop can provide valuable guidance and ensure a successful installation of your front shocks.
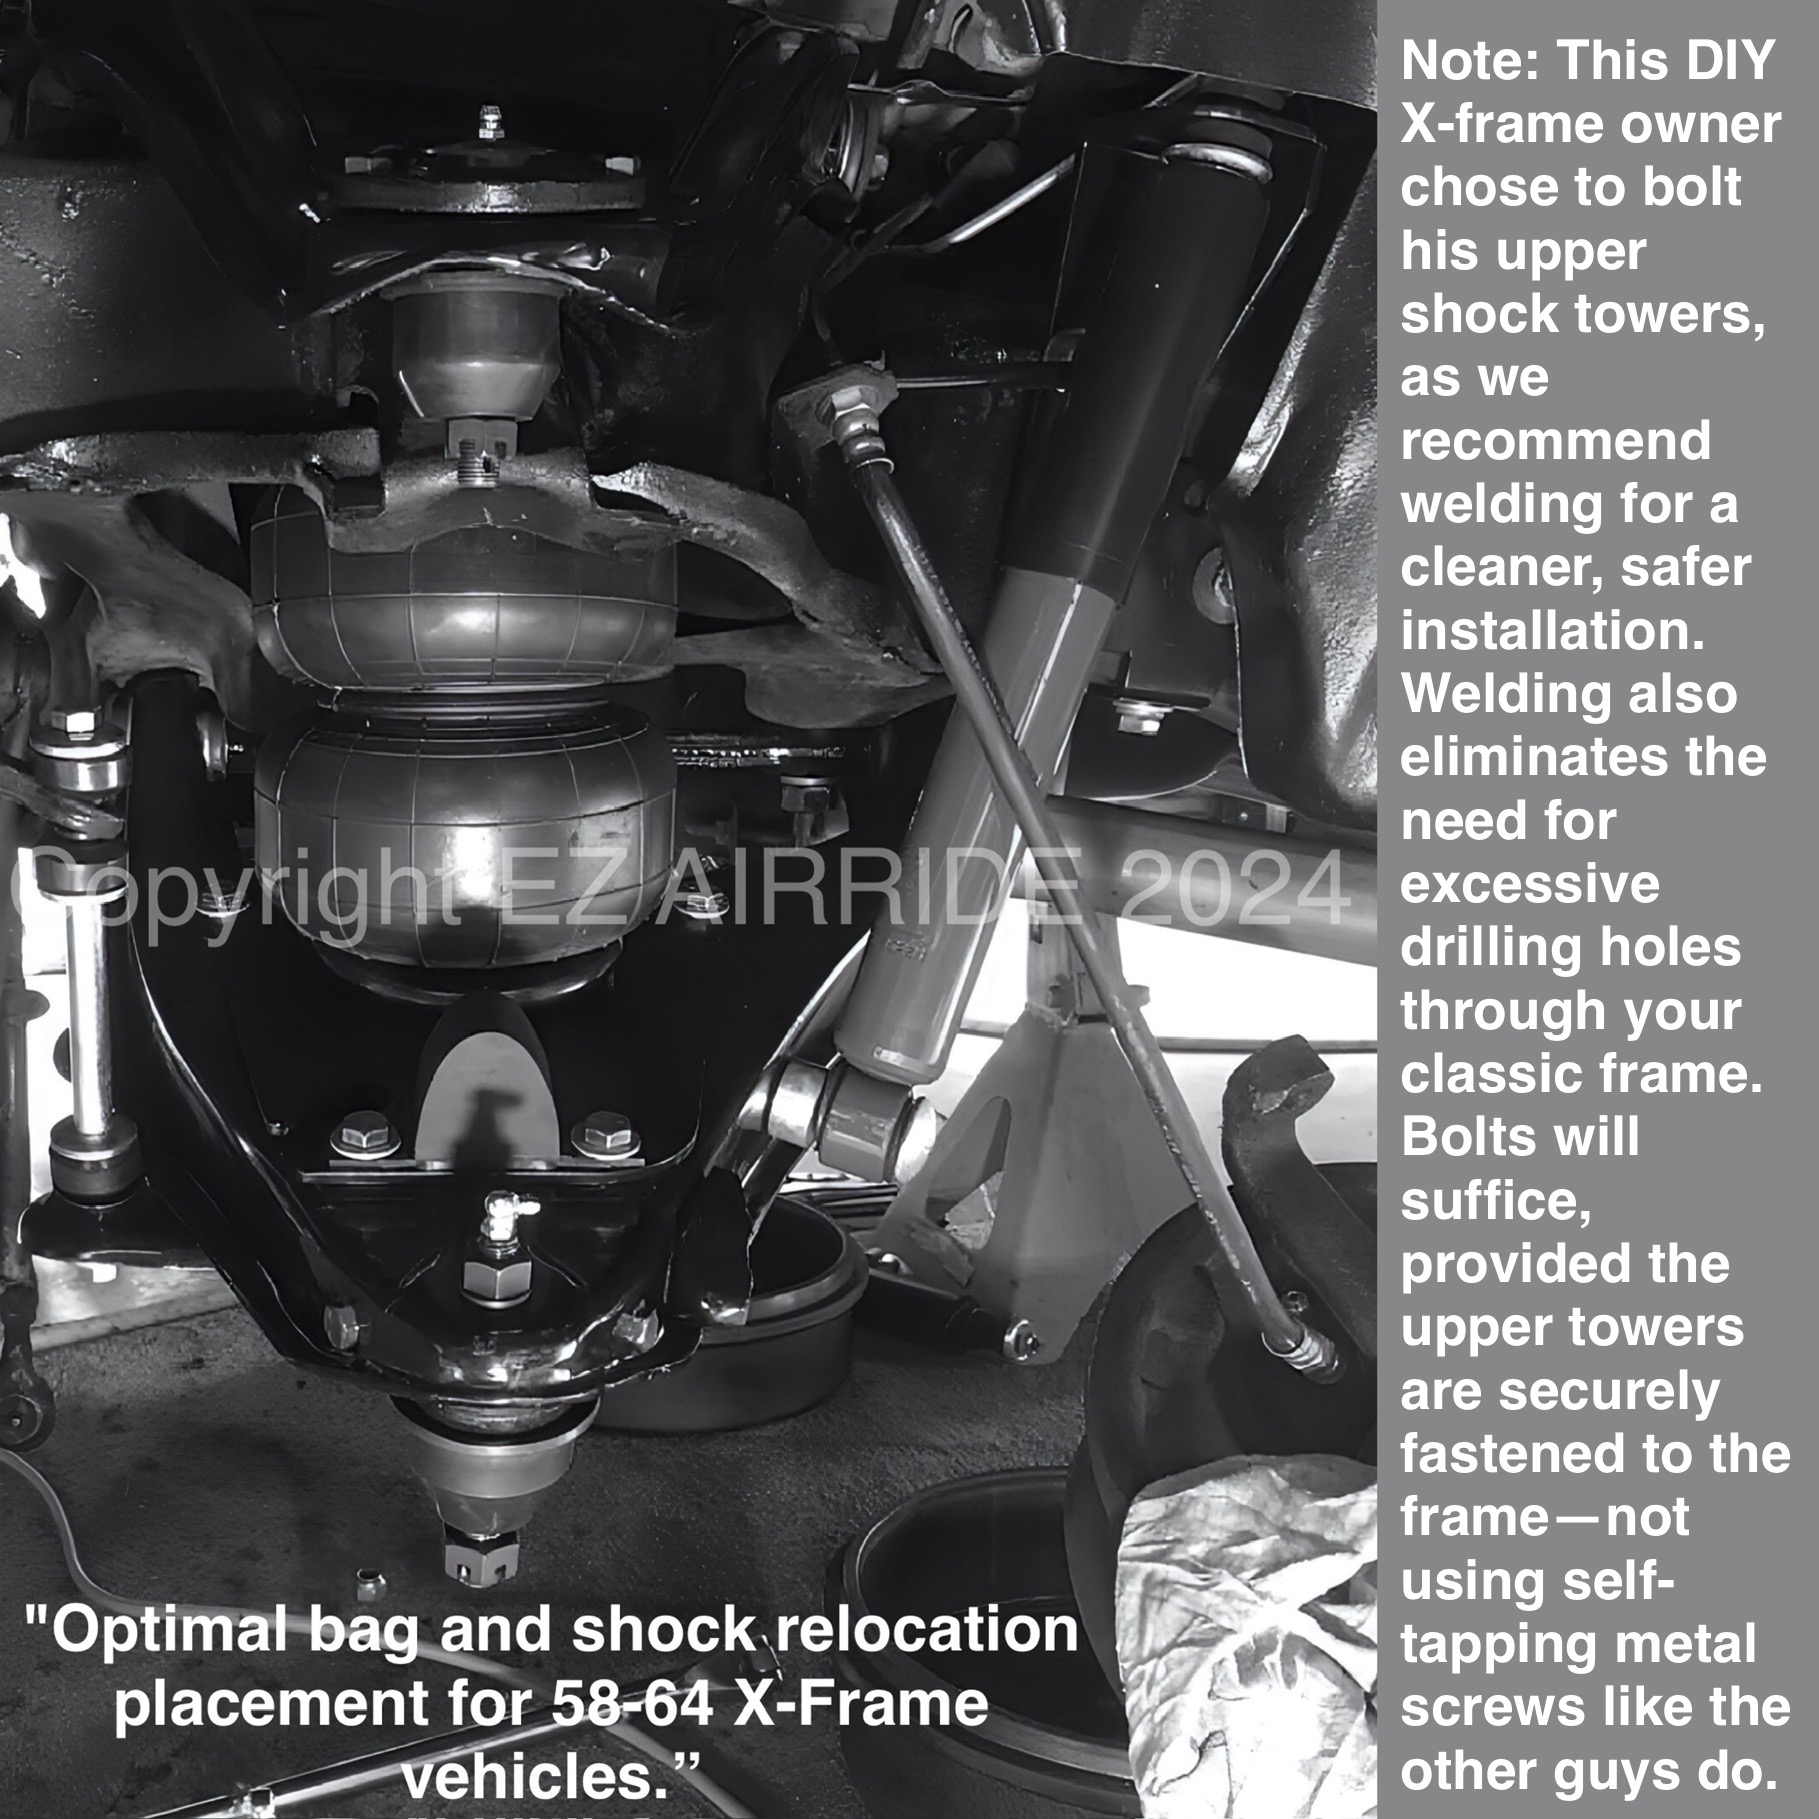
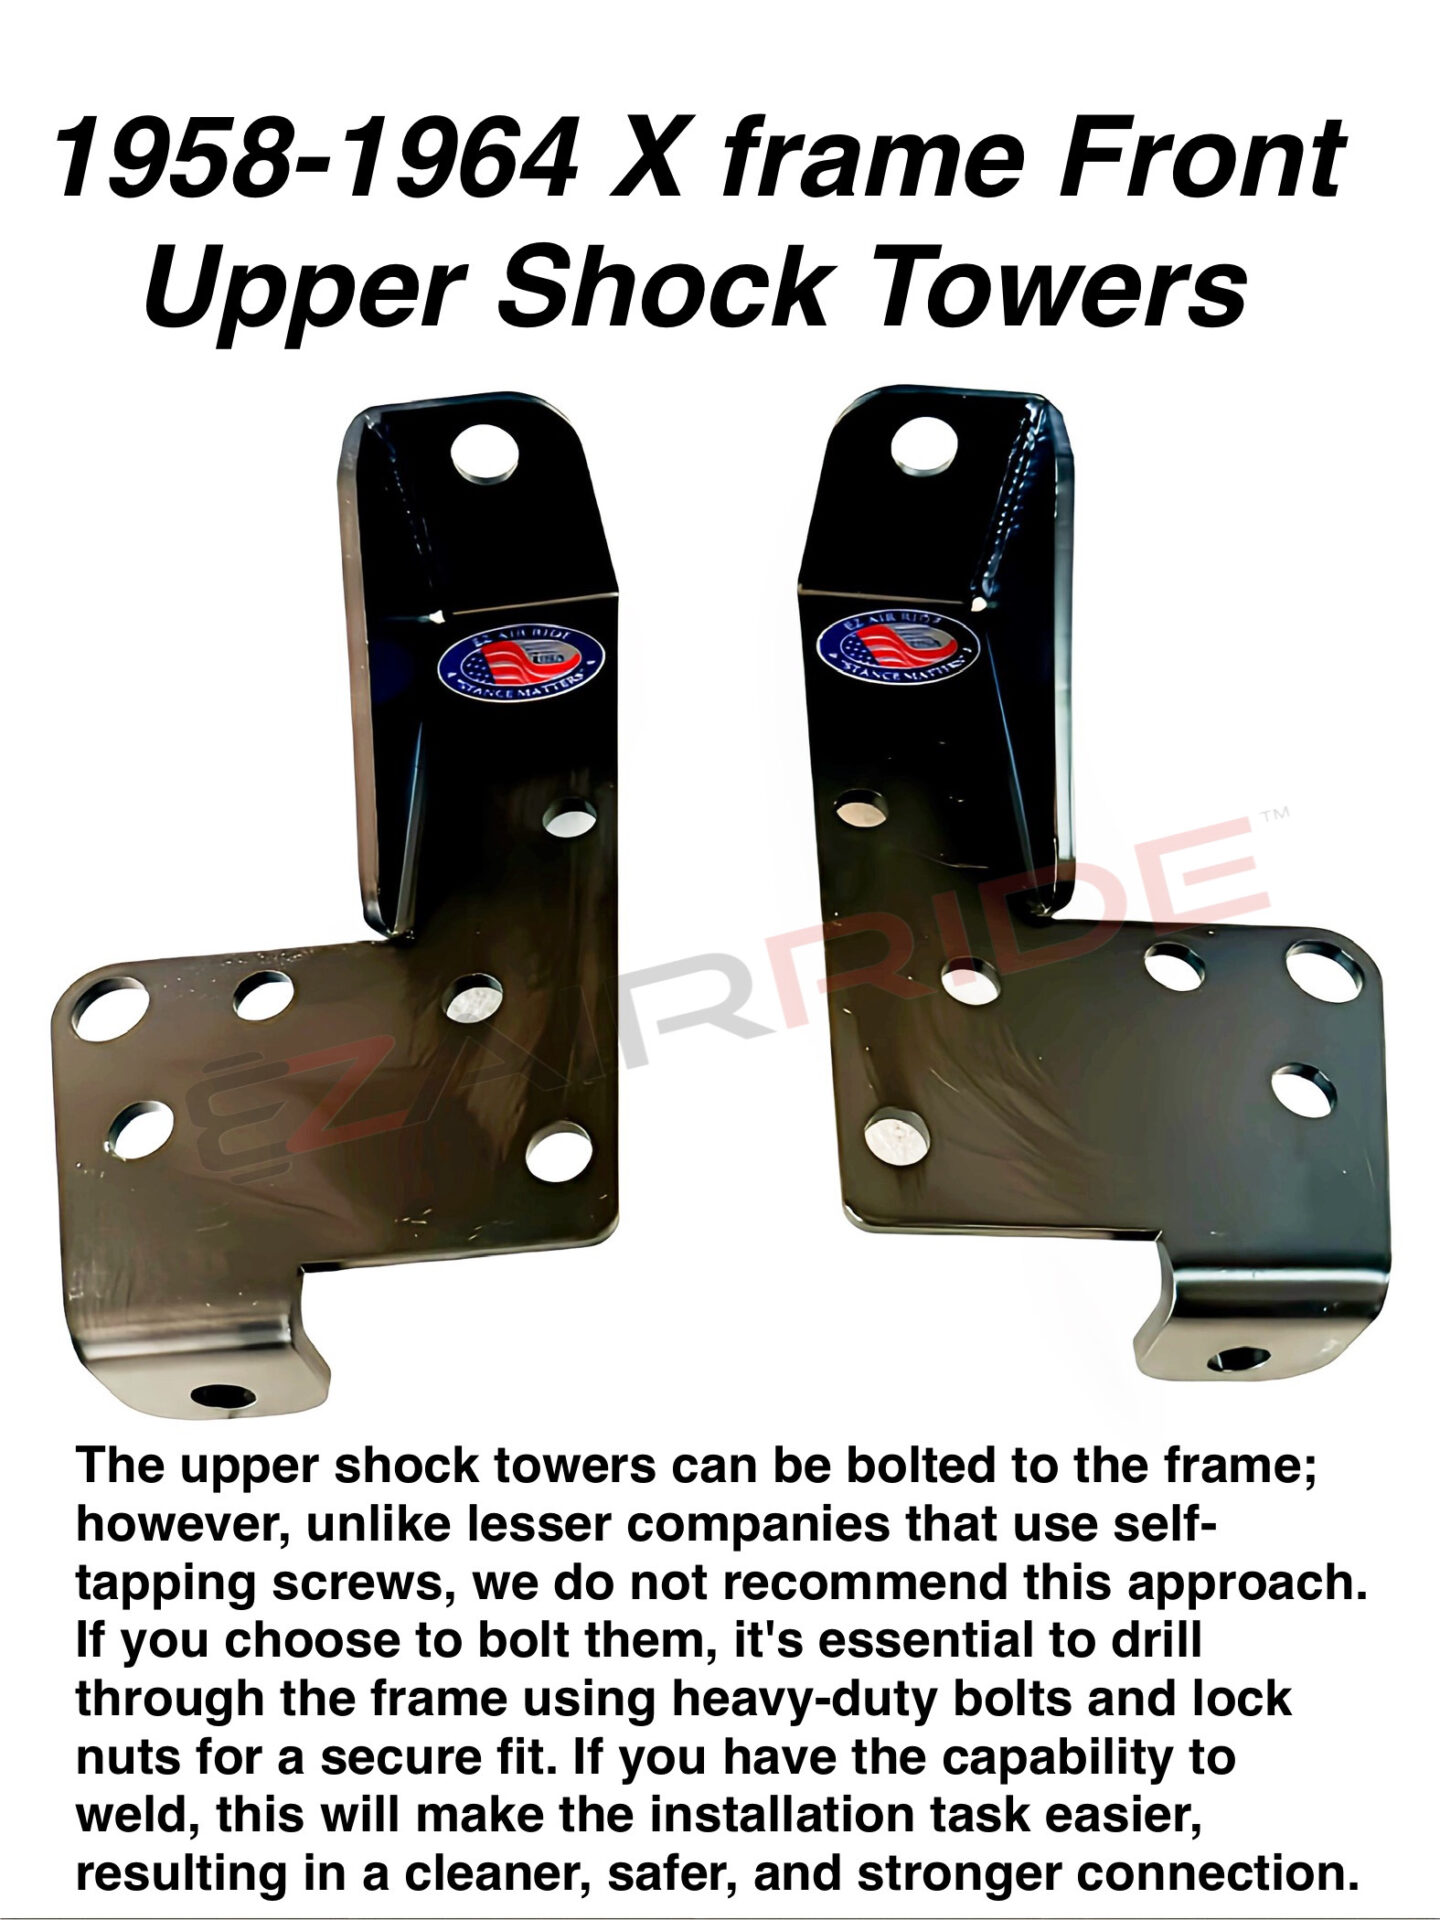
THE UPPER SHOCK TOWERS: These are designed to be affixed to the upper frame via welding. While our brackets come with placement holes that in theory, could be bolted, we advise filling these holes with welds for a much stronger bond and then smoothing them out for that professional finish. Suppose you do not have access to a welder. In this case, it is feasible to use the holes to bolt the bracket. However, if you choose this installation method, we recommend fully securing the shock towers with bolts running from the frontside to the backside of the frame. Just keep in mind that if you decide to bolt them on, there will be more holes in your iconic Impala’s frame than in a chunk of Swiss cheese.
CLOSING REMARKS ON FRONT SHOCK INSTALLATION: The advice provided is relevant for the majority of our vintage vehicles during the process of relocating the front shock for air suspension installation. There may be some disparities among early classic vehicles, particularly between rear-steer and front-steer models during shock installation. Most well-known models, such as early X-frame Impala’s, Chevelle’s, Monte Carlos, Caprice Classics, and similar vehicles, are typically categorized as front-steer models. This means that the steering components are usually positioned in front of the wheels, near the core support, leaving more clearance for a shock to be mounted outside of the airbag onto the backside of the control arm facing the firewall. On the other hand, other early classics, such as 1958-1970 Cadillacs and similar models, are considered rear-steer vehicles, meaning that most of the steering components are located behind the wheels. This arrangement leaves little room for mounting a shock. As a result, many professional builders opt to mount the shock up front, facing the bumper—similar to the approach taken by Cadillac engineers when they introduced factory air suspension on several early models between late 1957 and 1960. Given the diverse designs of vehicles made over half a century ago and different manufacturing practices across the country, potential obstacles—such as brake lines, sway bars, or oversized wheels—may arise. Therefore, we want to reiterate that consulting with a professional builder or a certified shop is advisable when planning to relocate your front shocks.
REAR SHOCKS: Let’s talk about rear shocks—done! We don’t include them for this reason: our rear bags and brackets are designed to work with your original factory gas shocks. Many companies will try to sell you high-end name-brand shocks, claiming they are essential for air ride systems. In reality, the airbag’s quality and longer stroke support the vehicle’s weight. The purpose of the shock is to act as a dampener for the airbag, helping to smooth out the ride during sudden encounters with large potholes or unexpected railroad tracks at 45 MPH. That’s why a basic stock shock will work just fine—if it’s too stiff or heavy-duty, it will interfere with the air spring’s ability to absorb impacts effectively. This means the airbag won’t perform at its best in cushioning the ride. If your rear shocks resemble relics from Montgomery Ward or were added during high school auto shop class, like those hijacker air shocks from the ’70s, it might be time for an upgrade. Visit your favorite auto parts store for an inexpensive stock gas shock that fits your vehicle. Remember, investing in higher-end heavy-duty shocks may lessen the dynamic lift and ride quality of your air ride system. The more robust the shock, the more it can take away from the ideal ride quality. So take the $200-$300 we saved you and put it back into your pocket!
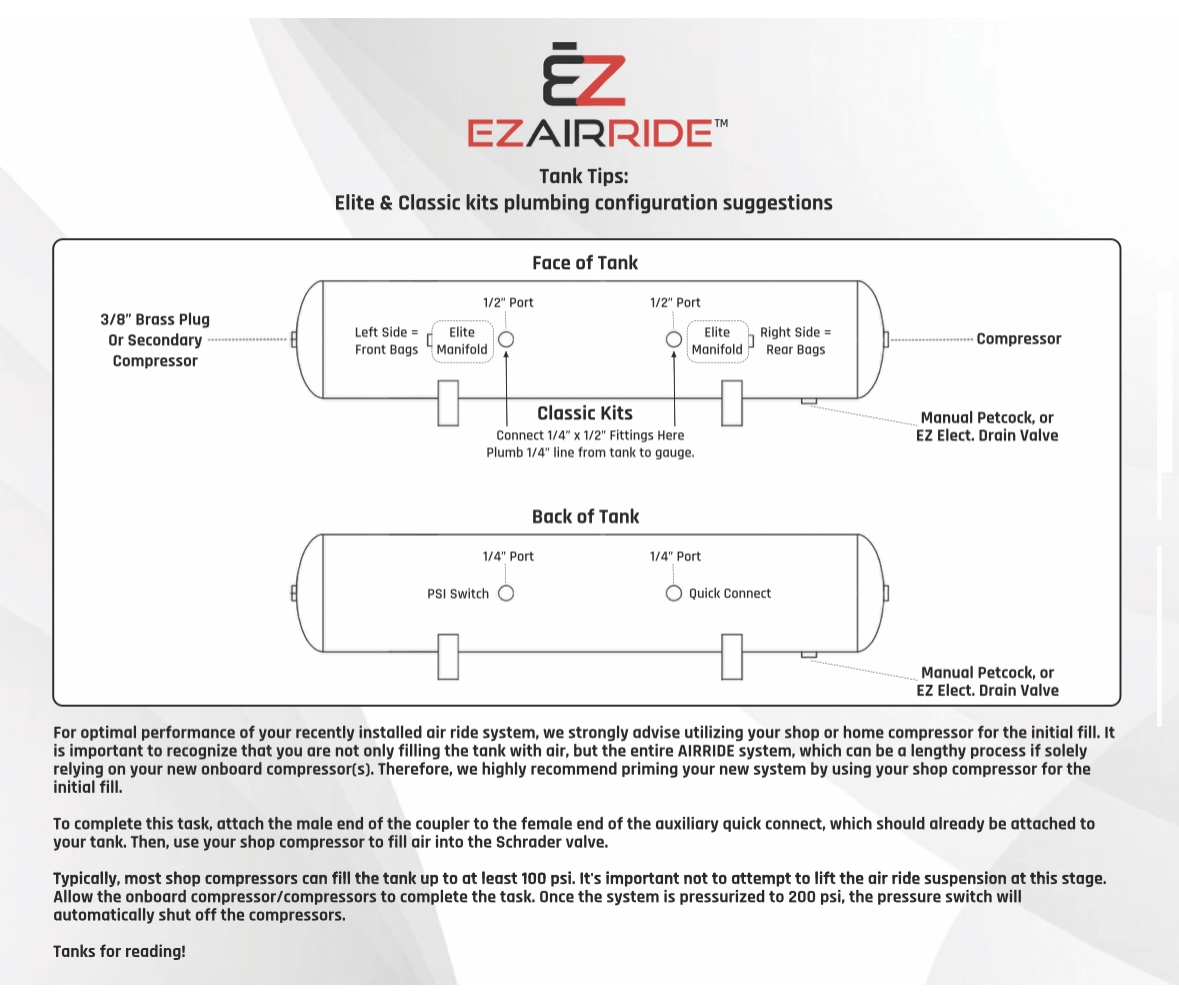
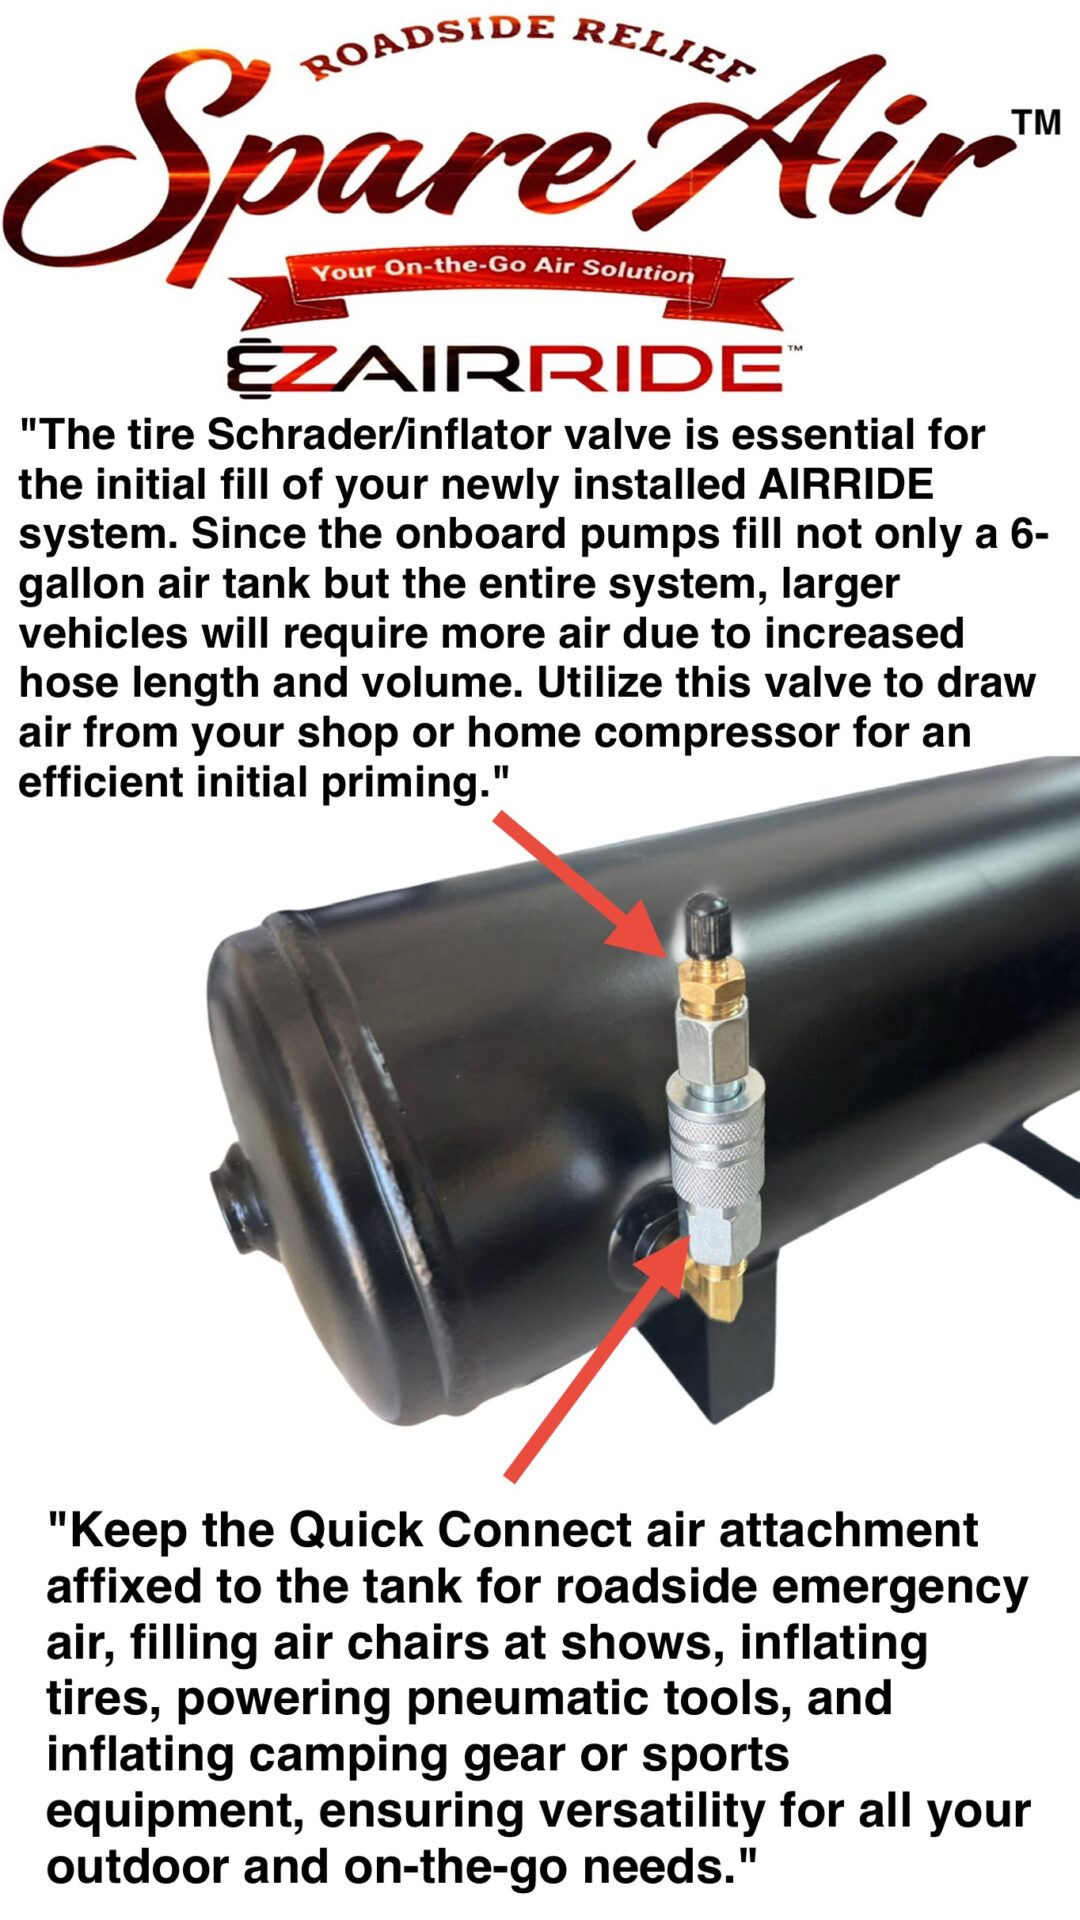
THE AIR TANK : Our exclusive tanks have a capacity of approximately 6 gallons. They measure just over 35″– in length, 7.25″- in diameter, and stand about 8.50″- tall. The front features two 1/2″ bungs for connecting to the manifolds, while each end of the tank has 3/8″ bungs for adapting to one or more compressors. Additionally, there are two 1/4″ bungs on the rear of the tank for the PSI switch and a quick connect for roadside air/train horn. Lastly, a 1/4″ bung on the bottom of the tank for easy drainage.
SPECIAL NOTE FOR EL CAMINO OWNERS: Our air tank measures approximately 35 inches in length with a capacity of just over 6 gallons. This larger tank may pose a challenge if you prefer not to mount it in the bed. However, if your El Camino has a compartment directly behind the cab with an access panel, this tank is ideal for fitting into that space. If your El Camino does not have that compartment or if it’s being used for other purposes, we also provide mini split tanks. These (2) 3-gallon air tanks measure just under 20 inches in length and can fit snugly under the bed within the frame rail, utilizing the cavernous underside of the El Camino effectively. There are numerous locations to install these 3-gallon tanks. To secure them properly, you may need to create a simple L-shaped bracket to fasten or bolt the tanks to your frame. Feel free to give us a quick call or email if you’d like to discuss the upgraded option of using two tanks.
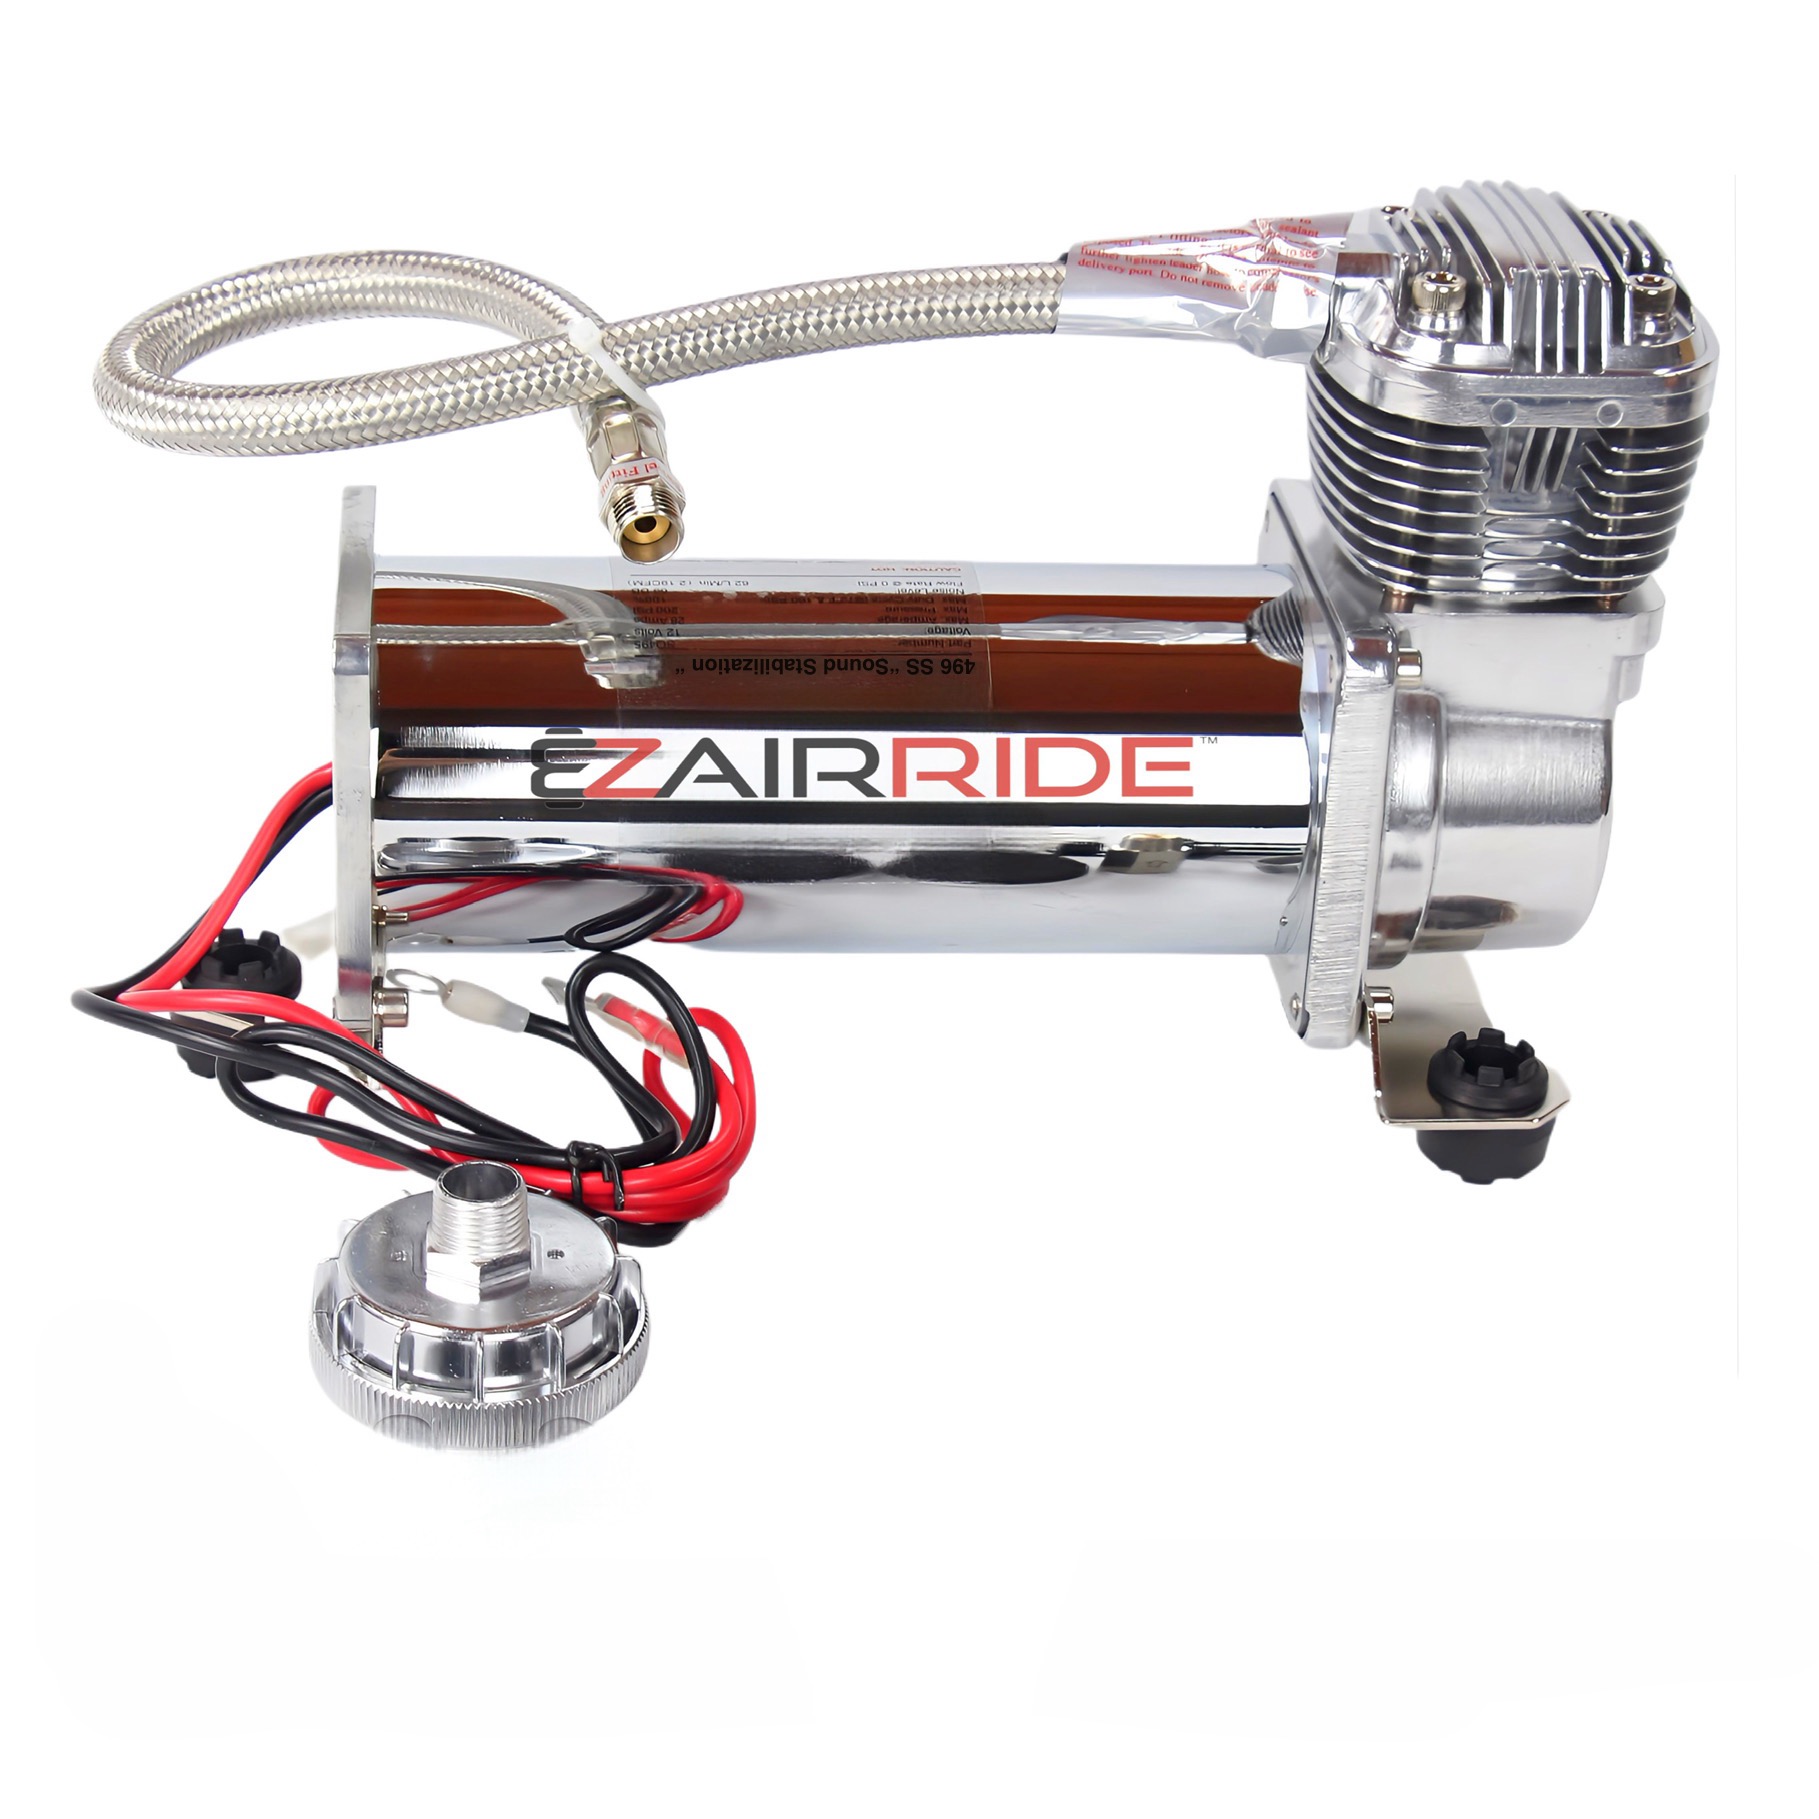
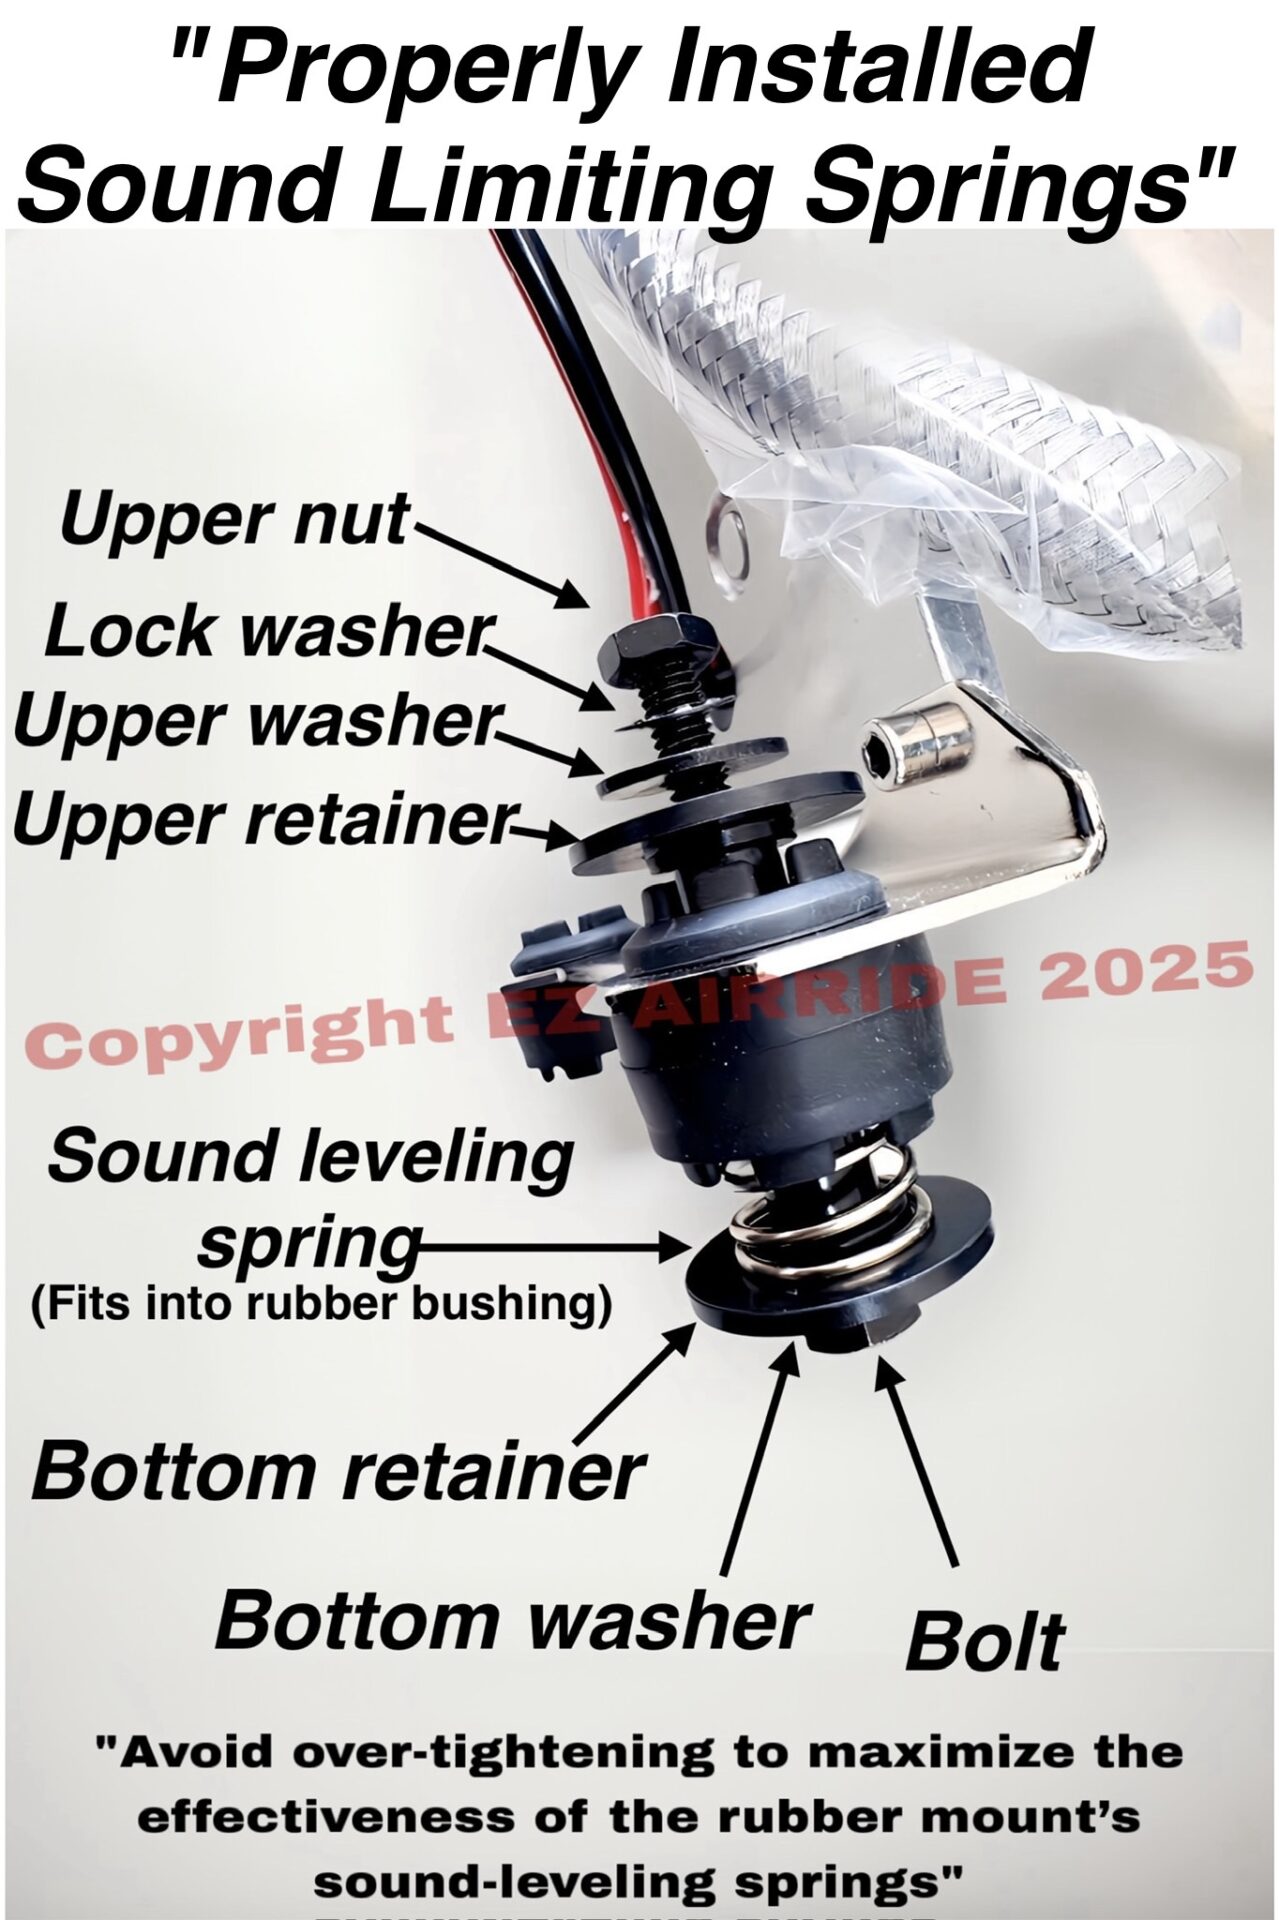
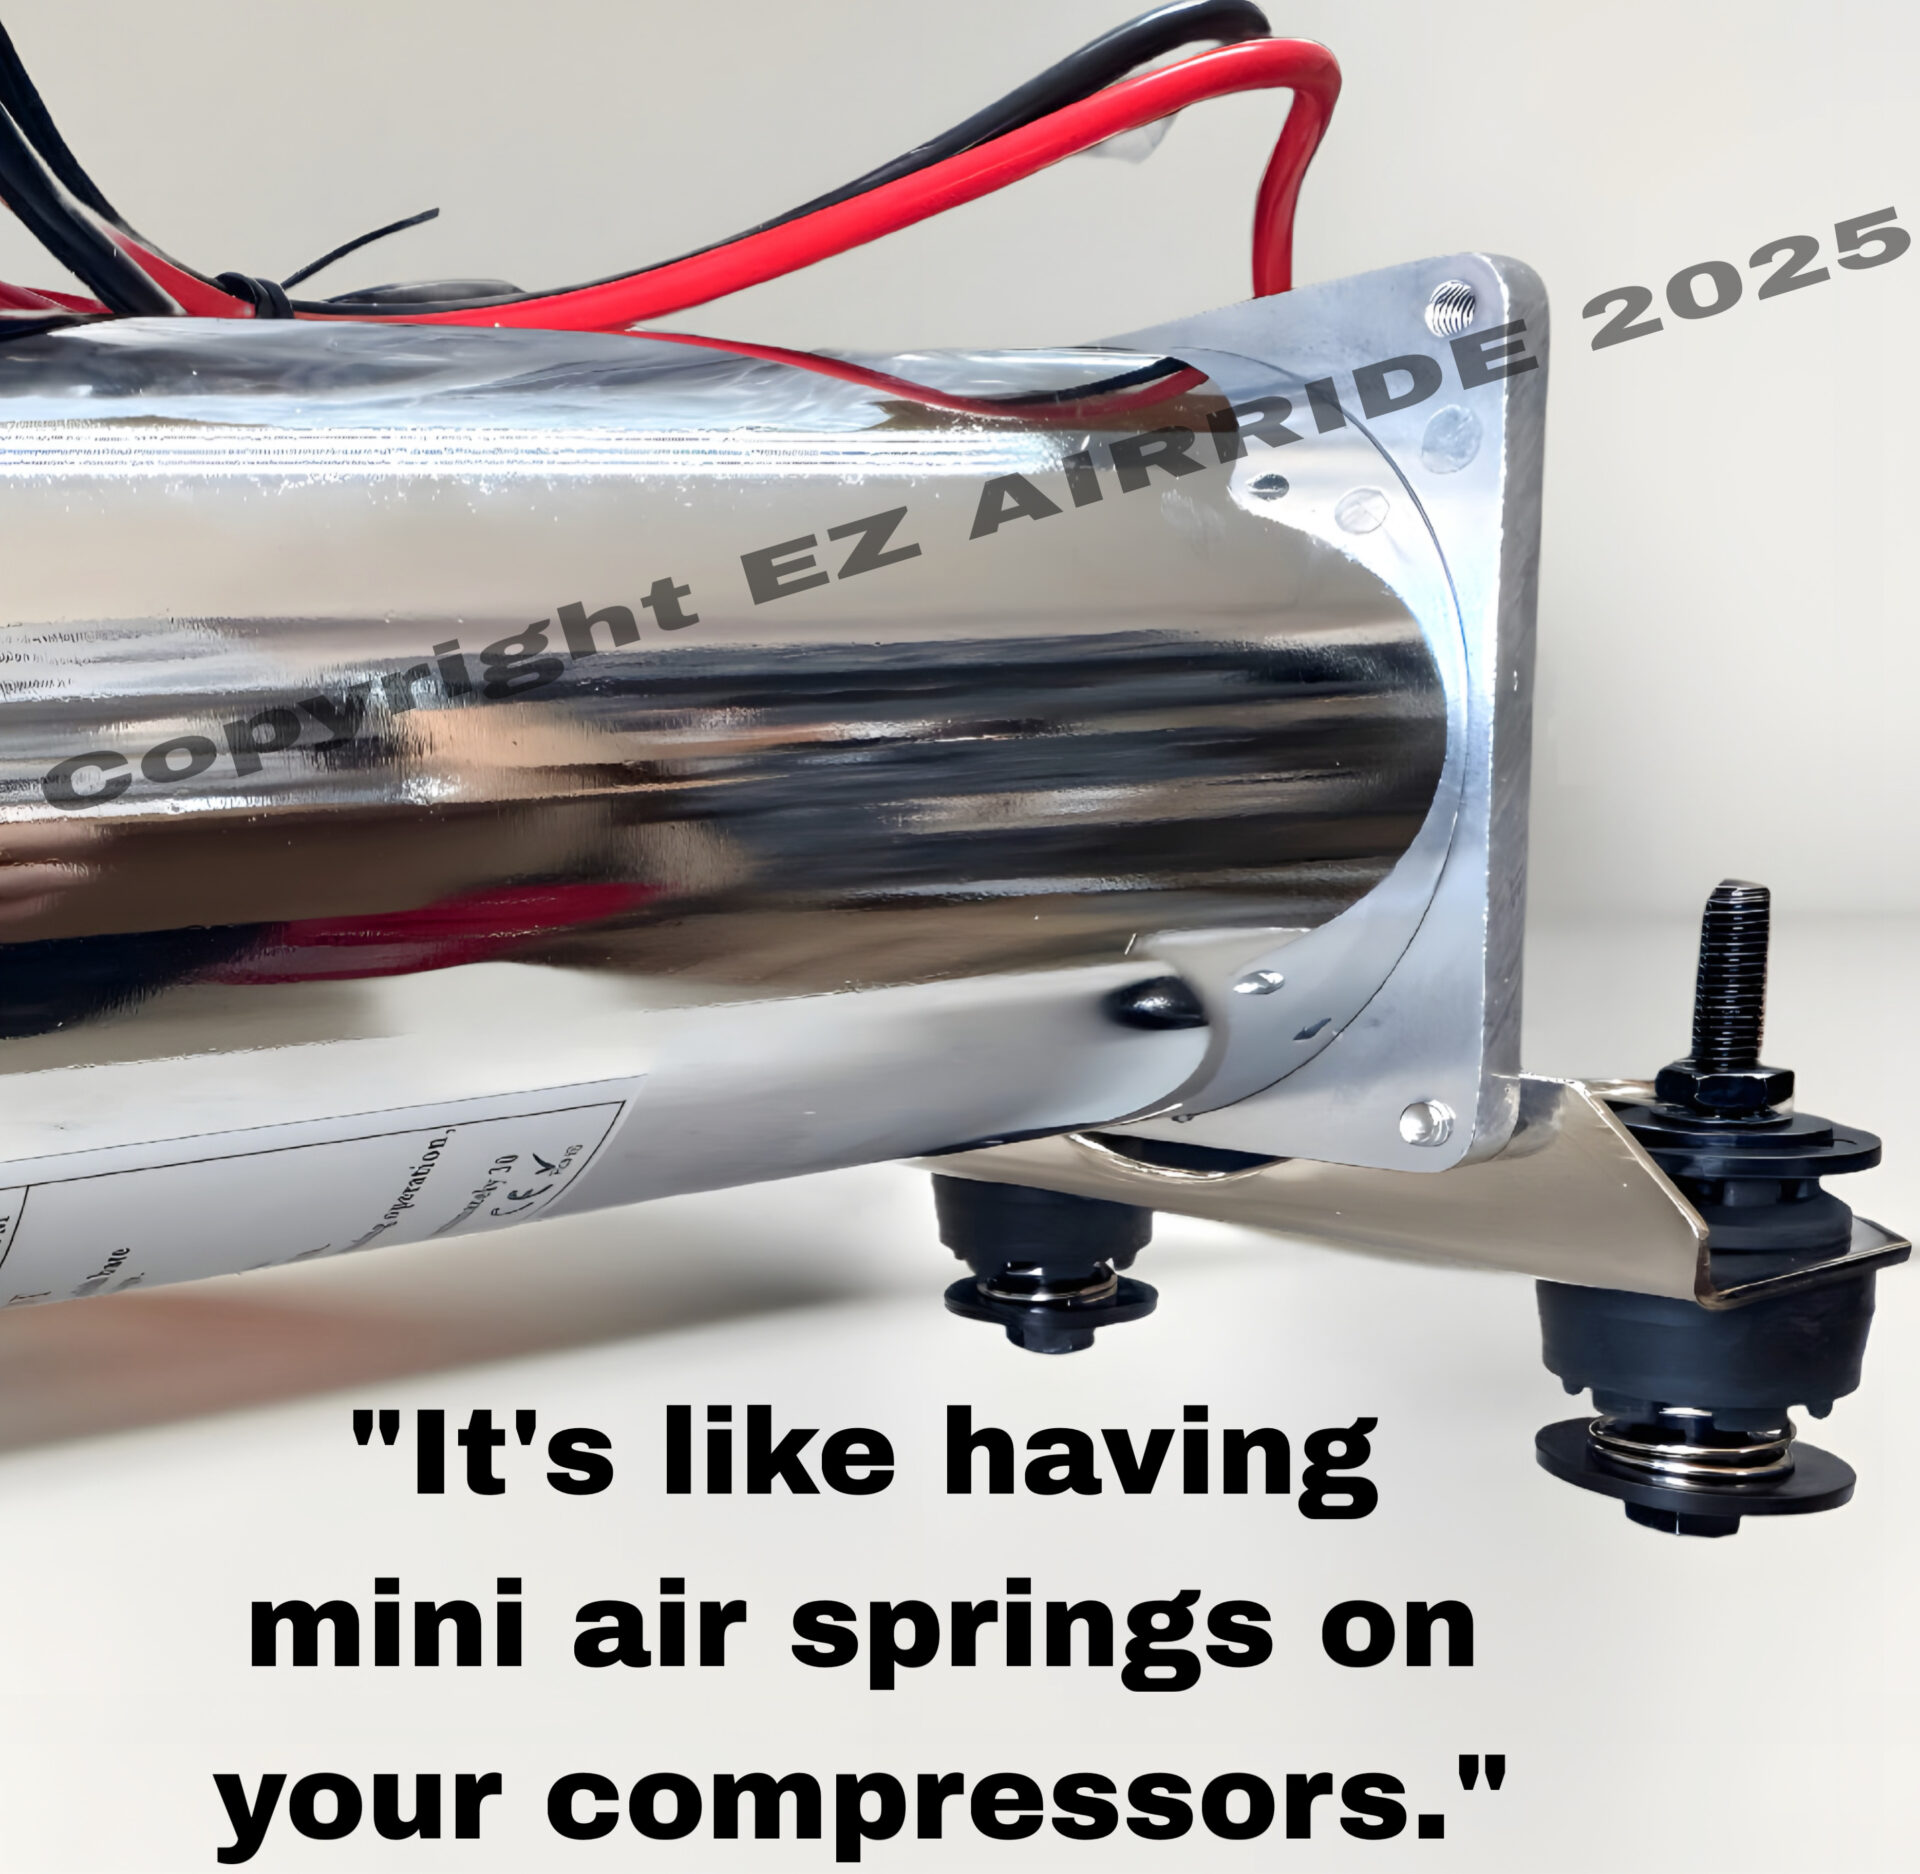
THE AIR COMPRESSORS: Introducing our premium 485c style compressor, featuring a maximum working pressure of 200 psi. This compressor offers a true 100% duty cycle at 200 psi, delivering 2.24 CFM. This work horse is the ideal choice for any onboard air ride system. Every 485c pump includes a special set of “Sound Limiting Springs” to reduce noise and vibrations, ensuring a much more quiet operation. Each compressor is accompanied by a sleek 3/8″ NPT stainless steel braided leader hose featuring a built-in check valve for effortless connection to the air tank.
OUR 485c COMPRESSOR IS OIL-LESS: And features a built-in thermal overload protector incorporated to safeguard the compressor from overheating even in the most challenging operating conditions. With it being oil-less you can mount it in any direction or position. The only position we do not recommend is an upside-down mount, since heat tends to travel upward, and does not dissipate well in the motor housing.
INCLUDED WITH ARE COMPRESSORS: An EZ AIRRIDE™ comprehensive wire care package, designed to provide everything you need for a successful installation and to ensure your compressor operates smoothly for years to come. This package includes 2 premium 20′ rolls of our exclusive EZ AIRRIDE UL Certified 8-gauge OFC Tinned Copper wire, allowing you to connect the compressors in your trunk to the battery located up front. Also included are (2) 40-amp inline fuses with a protective fuse holder, a 30/40-amp transparent relay w/LED accompanied by a color-coded plug-in relay harness for easy setup, and 8 gauge copper lugs. With these high-quality components, you can trust that your air ride compressor will deliver reliable and efficient performance for years ahead.
KEY FEATURES OF THE COMPRESSOR:
- Chrome body
- 12V permanent magnetic motor
- Maximum pressure: 200 psi
- Duty cycle: 100% @ 100 psi, 100% @ 200 psi
- CFM: 2.24
- Maximum amp draw: 23 per compressor (46 max amp draw for two)
- Fill rate (5 gallons): 0-200 psi with (2) pumps = 4 minutes 50 seconds; 165-200 psi = 1 minute 15 seconds
- Sound Limiting Springs /Anti-vibration pads
- 3/8″ leader hose with built-in check valve
- Built-in thermal overload protector